Working with hosts
This documentation refers to the items on the EMM menu as the primary means of carrying out operations on hosts. However, these operations can also be carried out from the context menus in the Navigation Pane, and the most useful are also available on the toolbar.
The Host menu provides the following options for interacting with hosts:
Add host
This is equivalent to using the

button on the toolbar.
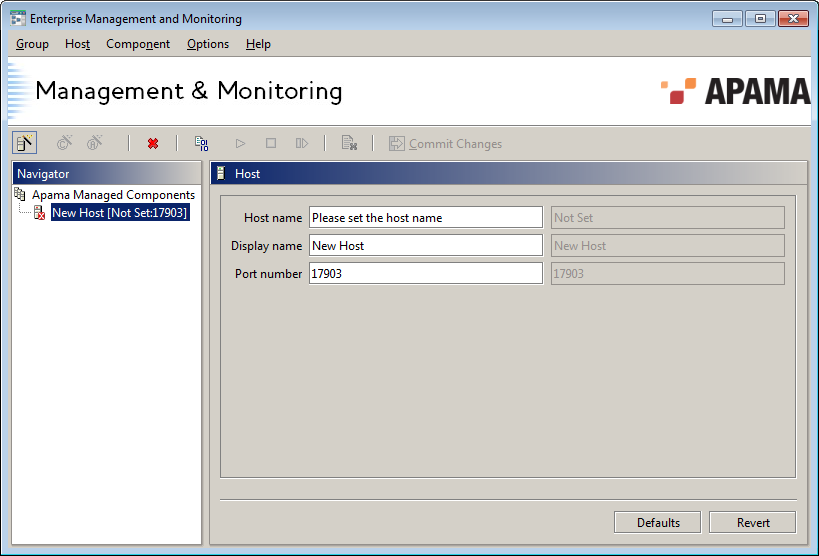
Add host allows you to add a host to the Apama Managed Components group, the root node illustrated in the Navigation Pane. This adds a placeholder node in the Navigation Pane and provides options for configuring EMM to work with the host in the Details Pane, as illustrated in the following.
You need to provide the following information:
 Display name
 – A descriptive name for the host. This name is what is displayed in the Navigation Pane.
Host name – The host’s name or IP address, for example
lawrence.apama.com or
127.0.0.1. Whether you need to provide the full name as in this example, or whether an abbreviation (e.g.
lawrence) will do depends on your network configuration and DNS/WINS settings, but in most circumstances it is advisable to use the host’s full network name.
You can only use ASCII characters in a host name.
Note that it is not possible to change the Host name once components have been added to the host.
Port number – The port that the Sentinel Agent (on that host) is listening on. By default this is
17903, although it might have been changed by whoever installed and configured the Sentinel Agent on that host.
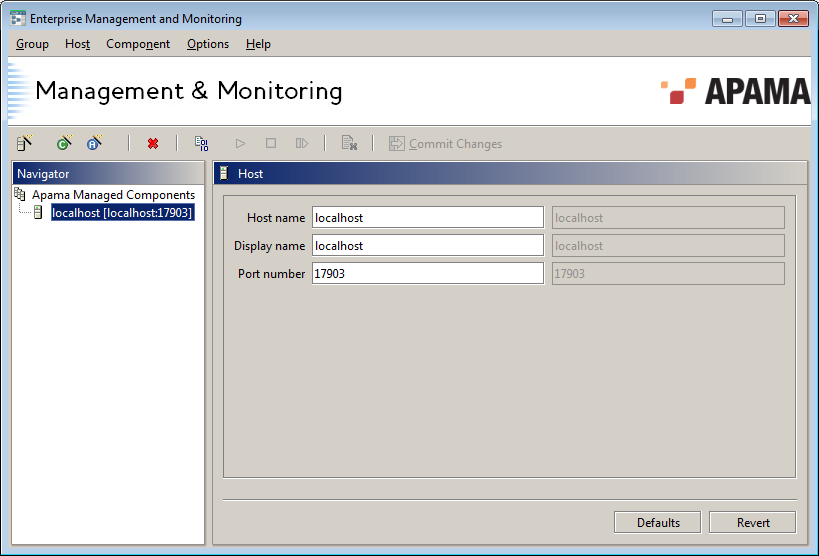
In following illustration, we have created a reference to the host localhost and specified port 17903 (the default port) as the port to use for communicating with the Sentinel Agent running on this machine.
Once the host information has been set, click on the
Commit Changes button (

) on the toolbar. Note that no components can be added to a host until it is committed.
The Commit Changes button will be disabled if the Host name has not yet been set or if the host has already been setup and committed, and there are no outstanding changes to commit on the host or any associated component.
Notice how the icons next to the new node in the Navigation Pane are different in the illustrations above. When you first define a new host the icon alongside it in the Navigation Pane will be

. This will change to

once EMM successfully manages to contact the Sentinel Agent running on that host.
EMM will continue verifying communication with the Sentinel Agent on that host at regular intervals, for as long as that host is included in the Apama Managed Components group.
If EMM cannot communicate with a host’s Sentinel Agent, or connects and subsequently loses connection, the icon against that host will change to
and stay that way until the problem is resolved. This might be the case if the host is no longer available on the network, the network has failed, the remote Sentinel Agent has been shut down or if a firewall (such as the one installed by default with Microsoft Windows XP Service Pack 2) is blocking the port that the EMM console uses to communicate with the Sentinel Agent.
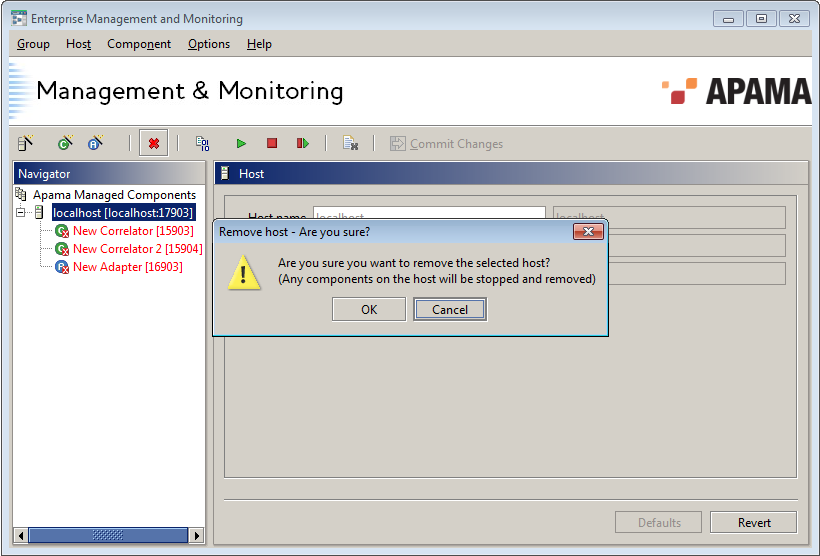
Remove host
This is equivalent to using the

button on the toolbar, and is only available if a host is currently selected in the Navigation Pane.
Choose it to remove all components on that host from the Apama Managed Components group.
Note that this operation does not shut down the remote Sentinel Agent on the host in question.
By default, EMM displays a confirmation dialog providing the option to cancel the removal of the host, as shown in the following illustration.
If the host contains one or more components that are known to be running, as well as providing the option to cancel the removal the dialog asks whether these component(s) should be stopped before being removed; see the following illustration.
Note: See
Preferences for information about how these confirmation dialogs can be turned on or off using the EMM Preferences dialog.
Start component(s)
This is equivalent to using the

button on the toolbar. This option is available if a host is currently selected in the Navigation Pane.
Choose it to start all Apama components configured on that host. Please see Chapter 3 for details on how to add and configure Apama components.
Please refer to
Start component for information on why components might fail to start.
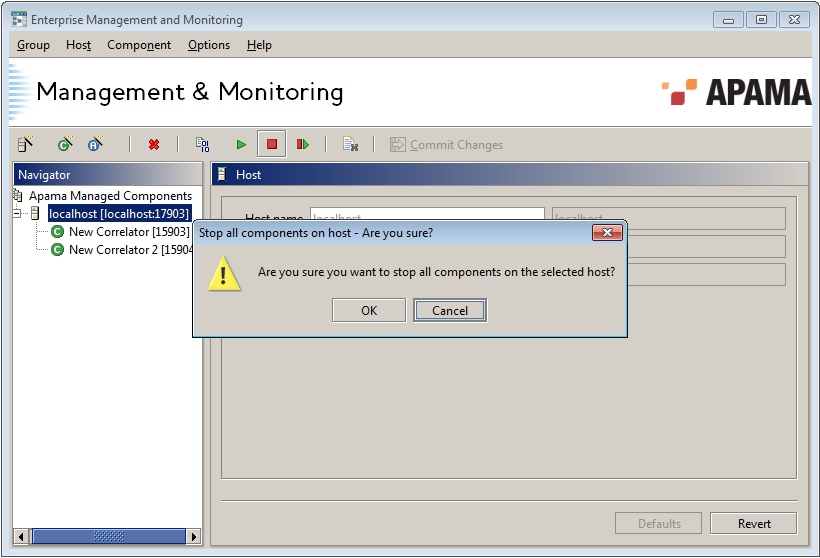
Stop component(s)
This is equivalent to using the

button on the toolbar. This option is available if a host is currently selected in the Navigation Pane.
Choose it to stop all Apama components configured on that host.
Restart component(s)
This is equivalent to using the

button on the toolbar. This option is available if a host is currently selected in the Navigation Pane.
Choose it to re-start (stop and start again) all Apama components configured on that host.
Send license
This is equivalent to using the

button on the toolbar. This option is available if a host is currently selected in the Navigation Pane and a license has been configured within EMM (through the
Options /
Set license menu option).
Choose it to push out the currently configured license to the Sentinel Agent running on that host, which the Sentinel Agent will use to create a local license file on that host. The license file will be written to the location that was specified in the Sentinel Agent’s command line startup parameters, replacing any existing license file.
A dialog will be displayed indicating if the license push was successful or whether the license was rejected as invalid or some other error occurred.
Components do not have to be restarted to become aware of the new license file.
Copyright © 2013
Software AG, Darmstadt, Germany and/or Software AG USA Inc., Reston, VA, USA, and/or Terracotta Inc., San Francisco, CA, USA, and/or Software AG (Canada) Inc., Cambridge, Ontario, Canada, and/or, Software AG (UK) Ltd., Derby, United Kingdom, and/or Software A.G. (Israel) Ltd., Or-Yehuda, Israel and/or their licensors.