First steps: Creating a model from a sample
This topic gives a brief overview of how to create a model from a sample. It is based on the On missing measurements create alarm sample. Your new model will create an alarm if no new measurement data has been received for a specified time period.
This topic is not intended to be a comprehensive description of the full range of possibilities provided by Analytics Builder. Therefore, explanations are kept to a minimum. For more detailed information, see the remainder of this documentation.
The steps below require that a device has already been registered in
Cumulocity IoT. Preferably, this is a device which is already sending measurement values to
Cumulocity IoT. This can be, for example, a smartphone on which the Cumulocity IoT Sensor App has been installed (see
Cumulocity IoT Sensor App in the
Cumulocity IoT documentation for detailed information).
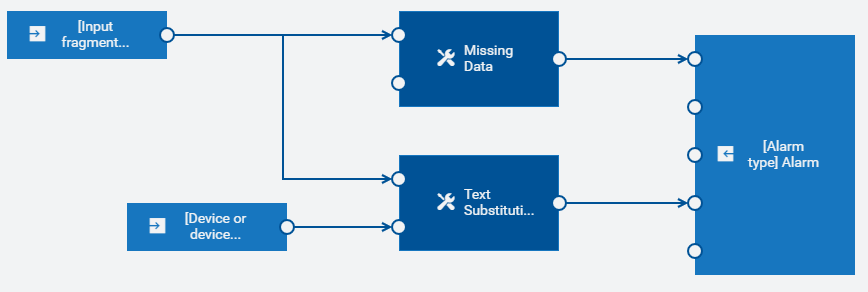
The following image shows the blocks that are defined in the On missing measurements create alarm sample.
The sample uses predefined template parameters. After you have created a model from the sample, you can create multiple instances of the model and you can specify different values for the template parameters. See also
Models which explains the difference between models without template parameters and models with template parameters.
The following is a brief description of the blocks that are defined within the sample:

The input starts with the
Measurement Input block waiting for new incoming measurements that match a given value that is defined with the
Input fragment and series template parameter. The name of that parameter is the label that you can see on the input block.
The output from the
Measurement Input block is then passed to the
Missing Data block which triggers an output if no input is received within the time defined with the
Duration (seconds) template parameter.
The output from the
Missing Data block is used as the trigger for the
Create Alarm input port of the
Alarm Output block. The name of the
Alarm type template parameter is the label that you can see on the output block.
The output from the
Measurement Input block is also passed as input to the
Object input port of the
Text Substitution block, along with the input from the
Managed Object Input block which is passed to the
Source input port of the
Text Substitution block. The name of the
Device or device group template parameter is the label that you can see on the input block.
The
Text Substitution block supports replacement of placeholders. For example, if the input text is
Missing measurements of type: #{type}, then the
#{type} value is replaced by the actual
type of the measurement. See
Text Substitution for more details.
The
Text Substitution block is configured to use the
Alarm text template parameter as user input. It applies the required substitutions and then sends the string containing the substitutions from its
Output output port to the
Message input port of the
Alarm Output block.
The
Alarm Output block requires the
Alarm type and
Alarm severity template parameters to be configured and creates an alarm whenever it is triggered by the
Missing Data block.
Step 1: Create a new model from a sample
The Samples tab of the model manager lists all sample models that are provided with Analytics Builder. You can view a sample by simply clicking on its card, but you cannot edit or deploy it. However, you can use the samples as a basis for developing your own models, by creating a model from a sample.
1. Go to the Samples tab of the model manager.
2. Click the actions menu of the On missing measurements create alarm sample and then click Create model from sample.
The new model is immediately shown in the model editor. It has the same name, description and tags as the sample.
3. If you want to rename the model, click the model name which is shown at the left of the toolbar. You can then specify a new name in the resulting Model Configuration dialog box.
4. In the toolbar of the model editor, click

.
5. In the toolbar of the model editor, click

to leave the model editor and thus to return to the model manager.
Note:
Keep in mind that only saved models are listed on the Models tab of the model manager.
Step 2: Create a new instance of the model
The sample model uses template parameters. So when you turn the sample into a model, you create a so-called template model. You cannot activate a template model directly in the model manager. Instead, you must create at least one instance of the model, and you can then activate that instance using the instance editor.
1. On the Models tab of the model manager, locate the card for your newly created model.
2. To invoke the instance editor, click 0 Instances which is currently shown on the card.
3. Click New Instance to create the first instance of your new model.
Step 3: Fill in the template parameter values
In the instance editor, a row is shown for each instance that you create. A column is provided for each template parameter that is defined in the template model, with the name of the template parameter being the column header. As long as an instance is not active, you can adjust the values for that instance.
Use the horizontal scroll bar below the instance table if not all template parameters (columns) are shown on the screen.
1. Click the field below the Device or device group column header. In the resulting dialog, select the device or device group that you want to use for this instance and click Use.
2. In the text box below the Input fragment and series column header, specify the details of the measurement input that you want to monitor in the following format:
<valueFragmentName>.<valueSeriesName>
For example, if the measurement fragment is c8y_Gyroscope and the series is gyroscopeX, then you must enter the following:
c8y_Gyroscope.gyroscopeX
Tip:
If you want to find out which fragments and series are available to your device, without changing the predefined template parameters of the Measurement Input block, go back to the model editor, drag the input block for your device from the palette onto the canvas and open the Fragment and Series drop-down list box. This lists all the values that you can use. However, instead of the => that you can see in the drop-down list box, you have to use a dot (.) in this case. Don't forget to remove this block again after you have decided which value to use.
3. The fields below the Duration (seconds), Alarm type, Alarm text and Alarm severity column headers already contain default values (see also the above description of the blocks). Adapt them to your requirements. For example, change the duration to 30 seconds, rename the alarm type to MyAlarmType, keep the predefined alarm text, and set the alarm severity to Minor.
4. In the toolbar of the instance editor, click Save.
Step 4: Activate the instance
You will now activate the instance in production mode. This deploys the instance so that the measurements from your device are processed.
1. In the Run Mode column of the instance editor, click the drop-down menu for the instance and select Production.
2. In the Status column of the instance editor, click the button which currently shows Inactive to change the status to Active.
Step 5: Send in the data from your device
Once the instance has been activated, send in the data from your device. The instance starts monitoring the device once measurement data starts arriving and creates an alarm if no data is received within the configured duration.
For our example case with the gyroscope measurements from a smartphone, it should be sufficient that you simply turn off the smartphone display while the Cumulocity IoT Sensor App is still running.
Step 6: Go to the Device Management and view the alarms
To view the alarms that are sent from your active instance, you have to switch to
Cumulocity IoT's Device Management application. See
Device Management in the
Cumulocity IoT documentation for detailed information.
1. Click the application switcher button (

) and then click
Device management.
2. In the navigator on the left, click Devices and then All devices.
3. Locate your device and click its name to display the device details.
4. Click Alarms on the left.
5. On the resulting page, check the alarms that are sent from your device. If you have edited your instance as described above, you should see a MINOR alarm after 30 seconds, saying
Missing measurements of type: c8y_Gyroscope. See
Working with alarms in the
Cumulocity IoT documentation for more information on the
Alarms tab.