
Select a computer on which
the CONNX Administrator component is installed. Click the Start
button, and then point to All Programs.
Point to CONNX Driver and
then click CONNX Server Setup.
The CONNX Server Component Installation dialog box appears.
Select the VSE tab in the
CONNX Server Component Installation dialog box.
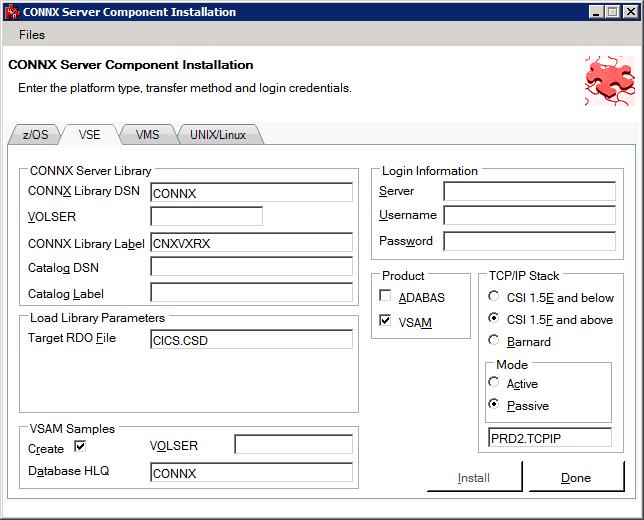
In the CONNX Server Library area, enter the fully qualified VSE cluster name which contains the CONNX VVRR library in CONNX Library DSN and its VOLSER in the VOLSER text box. Enter the CONNX library name defined in the CONNX library cluster in CONNX Library Label, the data set name of the VSE user catalog where the CONNX sample files and managed library are defined in Catalog DSN, and the system data label which references the physical data set name of the User Catalog in Catalog Label.
Note: If CONNX Library Label is blank, the library name defaults to CNXWRR. If Catalog DSN is blank, CONNX files are defined in the default VSE system catalog. If Catalog Label is blank, the data label defaults to IJSYSCT.
In the Login Information area, type the TCP/IP symbolic host name or dotted numeric address for your VSE server in the Server text box, a privileged user account name in the User ID text box and its password in the Password text boxes. Under Product, click VSAM and under Server Type, click CICS.
In the TCP/IP
Stack area, if you
are using the Barnard TCP/IP stack rather than CSI, select the Barnard radio button. For Mode, select either Active
or Passive FTP mode. Unless
your system is not configured to support Passive mode FTP, you should
select Passive. If the FTP transfer fails for any reason other
than the user id or password was entered incorrectly, switch modes
and try again.
Enter the TCP/IP stack location in TCP/IP
HLQ.
Caution: To enable the environment variable for the Barnard
TCP/IP stack, set CNXBARNARD
to 1 in the CONNX Configuration Utility.
In the CICS Parameters area, see the table in Required and Optional Entry Fields for VSAM TCP/IP Server Setup for a detailed explanation of the information required in Target RDO File.
In the VSAM Samples Group area, if you clear the Create check box,CONNX will not create the CONNX VSAM sample KSDS, RRDS, and ESDS data sets. If the Create check box is selected, the CONNX VSAM sample KSDS, RRDS, and ESDS data sets and the VSAM clusters described in VSAM Objects for CONNX.CICS.SAMPLES are created, defined to the target CICS region, and given the data set prefix specified in Database HLQ.
Note: The detault dataset prefix for Database HLQ is CONNX.SAMPLES.
Click the Install button. This action starts an FTP session and copies the CONNX components from the client PC to the target host. A message confirming that the FTP session has started appears in the status bar..
Allow several minutes for the file transfer process to complete.
Click the Close button. The CONNX Server Component Installation dialog box closes.