
The CONNX Desktop C-ISAM module enables access to C-ISAM database objects through the C-ISAM driver. See the section on the CONNX and C-ISAM Module in the CONNX User Reference Guide, which is available online, on the CD-ROM, and within the CONNX product, for more information on the text boxes required to import C-ISAM database tables.
Sample database tables can be created either during installation or after installation. During installation, a dialog box appears asking whether you want to install sample database tables. Click Yes to continue with sample table installation through CONNX sample database logon dialog boxes. Click No to continue with CONNX installation. You can install sample tables at any time using the Build Sample Database icons available in your program group.
The following procedure runs a script designed to insert CONNX sample data into a C-ISAM database installed on a C-ISAM server or, in Windows, on a local host machine. See General Information for C-ISAM for configuration information.
During installation, click
Yes to install sample database
tables, or click the Start
button, and then point to All
Programs. Point to CONNX Sample Databases, and then click
Build C-ISAM Sample Data.
The C-ISAM Sample Database Logon
dialog box appears.
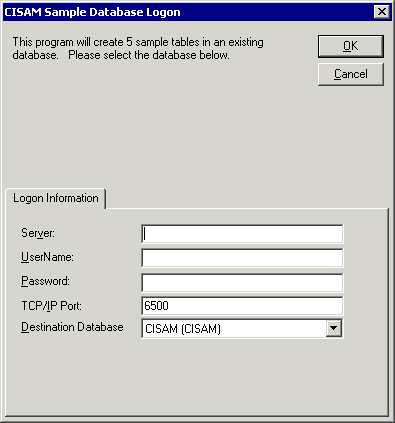
Enter the TCP/IP host
name or address for your system platform, a privileged user account
name, and a user account password in the login text boxes, for example,
hpux, NickD, and Password.
(The password appears as ********.) Note that these are all required
fields.
Important: If you are running
C-ISAM on a Windows platform, enter "localhost" in the
Server
text box.
Port 6500 is listed in the TCPIP Port text box by default. Any change made to the port setting in this text box becomes a permanent change to the port setting of the imported database. See Editing the OpenVMS Site-Specific Startup Command for information about changing the port setting on the server.
Select a Destination Database in the list box. See "Add a Database Connection" in the CONNX User Reference Guide, available online, on the CONNX CD-ROM, and within the CONNX product, for more information.
Click the OK button. The samples are installed in the selected data source table and appear in the CONNX Data Dictionary Manager window.