
This document describes how to administer databases and files with Adabas Manager. Common tasks include listing databases and files, starting/stopping databases, viewing and modifying database parameters, managing database containers, and viewing information about high water marks and buffer pools.
 To access database administration
Click on the icon Administer Adabas databases and files on the Adabas Manager home page.
The Database Administration start screen is displayed.
This section describes how to administer databases with Adabas Manager.
To list databases
When you log in to the Adabas Manager home page, the list of known databases to which you have access is displayed in the data area.
The databases are listed in ascending numerical order. The following information is displayed:
| Column | Description |
|---|---|
| Database ID |
The database number. |
| Database Name |
The name of the database. |
| Connection Name |
The name of the connection used to access Adabas Manager. |
| Status |
The status of the database - online (green)/offline (red). |
| Version |
The version of Adabas. |
Next to each database there are also icons which can be used to start/stop, rename and delete the database.
You can use Adabas Manager to create a new database. The button is available above the list of known databases. Alternatively you can use the Create New Database link in the navigation area.
There are two options available when you create a new database:
You specify the database number, the database name, and the host on which the database is to be created; Adabas Manager then provides default values for all other database details.
If you open the tab Database Details, you can also specify the block size (in KB) and total size (in MB) of the containers ASSO1, ASSO2, DATA1 and WORK1 together with their respective path names. In addition, you can assign non-default file numbers to the Adabas system files (checkpoint, security and user data), and specify whether or not to load the demo database files.
To create a database
Click the button above the list of databases, or click on the link Create New Database in the navigation area. The Create New Database dialog is displayed.
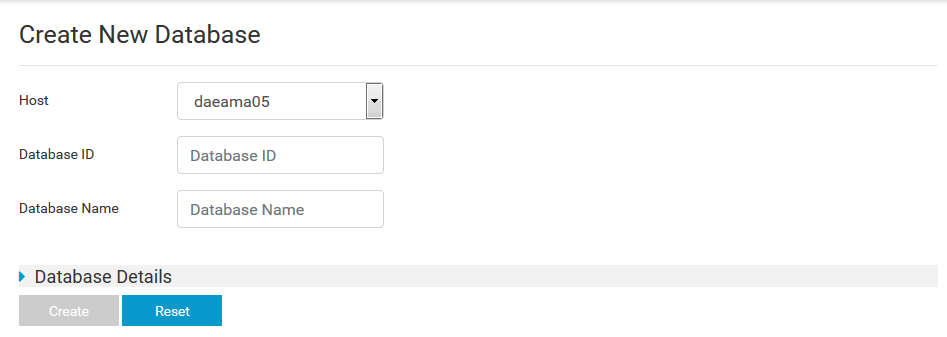
Enter the name of the host on which the database is to be created in the field Host, or select it from the drop-down list.
Enter the numerical ID for the database in the field Database ID. Values between 1 and 255 are permitted. Duplicate database IDs are not allowed on a single host.
Enter the name for the database in the field Database Name. The name must be between 1 and 16 characters long. Only alphanumeric characters are allowed; all special characters (with the exception of period ".", hypen "-" and underscore "_") are not permitted.
If you do NOT want to specify further database details (see below), click on the button to create the new database.
Or:
If you want to specify further database details, click on
the arrow on the left of the Database Details tab to open
it, and continue as described below.
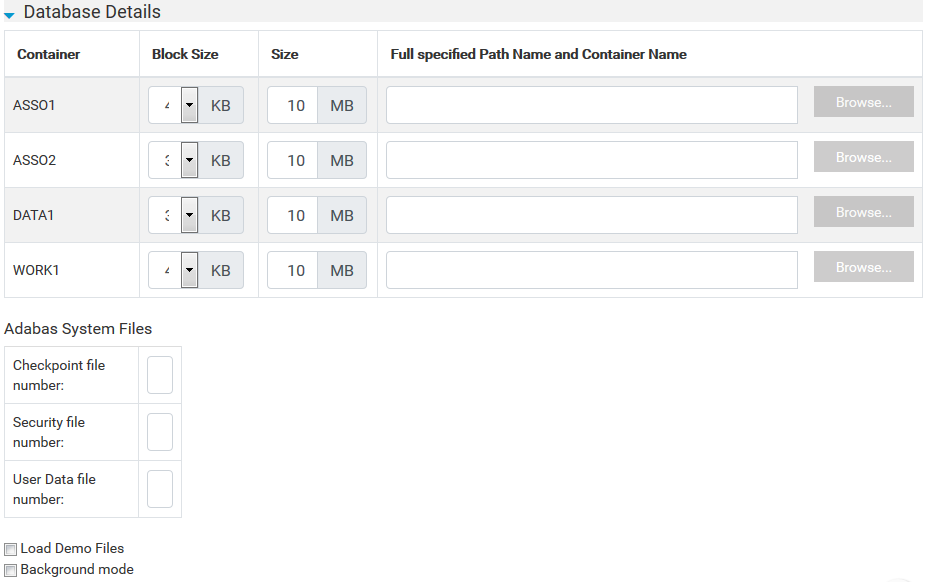
Specify the block sizes, total sizes and path names for the containers ASSO1, ASSO2, DATA1 and WORK1, or click on the buttons to select paths from another directory/drive.
Note:
If you leave the path empty, the name will be set to the
default value for the environment variable
%ADADATADIR%.
By default, the Adabas checkpoint file, security file and user data file are assigned the numbers 1, 2 and 3 respectively. You can assign your own numbers by entering them in the corresponding text boxes. Valid values are between 1 and 32000 and must be unique in the database.
Tick the check box Load Demo files if you want to load the demo data files Employees, Employees-Nat, Vehicles, Miscellaneous and the associated LOB files into the new database.
Tick the check box Background mode if you want to create a very large database (container files >3GB). In this case, when you click on , a batch job is started in background mode, and the status of the job is displayed on the screen Database Creation Jobs.
Note:
The check boxes Load Demo files and
Background mode are mutually exclusive.
When you have specified all of the details that you want, click on the button to create the new database.
If you create a database in background mode (recommended for container files >3GB), an entry is made in the list of Database Creation Jobs.
To view the Database Creation Jobs
Click on the link Database Creation Jobs in the navigation area. The job list is displayed in the data area.
The following information is displayed:
| Column | Description |
|---|---|
| Job |
The name of the background job |
| Job Status |
The status of the job (running, completed, failed) |
| User |
The ID of the user who executed the job |
| Start Time |
The date and time that the job was started |
| End Time |
The date and time that the job completed |
| Delete |
Delete the entry from the job list |
The entries in the column Job are links - click on an entry to display details of the job in a pop-up.
You can delete individual entries by clicking on the waste basket
icon ( ) in the
column next to the entry that you want to
delete.
) in the
column next to the entry that you want to
delete.
You can use Adabas Manager to delete an existing database.
Notes:
Deleting a database physically removes all of its container files, the DB_LIST entry in the ADABAS.INI file, the directory ..\Software AG\Adabas\dbnnn (where nnn is the database number) and all of its associated files.
| Warning: Deleting a database is permanent and irreversible. Therefore, Software AG strongly recommends that you create a backup copy of the database before it is deleted. |
To delete a database
Select the database that you want to delete by clicking on its Database ID or Database Name in the list of databases.
Click on the waste basket icon () in the column
next to the database that you want to delete.
The pop-up Delete Database dialog box is displayed. Click Delete to delete the database.
You can use Adabas Manager to rename a database.
The database to be renamed can be either online or offline.
To rename a database
Select the database that you want to rename by clicking on its Database ID or Database Name in the list of databases.
Click on the edit icon
 in the
column next to the database that you want to rename.
in the
column next to the database that you want to rename.
Enter the new name for the database in the text box in the Database Name column. The name must be between 1 and 16 characters long. Only alphanumeric characters are allowed; all special characters (with the exception of period ".", hyphen "-" and underscore "_") are not permitted.
Click on the green check mark to rename the database. Clicking on the red cross resets the name to the old name.
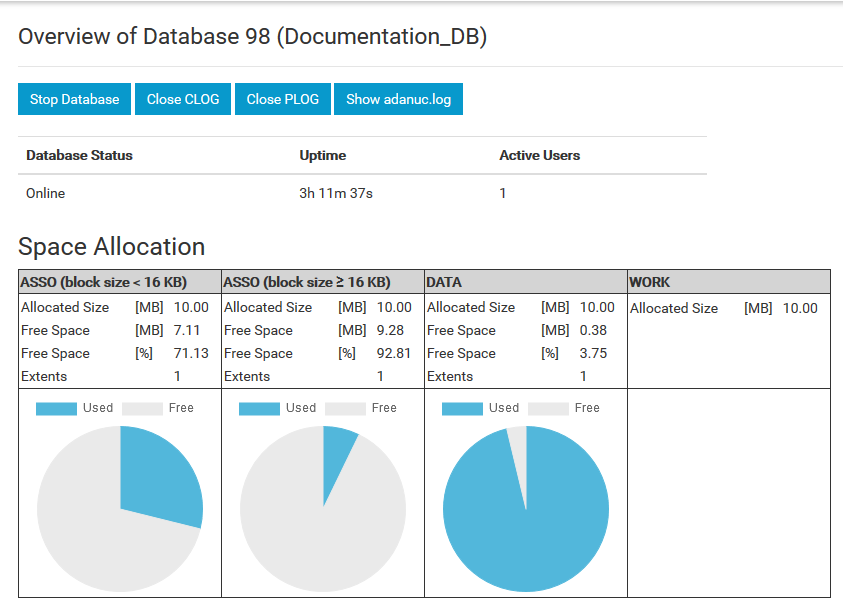
The database overview provides you with some basic information about a database. This information includes:
The database status (online/offline);
The database uptime;
The current number of active users;
Space allocation for ASSO, DATA and WORK:
The total size in MB;
The amount of free space in MB and in % (ASSO and DATA);
The size of the Protection Area and the Active Area in MB (WORK, only if the database is online);
The number of extents.
To display a database overview
Select the database that you want to use by clicking on its Database ID or Database Name in the list of databases.
An overview of the database is displayed.
To start a database
Select the database that you want to start by clicking on its DBID or Database Name in the list of databases (the database to be started must be offline, as indicated in the Status column).
An overview of the database to be started is displayed.
Click on the button in the data area.
Or:
Click on the start icon
 in the column Start/Stop next to
the database that you want to start in the Database List display.
in the column Start/Stop next to
the database that you want to start in the Database List display.
Once the database has been successfully started, the database overview is updated to show the new online status.
To stop a database
Select the database that you want to stop by clicking on its Database ID or Database Name in the list of databases (the database to be stopped must be online, as indicated in the Status column).
An overview of the database to be stopped is displayed.
Click on the stop icon
 in the column Start/Stop next to
the database that you want to stop in the Database List display. Alternatively,
click on the button in the database
overview display. The pop-up Stop Database dialog box is
displayed.
in the column Start/Stop next to
the database that you want to stop in the Database List display. Alternatively,
click on the button in the database
overview display. The pop-up Stop Database dialog box is
displayed.
There are 3 options available for how the database is to be stopped:
Shutdown;
Cancel;
Abort.
Click on the radio button of the option that you want to use, then click on the button to stop the database.
To list files in a database
Select the database that you want to use by clicking on its Database ID or Database Name in the list of databases. The database overview is displayed
Click on the link File above the navigation area. The list of files contained in the database is displayed in the data area.
By default, the files are listed in ascending numerical order. The following information is displayed:
| Column | Description |
|---|---|
| FNR |
The file number. |
| File Name |
The name of the file. |
| File Type |
The type of file (system file, LOB file, base file for LOB file). Blank entries indicate standard user files. |
| Loaded Records |
The number of records loaded in the file. |
Next to each file there are also icons which can be used to rename, renumber, refresh and delete the file (where applicable).
Adabas Manager can be used to view/modify various database parameters. Before the parameters can be viewed/modified, you must first select the database to be used.
The parameters are displayed in groups, according to their function - Pools and Queues, Time Limits, Logging, Options, User Exits, Remote Database Access and Encryption (for Adabas on Linux only). Groups can be opened/close by clicking on the name or on the arrows on the left side of each group.
To view database parameters
Click on the link Parameters in the navigation area. The parameters of the database are displayed in the data area.
The following information is displayed:
| Column | Description |
|---|---|
| Description |
A brief description of the parameter. |
| Parameter |
The short parameter name. |
| Static Value |
The current static value of the parameter. |
| Dynamic Value |
The current dynamic value of the parameter. |
| Unit |
The unit used to define the size/value of the parameter (where applicable). |
Static and dynamic parameters behave as follows:
The value of a static parameter is valid for the running database session. If you modify the value of a static parameter, you must stop and restart the database in order for the new value to apply.
The value of a dynamic parameter is valid immediately from the time it is modified until the end of the running database session. If the database is stopped and restarted, the old static value of the parameter from the previous session is valid again. Dynamic parameters can only be modified while the database is active.
If you modify both the dynamic and the static value for a parameter, the modified dynamic value applies until the database is stopped, and the new static value becomes valid when the database is started again.
Once the parameters have been displayed, you can use Adabas Manager to modify their values if required.
To modify database parameters
Click on the short name of the parameter that you want to modify in the column Parameter in the data area.
The pop-up Edit Parameter dialog box is
displayed - the example below shows the dialog box for the parameter
Attached Buffer Area
(LAB):
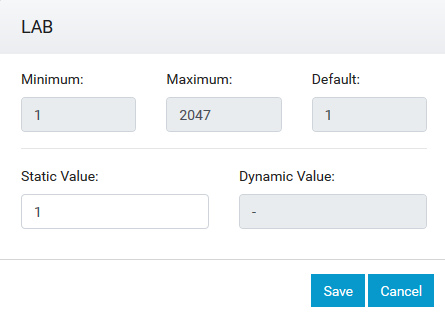
The dialog box contains information about the minimum, maximum and default values of the parameter (where applicable). It also shows the unit in which the size/value of the parameter is defined.
Enter the new valid value for the parameter in the Static Value text box, then click to change the value and return to the Parameters display, or click to return to the Parameters display without changing the value.
The button is not available if the text box contains an invalid value.
Note:
In some cases, it is possible to modify both the dynamic
and static value of the parameter; you can enter a new value for either one, or
for the other or for both.
You can now repeat the first two steps to modify the values of any other parameters that you want to change.
Once you have modified all of the parameters that you want to change, click to permanently update the parameter values. Alternatively, click to reset any modified parameters to their previous values.
Adabas Manager can be used to display various properties of a database. Before you can view the properties, you must first select the database from the database list.
To display database properties
Click on the link Properties in the navigation area. The properties of the database are displayed in the data area.
The following information is displayed:
| Property | Meaning |
|---|---|
| Database Load Date | The date and time that the database was loaded. |
| Number of Loaded Files | The number of files loaded in the database. |
| Highest File Number | The highest number used for loaded files. |
| Checkpoint File | The number of the checkpoint file in the database. |
| Security File | The number of the security file in the database. |
| ET Data File | The number of the ET data file in the database. |
| Current PLOG Number | The number of the PLOG currently in use. |
| Number of DATA Extents | The number of DATA extents in the database. |
| Number of ASSO Extents | The number of ASSO extents in the database. |
| Character Set | The character set used by the database. |
| Byte Order | The byte order used by the database. |
| Floating Point Representation | The floating point representation used by the database. |
| Replication Files | The numbers of any replication files defined in the database (where appropriate). |
| Current CLOG Number | The number of the CLOG currently in use. |
| Current PLOG Count | The count of the PLOG currently in use. |
| Current PLOG Extent | The number of the PLOG extent currently in use. |
This section describes how to create/edit a field definition table ( FDT) with Adabas Manager.
Adabas Manager provides 3 ways in which you can edit an FDT:
Create and edit a new FDT from scratch;
Edit an existing FDT;
Extract and edit an FDT from a file in a database.
See Adabas Basics, FDT Record Structure in the Adabas for Linux, UNIX and Windows documentation for information about the syntax and use of the data definitions to define the logical structure of the file in the database.
You can create a new FDT by defining fields, one at a time, together with corresponding definition options. Options/definitions which are not allowed are disabled in the editor. In some cases, for example when you define a group at a given level, some options are automatically selected/disabled. Once you have defined a field, you can add it to the FDT, and then define the next field. When the FDT is complete, you can save it to a location that you choose.
Note:
You can save the FDT at any time after at least one field has
been added. You can edit the FDT again as described in
Editing an Existing
FDT.
To edit a new FDT
Click the link Manage Databases, then click on the link in the navigation area. The Create Field Definition Table (FDT) screen is displayed.
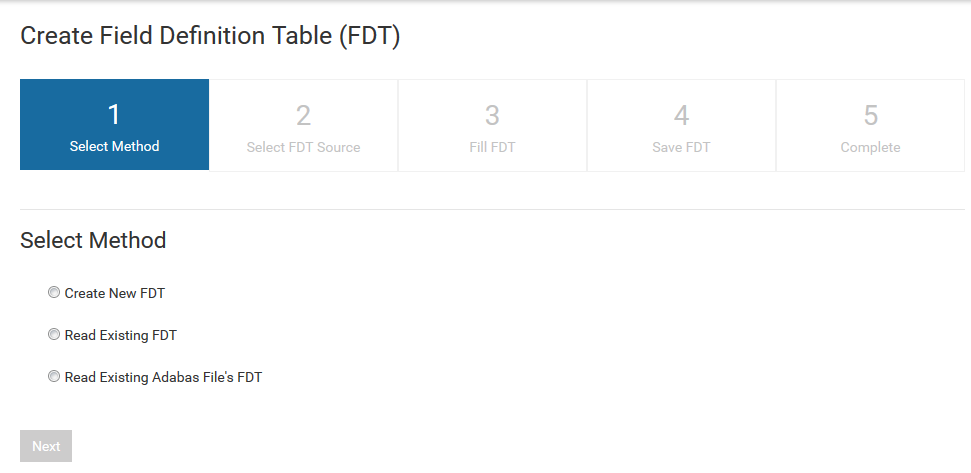
Select Create New FDT and click on the button. The Fill FDT Form dialog is displayed.
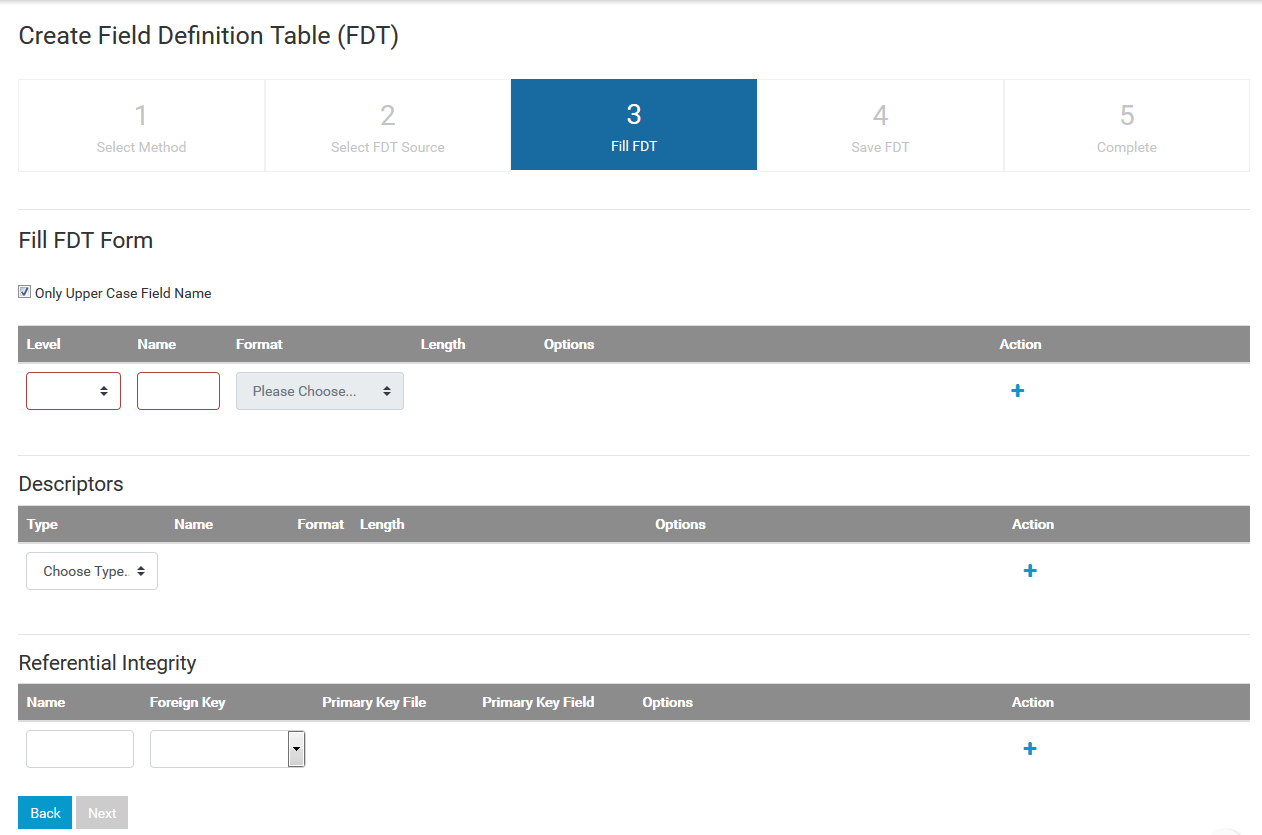
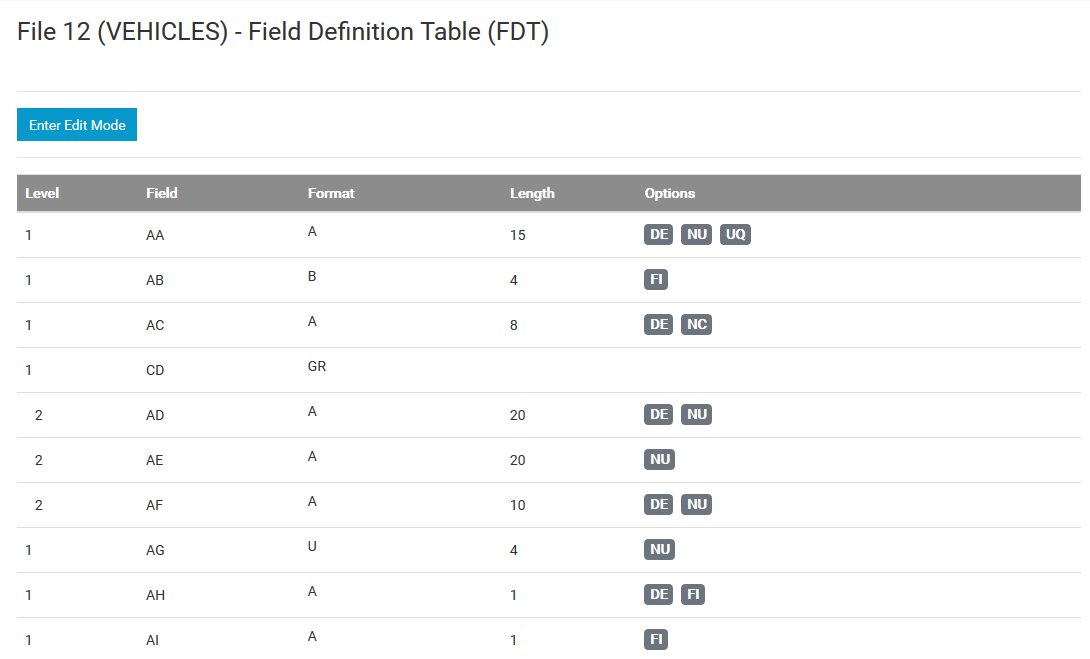
Provide the following information for the first field that you want to include in the FDT:
The level of the field (select from the Level list box).
Note:
The level is selected automatically if the field is a
member of a group.
The name of the field in the field Name;
The format type of the field (select from the Format list box);
The length of the field in the field Length;
If you want to define date/time details for the field (e.g. local time zone, edit mask), click on the arrow on the right of the Date/Time tab to open it, and specify the definitions that you want for the field.
Specify further definition options that you want to use for
the field by clicking on the edit icon
in the Options column next to the
field, and selecting the corresponding check boxes.
Once you have finished defining the field, you can click on the plus sign (+) in the Action column to add a new field to the FDT. Clicking on the plus sign (+) next to a field that you have already defined will add a new field below the one that you select.
You can delete a field from the FDT by clicking on the waste
bin icon in the Action colunm
next to the field that you want to delete. You are asked to confirm the
deletion in a pop-up window.
Continue defining and adding fields to the FDT until the FDT is complete.
You can define special descriptors (subdescriptors, super descriptors, phonetic desciptors, hyperdesriptors and collation descriptors) by first selecting the type from the drop-down list under the heading Descriptors, and then supplying the appropriate definitions required for the descriptor type (field name, format, lengths and options).
Once you have added and defined all of the fields that you want, click on the button.
The Save FDT dialog is displayed.

Select the host on which the FDT is to be saved from the Hostname drop-down list. Specify a name for the FDT file to be created in the FDT File text box. By default, the file will be created in the directory C:\ProgramData\Software AG\Adabas\. Click on the button to select a different directory and/or drive.
Click on the button to save the FDT to the specified location.
To edit an existing FDT
Click the link Manage Databases, then click on the link in the navigation area. The Create Field Definition Table (FDT) screen is displayed.
Select Read exisiting FDT, then click the button. The Read FDT from existing FDT File dialog is displayed.
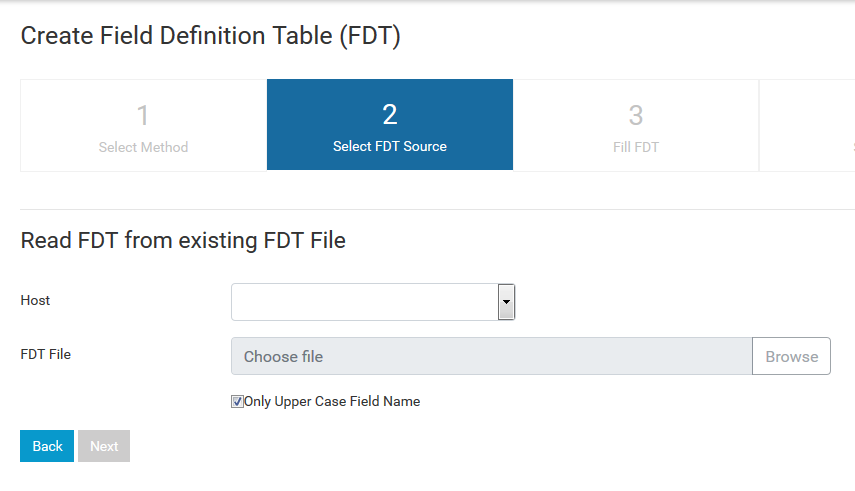
Select the host on which the FDT to be edited resides from the Hostname drop-down list. Specify the name of the FDT file to be edited in the FDT File text box, or click on the button to select an FDT from the default directory or from another directory/drive. Once you have selected an FDT, click on the button in the pop-up, then click on the button to load the FDT for editing.
You can now edit the FDT as described in the section Editing a new FDT.
You can use Adabas Manager to extract and edit an FDT from an existing file in a database; this might be useful, for example, for testing purposes.
The database containing the file that you want to use must be online.
Important:
The original FDT of the file in the database is
not altered in any way.
Note:
The FDTs of system files cannot be displayed and edited.
To extract and edit an FDT from a file in a database
Click the link Manage Databases, then click on the link in the navigation area. The Create Field Definition Table (FDT) screen is displayed.
Select Read Existing Adabas File's FDT then click the button. The Read FDT from existing Adabas File dialog is displayed.
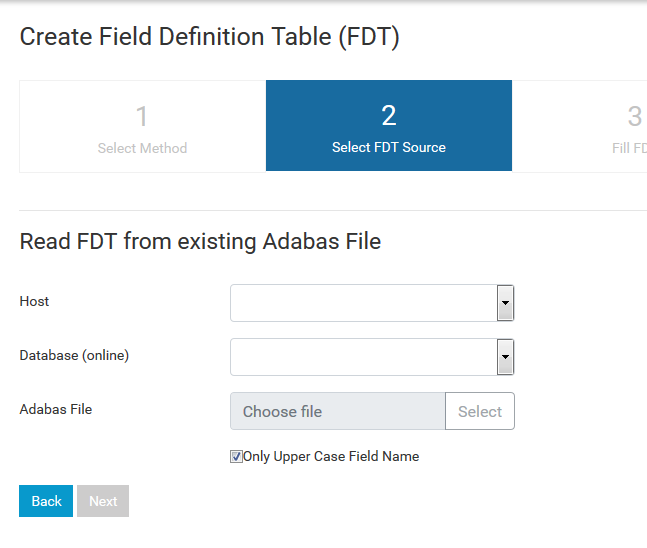
From the Host list box, select the name of the host on which the database you want to use is running. Then from the Database list box, select the database that contains the file that you want to use.
Click on the button next to the Adabas File field to display a list of available files in the selected database. Click on the file that you want to use, then click on the button.
This returns you to the Read FDT from existing Adabas File dialog
Click on the button to load the FDT for editing.
You can now edit the FDT as described in the section Editing a new FDT.
This section describes how to administer files with Adabas Manager.
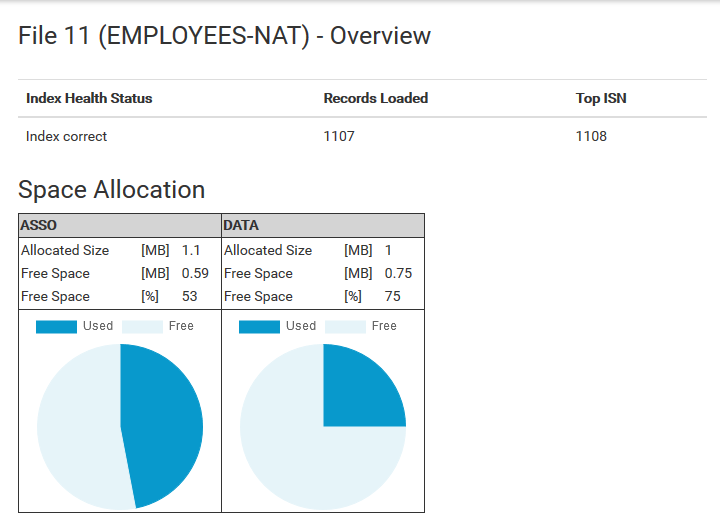
The file overview provides you with some basic information about a file. The information includes:
The health status of the index;
The number of records loaded in the file;
The highest ISN (Top ISN) defined for the file;
Space allocation for ASSO and DATA:
The allocated size in MB;
The amount of free space in MB and in %.
To display a file overview
Select the file that you want to use by clicking on its FNR or File Name in the list of files.
An overview of the file is displayed.
You can use Adabas Manager to add a file to a database. The link is available in the navigation area of the file list display. The database that contains the file to be added can be either online or offline.
To add a file
Click on the link in the navigation area of the file list for the database to which the file is to be added. Alternatively, click on the button in the data area of the Files list.
The Add File dialog is displayed.
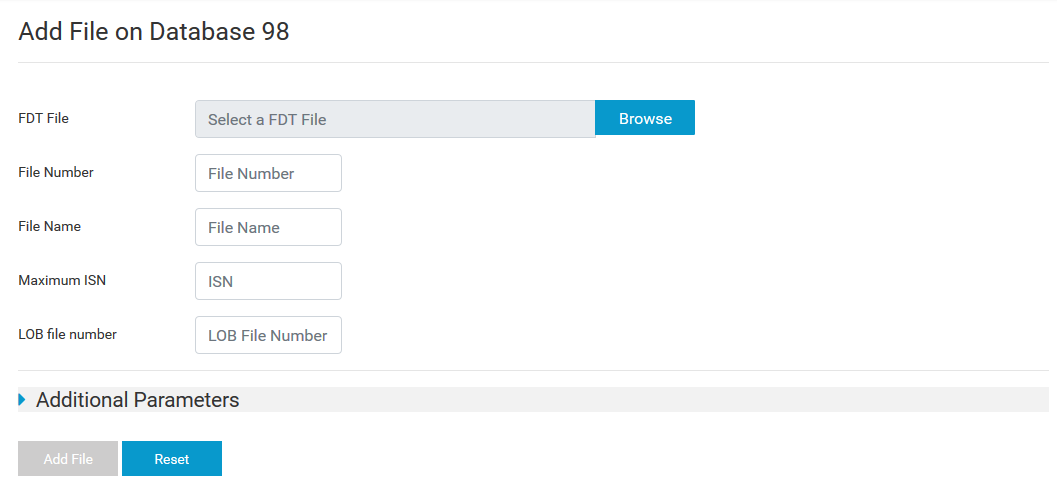
Enter the name (including full path name) of the FDT to be used as input for the add file function in the FDT File text box, or click on the button to select an FDT from the database's default directory or from another directory/drive.
Enter the file number for the new file in the field File Number. Values between 1 and 32000 are permitted. Duplicate database IDs are not allowed on a single host.
Enter the name for the new file in the field File Name. The name must be between 1 and 16 characters long. Only alphanumeric characters are allowed; all special characters (with the exception of period ".", hypen "-" and underscore "_") are not permitted.
Enter the value for the maximum ISN in the field Maximum ISN. The default value is 5000.
Optional: enter the file number for the LOB file in the field LOB file number. If specified, a LOB file with the number given is generated and assigned to the base file to be created, and the base file is enabled for LOB processing.
If you do NOT want to specify further file parameters (see below), click on the button to add the new file.
Or:
If you want to specify further file parameters, click on the
arrow on the left of the Additional Parameters tab to open
it, and continue as described below.
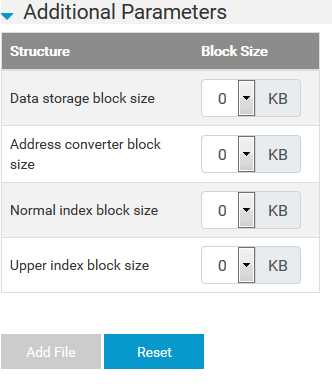
Specify the sizes, in KB, for the structures Data Storage, Address Converter, Normal Index and Upper Index.
When you have specified all of the parameters that you want, click on the button to add the new file.
You can use Adabas Manager to delete a file from a database. The database that contains the file to be deleted can be either online or offline.
Deleting a file physically removes the complete file (including the data records, the FDT and all administrative data) from the database. Deleting a file is permanent and irreversible. Therefore, it is recommended that you create a backup of a file before you delete it.
Note:
The security file, system files, LOB files, Adabas replication
system files and files with referential integrity (primary table) cannot be
deleted using Adabas Manager. However, if you delete a base file, the LOB file
associated with it will also be deleted.
To delete a file
Click on the waste bin icon
in the column Delete in the
Files list next to the file that you want to delete.
The pop-up Delete File dialog box is displayed.
Click on the button to delete the file.
You can use Adabas Manager to refresh a file in a database. The database that contains the file to be refreshed can be either online or offline.
Refreshing a file resets it to the state of zero records loaded. All data records are deleted, and only the first extents for Normal Index, Address Converter and Data Storage are kept. Refreshing a file is permanent and irreversible. Therefore, it is recommended that you create a backup of a file before you refresh it.
Note:
The security file, system files, LOB files, Adabas replication
system files and files with referential integrity (primary table) cannot be
refreshed using Adabas Manager. However, if you refresh a base file, the LOB
file associated with it will also be refreshed.
To refresh a file
Click on the eraser icon
 in the column Refresh in the
Files list next to the file that you want to refresh.
in the column Refresh in the
Files list next to the file that you want to refresh.
The pop-up Refresh File dialog box is displayed.
Click on the button to refresh the file.
You can use Adabas Manager to rename a file in a database. The database that contains the file to be renamed can be either online or offline.
To rename a file
Click on the edit icon
in the column Rename in the Files
list next to the file that you want to rename.
Enter the new name for the file in the text box in the File Name column. The name must be between 1 and 16 characters long. Only alphanumeric characters are allowed; all special characters (with the exception of period ".", hyphen "-" and underscore "_") are not permitted..
Click on the green check mark to rename the file. Clicking on the red cross resets the name to the old name.
You can use Adabas Manager to renumber a file in a database. The database that contains the file to be renumbered can be either online or offline.
To renumber a file
Click on the edit icon
in the column Renumber in the Files
list next to the file that you want to renumber.
Enter the new number for the file in the text box in the FNR column. The number must be between 1 and 32000.
Click on the green check mark to renumber the file. Clicking on the red cross resets the number to the old number.
| Warning: If the file's new number is already assigned to another file in the same database, the numbers of the files concerned will be exchanged when you click on the green check mark. |
You can use the Adabas Manager to add a LOB file to a base file in a database. The base file must not already have an assigned LOB file. Once the LOB file is successfully added, the base file is enabled for LOB processing.
Note:
A LOB file cannot be added to a system file.
To add a LOB file
Select the base file to which you want to add the LOB file by clicking on its FNR or File Name in the list of files.
Click on the link Add LOB File in the navigation area.
The Add LOB File dialog is displayed.
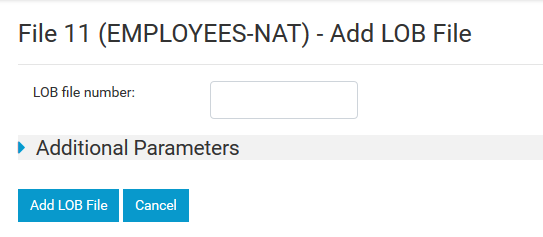
Enter the number for the LOB file in the field LOB file number. The number must be between 1 and 32000.
If you do NOT want to specify further file parameters (see below), click on the button to add the LOB file to the base file.
Or:
If you want to specify further file parameters, click on the
arrow on the left of the Additional Parameters tab to open
it, and continue as described below.
Specify the sizes, in KB, for the structures Data Storage, Address Converter, Normal Index and Upper Index.
When you have specified all of the parameters that you want, click on the button to add the LOB file to the base file.
You can use Adabas Manager to display the Field Definition Table (FDT) of a file. The link Field Definition Table (FDT) is available in the navigation area. The database that contains the file for which the FDT is to be displayed must be online. Before the FDT can be displayed, you must first select the file from the Files list.
To display the FDT of a file
Click on the link Field Definition Table (FDT) in the navigation area. The FDT of the file is displayed in the data area.
You can use Adabas Manager to change the Field Definition Table (FDT) of a file. The button is available above the FDT display. The database that contains the file for which the FDT is to be changed must be online.
| Warning: Changing the FDT of a file may mean that applications accessing the file no longer work, or no longer work correctly. Software AG strongly recommends that you make a backup of the file (for recovery purposes) before you change the FDT. |
To change the FDT of a file
Click on the button above the FDT display in the data area. The FDT of the file to be changed is loaded in the data area. You can now edit the loaded FDT as described in the section Editing a new FDT.
Once you have made all of the changes that you want, click on the button to save the FDT.
Adabas Manager can be used to view various properties of a database file. Before the properties can be viewed, you must first select the file from the file list.
To display file properties
Click on the link File Properties in the navigation area. The properties of the file are displayed in the data area.
The following information is displayed:
| Property | Meaning |
|---|---|
| File Number | The number of the file in the database. |
| File Name | The name of the file. |
| Number of Loaded Records | The number of records currently loaded in the file. |
| Top ISN | The number of the highest ISN used for the file |
| Maximum ISN | The number of the highest ISN expected for the file. |
| File Load Date | The date and time that the file was loaded into the database. |
| FDT Modification Time | The time and date that the FDT was last modified (displayed even if empty). |
| File Definition Options | The file definition options that apply to the file. |
| High Index RABN | The highest RABN in the index. |
| High Index Level | The highest level used in the index. |
Adabas Manager can be used to view and modify the following file options:
| File Option | Meaning |
|---|---|
| ISN_REUSAGE | Reuse of ISNs by Adabas |
| SPACE_REUSAGE | Reuse of data storage space by Adabas |
| PROGRAM_REFRESH | Refresh file from within an application |
The following restrictions apply when you modify the file options:
ISN_REUSAGE cannot be changed if the database is offline;
SPACE_REUSAGE cannot be changed if the database is offline;
PROGRAM_REFRESH cannot be changed if the file is defined as a primary table for referential integrity, or if it is a LOB file.
To view file options
Click on the link File Options in the navigation area. The options of the file are displayed in the data area.
The value of each option can be either enabled or disabled.
To modify file options
Click on the edit icon to the right of the file option that you want to modify in the Options data area.
Radio buttons for enabling/disabling the selected option are displayed. Select the new value for the option, and click on the green check mark to save the new value.
This section describes the miscellaneous administration tasks that you can perform with Adabas Manager.
You can use Adabas Manager to close the current command log file (CLOG) and/or protection log file (PLOG), and to open a new log file of the same type. In the case of the PLOG, you can also optionally specify that Adabas Manager waits until all currently active ET logic users come to ET status before the file is closed. The database in question must be online.
To close the CLOG/PLOG file
Select the database that you want to use by clicking on its Database ID or Database Name in the list of databases.
Select the check box Close currently used CLOG file to close the current command log file and open a new one.
Select the check box Close currently used PLOG file to close the protection log file and open a new one.
Also select the check box Close with ET_SYNC option if you want Adabas Manager to wait for all currently active ET logic users to come to ET status before the PLOG file is closed.
Click on the button to close the CLOG/PLOG file(s).
You can use Adabas Manager to display the contents of the adanuc.log file. This file contains information about the settings of various nucleus parameters and options for the database selected.
To display the adanuc.log file
Select the database that you want to use by clicking on its Database ID or Database Name in the list of databases.
Click on the button in the database overview screen.
The contents of the file are displayed in a pop-up.
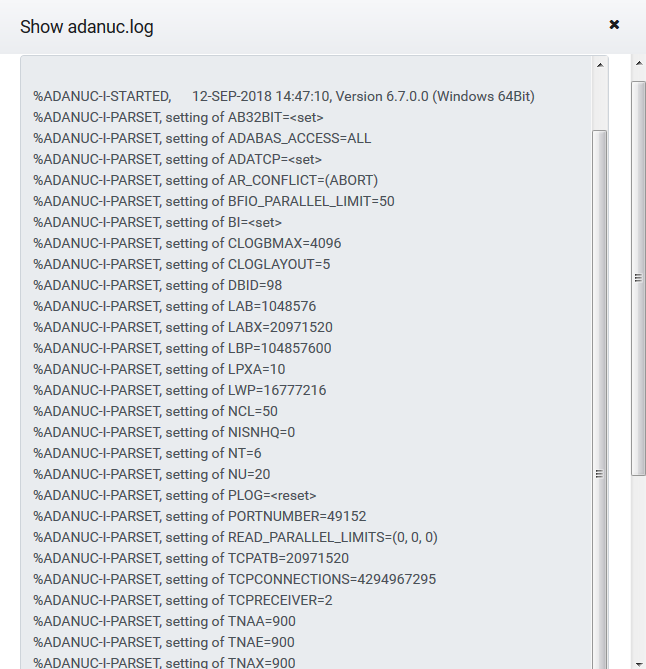
Click on the button in the pop-up to refresh the contents.
Adabas Manager can be used to display the user queue and the command queue for a selected database. The displays are static, but can be refreshed manually with the Refresh List function. In the case of the user queue, you can also select user queue elements from the display (also using optionally-defined filters) and stop them.
Note:
The user queue and the command queue can only be displayed is
the selected database is online.
To display the user queue
Select the database that you want to use by clicking on its Database ID or Database Name in the list of databases.
Click on the link User Queue in the navigation area. The list of currently active user queue elements for the database is displayed in the data area.
The following information is displayed:
| Column | Description |
|---|---|
| Identifier |
The internal user identification. |
| User ID |
The user identification. |
| Host Name |
The name of the host on which the selected database is running. |
| Login ID |
The login identification string of the user. |
| Type |
The user type. |
| Status |
The current status of the user. |
| Time Stamp ID |
The time and date when the user queue element was created. |
Once you have displayed the user queue, you can select one or more user queue elements from the display in order to stop them.
To stop one or more user queue elements
Select a user queue element that you want to stop by ticking the check box next to its identifier. You can select all of the user queue elements at one go by ticking the first check box at the top of the list.
Or:
You can also select the user queue elements on the basis
of a user-defined filter.
Enter the filter criteria that you want to use in the text box above the respective column. Multiple criteria are connected with a logical "and".
Once you have selected the user queue element(s), click the button above the display of user queue elements.
The pop-up Stop User dialog box, which contains details of the selected user queue elements, is displayed.
Click the button to stop the selected user queue element(s).
To display the command queue
Select the database that you want to use by clicking on its Database ID or Database Name in the list of databases.
Click on the link Command Queue in the navigation area. The list of currently active commands for the database is displayed in the data area.
The following information is displayed:
| Column | Description |
|---|---|
| Number |
The number of the command. |
| Host Name |
The name of the host on which the selected database is running. |
| APU |
The assigned Adabas Processing Unit of the command queue entry. |
| Login ID |
The login identification string of the user. |
| Process ID |
The process ID of the command. |
| Command |
The command string. |
| File |
The file number. |
| Status |
The current status of the command. |
Adabas Manager can be used to view information about and manage (add/remove) the containers defined for a database. Containers include the Associator (ASSO), Data Storage (DATA), and Work (WORK) containers.
To list container information for a database:
Click on the link Container above the database overview screen.
The list of containers is shown in the data area.
The following table describes the data displayed in the data area.
| Column | Description |
|---|---|
| Container | The name of the container. |
| Block Size (KB) | The block size of the container in kilobytes (KB). |
| Container Size (MB) | The size of the container in megabytes (MB). |
| Free Space (MB) | The available free space in the container in megabytes (MB). |
| Free Space (%) | The available free space in the container as a percentage of the total container size. |
| First RABN | The first relative Adabas block number (RABN) in the container. |
| Last RABN | The last RABN in the container. |
| Path | The path name of the container file. |
You can only add a new ASSO or DATA container. You cannot add a new WORK container.
To add a new ASSO or DATA container:
Click on the link Add Container in the navigation area. Alternatively, Click the button at the top of the Containers list.
The Add Container dialog box is displayed.
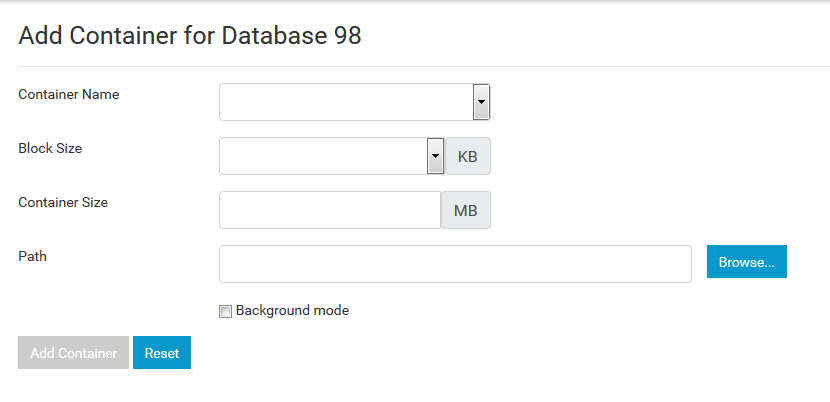
Select the name of the new container from the Container Name field drop-down list. The list only contains the next valid names for the container types ASSO and DATA (e.g. DATA3 if DATA1 and DATA2 already exist). The path from the preceding ASSO/DATA container is provided as default.
Select the block size (in KB) for the new container from the Block Size drop-down list.
Enter the size of the new container (in MB) in the Container Size text box.
Enter the path for the new container in the Path text box, or click on the button to select a path name.
If you are adding a very large container, you can add it asynchronously - in this case, select the check box Background mode.
Click the button to add the new container.
The container is added.
You can delete ASSO and DATA containers if they are no longer needed. Only the last, empty ASSO or DATA container of a database can be deleted. The containers ASSO1, DATA1 and WORK1 cannot be deleted.
Note:
The database must be offline before you can delete a
container.
To delete a ASSO or DATA container:
Click the waste bin icon
next to the container that you
want to delete in the Container list.
The pop-up Delete container dialog box is displayed. Click Delete to delete the container.
You can use Adabas Manager to display the highest recorded values for some database parameters. The information is displayed for the parameter groups Queues and Threads, Buffers and Pools, and Miscellaneous. The information includes the description and name of the parameter (together with the units, where appropriate), the maximum size or value allocated, the size or value that is currently in use, the maximum size or value used during the current database session (the so-called high water mark), the high water mark as a percentage of the size or value allocated, as well as the date and time that the high water mark occurred.
Note:
You can only display high water marks for a database that is
online.
To display the high water marks
Select the database that you want to use by clicking on its Database ID or Database Name in the list of databases.
Click on the link High Water Marks in the navigation area. The information about the high water marks is displayed in the data area.
You can use Adabas Manager to display statistics about the buffer pool. These statistics are for the categories Pool Allocation, I/O Statistics, Buffer Flushes and RABNs Present. The total amount of space allocated to the buffer pool (in MB) is also displayed. In addition, the statistics for Size Allocation and Buffer Pool Hit Rate are displayed graphically.
Note:
You can only display buffer pool statistics for a database that
is online.
To display the buffer pool statistics
Select the database that you want to use by clicking on its Database ID or Database Name in the list of databases.
Click on the link Buffer Pool Statistics in the navigation area. The buffer pool statistics are displayed in the data area.
You can use Adabas Manager to display statistics about the Adabas commands issued during the current database session. These statistics are available for the command category (read, find, modify, transaction and special) and for each Adabas command (A1, BT, C1 ... S9). The table below shows which category contains which Adabas commands:
| Category | Adabas Commands |
|---|---|
| Read | L1, L2, L3, L4, L5, L6, L9 |
| Find | S1, S2, S4, S8, S9 |
| Modify | A1, C1, C5, E1, N1, N2 |
| Transaction | BT, CL, ET, OP, RE |
| Special | C3, HI, LF, MC, RC, RI |
For the command categories, the statistics are available for the number of commands in each category, and as a percentage of the total number of all commands. The information is displayed as a bar chart.
For the individual commands, the statistics are available as the number of commands of each type, and as percentages of both the total number in each category and of the total number of all commands. The information is displayed in a table.
Notes:
To display the command statistics
Select the database that you want to use by clicking on its Database ID or Database Name in the list of databases.
Click on the link Command Statistics in the navigation area. The command statistics are displayed in the data area.
You can use Adabas Manager to display information about the entries in the thread table of a database. The information includes the thread number, the Adabas Processing Unit (APU) associated with the thread (if the database parameter APU is set), the total number of commands processed by the thread, the file number of the command that is currently being processed by the thread, the command string of the command that is currently being processed by the thread, and the status of the thread.
Note:
You can only display the entries in the thread table for a
database that is online.
To display the thread table
Select the database that you want to use by clicking on its Database ID or Database Name in the list of databases.
Click on the link Thread Table in the navigation area. The information about the thread table entries is displayed in the data area.
You can use Adabas Manager to display the entries in the checkpoint file of a database. The information includes the checkpoint number (consecutively numbered, the most recent checkpoint is number 1), the checkpoint type, the time and date it was made, and the number of the nucleus session in which it was made. The entries in the checkpoint file can also be filtered according to checkpoint type and starting date.
In addition, you can select and delete entries from the checkpoint file.
To display, filter and delete entries in the checkpoint
file
Select the database that you want to use by clicking on its Database ID or Database Name in the list of databases.
Click on the link Checkpoints in the navigation area. The information about the checkpoint entries is displayed in the data area. By default, the entries are displayed in blocks of 25 - use the controls at the top of the display to move forwards/backwards in the list.
Once you have displayed the contents of the checkpoint file, you can position the display to start at a selected date and/or mark a certain type of checkpoint.
Enter a starting date in the Date text box (in the format YYYY-MM-DD), or click on the calendar icon next to the Date text box and select a starting date. Click the button to start the display at the selected date; the entries made on the selected date are marked in light blue.
Or:
Once you have positioned to a starting date, you can delete
the marked entries by clicking the
button; the pop-up Delete Checkpoint dialog box is
displayed. Click Delete to delete the checkpoints.
Note:
Software AG strongly recommends that you make a backup of
the database/checkpoint file before deleting the entries - deleting checkpoints
is a permanent action that cannot be reversed.
You can use Adabas Manager to display and delete entries in the utility communication block (UCB) of a database. The UCB is used to control access to certain resources (the whole database, or one or more files) within a database. It saves information about the Adabas utilities processing the database and the resources attached to them. The information displayed includes the entry ID, the name of the utility, the mode in which the files are being accessed, the file numbers of the files being processed by the utility, and the creation date at which the entry was made.
To display and delete entries in the utility communication
block
Select the database that you want to use by clicking on its Database ID or Database Name in the list of databases.
Click on the link Utility Communication Block in the navigation area. The information about the UCB entries is displayed in the data area.
If you want to delete an entry from the UCB, tick the check box in the column on the left of its entry ID (alternatively you can select all entries by ticking the check box on the left of the header line of the table). Then click the button; the pop-up Delete Entry dialog box is displayed. Click Delete to delete the selected UCB entry/entries.
Adabas Manager can be used to execute Adabas utilities from within Database Adminstration. They can be accessed and executed in a GUI-based form (for backup, restore, export, import, unload and load), or via the so-called Expert Utility Call (ADABCK, ADACMP, ADADBM, ADADCU, ADAFDU, ADAFIN, ADAMUP, ADAOPR, ADAORD, ADAREP, and ADAULD). There is also an option to generate and save a script for the utility call, which contains the parameters and values used in the call; this script can then be executed at a later time.
In order to access/use the utilities, you must first select a database.
Note:
Some Adabas utilities contain functionality for modifying or
deleting existing database information, so caution is advised when these
utilities are used. Some utilities, such as ADAREP, provide status information
only, and can be used freely.
To access the Adabas utilities
Select the database that you want to use by clicking on its Database ID or Database Name in the list of databases.
Click on the link Utilities above the database overview screen. The available utilities are listed in the navigation area, and the utilities job list is displayed in the data area.
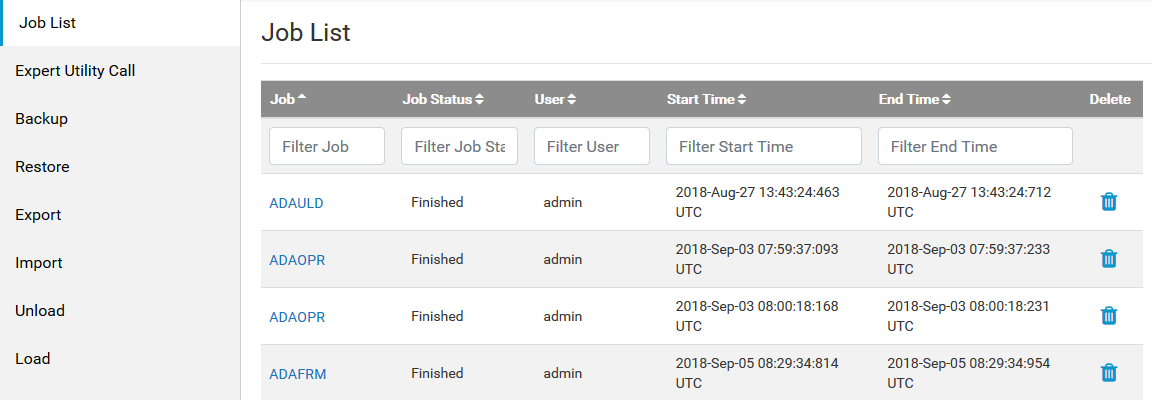
The job list contains the following information: the name of the job, the job status, the ID of the user who started the job, the date and time at which the job was started, and the data and time at which the job was completed.
You can display the output of a job that has been run by clicking on the name of the job in the list, the details are displayed in a pop-up window.
Individual jobs can be deleted by clicking on the waste basket
icon at the end of a row.
The Backup function writes a backup copy of the selected database or selected files from the database to a file. The database may be active while the backup copy is made.
To back up a database or selected files
Select the database that you want to use by clicking on its Database ID or Database Name in the list of databases.
Click on the linkUtilities above the database overview screen, then click on the link Backup in the navigation area. The Backup dialog is displayed in the data area.
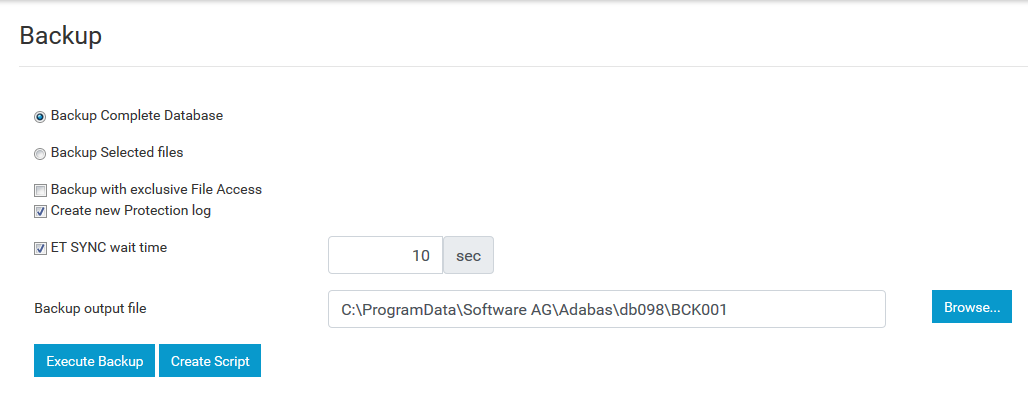
By default, a backup copy of the complete database is made. If you only want to back up selected files, click on the radio button, then click on the button; the Select Adabas Files dialog appears in a pop-up window.
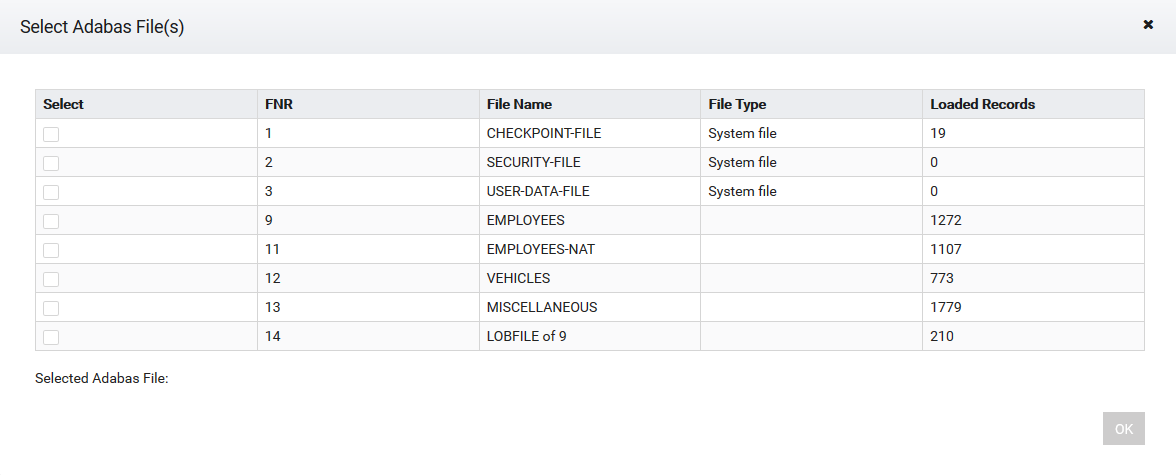
Click on the checkbox at the top left of the pop-up window to select/deselect all files in the list. Click on the checkboxes next to the file numbers to select/deselect individual files. The list of files that have been selected is displayed in the File selected text box. Click on the button to complete the file selection.
Note:
If you select the base file of a LOB file, the associated
LOB file will also be selected automatically.
Click on the Backup with exclusive File Access checkbox if you want only ACC users (read-only) to have access to the database/selected files while the backup is in progress.
If you are backing up a complete database, by default, the current protection log file is closed and new protection log file is created once the backup has completed; you should uncheck the Create new Protection log checkbox if you don't want to close the current protection log and create a new one. If you are backing up selected files, you should click on the Create new Protection log checkbox if you do want to close the current protection log file and create a new one.
Click on the ET SYNC wait time checkbox if you want to specify a time (in seconds) allowed for ET-logic users to come to ET status at the end of the backup function. This option is not available if you have checked the Backup with exclusive File Access checkbox.
Specify a name for the backup file to be created in the Backup output file text box; you cannot specify a file that already exists. By default, the backup will be created in the directory of the selected database. Click on the button to select a different directory and/or drive.
Click on the button to create the backup.
Or:
Click on the button to
create a script file that can be executed at a later time. By default, the
script file is called script.bat and will be created in
the directory of the selected database. If you want to use a different name,
enter the new name (together with the full path) in the Create
Script pop-up window, and click on the
button to select a different directory and/or
drive. If a file with the same name already exists, check the
checkbox to replace the old file
with the new file.
Click on the button in the job details pop-up window to return to the Backup dialog, or click on the button to return to the Adabas Utilities job list
The Restore function restores the contents of a database or selected files from an Adabas backup copy.
To restore a database or selected files
Select the database that you want to use by clicking on its Database ID or Database Name in the list of databases.
Click on the link Utilities above the database overview screen, then click on the link Restore in the navigation area. The Restore dialog is displayed in the data area.
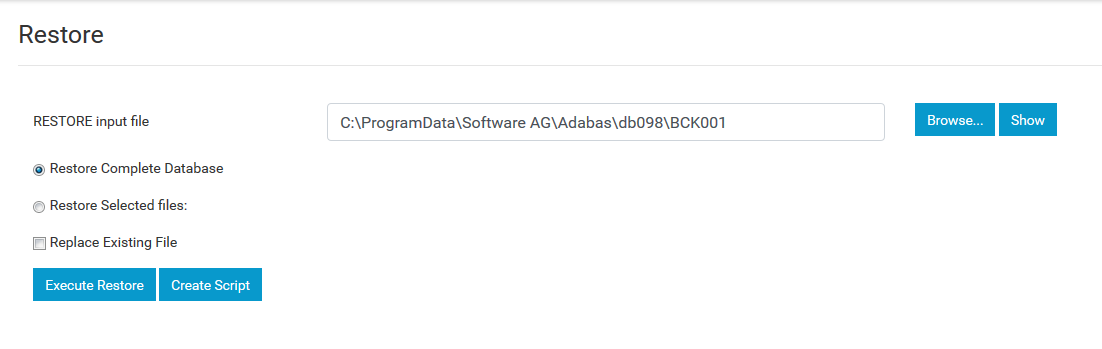
Enter the name (including full path name) of the backup file to be used as input for the restore function in the RESTORE input file text box, or click on the button to select an input file from the database's default directory or from another directory/drive. Once you have selected a file, you can click on the button to show the contents/summary of the input file that you have selected; the contents/summary are displayed in a pop-up window, click on to close the pop-up.
Click on the radio button to restore the complete database.
Or:
Click on the
radio button to restore only selected files; click on the
button to open the Select Adabas
Files to Restore dialog in a pop-up window. Select the files that
you want to restore by checking the check box next to the file numbers; check
the checkbox in the header of the table to select all files. The file numbers
of the files you select are displayed in the Selected file
text box. Click on the button to close the
pop-up and return to the
main Restore dialog.
Note:
If you select the base file of a LOB file, the associated
LOB file will also be selected automatically.
Check the checkbox if you want to restore files that are already loaded in the database. In this case, the file in the database is explicitly deleted and then replaced by the copy of the file from the restore input file.
Click on the button to restore the database.
Or:
Click on the button to
create a script file that can be executed at a later time. By default, the
script file is called script.bat and will be created in
the directory of the selected database. If you want to use a different name,
enter the new name (together with the full path) in the Create
Script pop-up window, and click on the
button to select a different directory and/or
drive. If a file with the same name already exists, check the
checkbox to replace the old file
with the new file.
The Export function exports (copies) one or more files from the database to a sequential output file. The output file can subsequently be used as an input file for the Import function. You can use the Export/Import functions together to migrate files between databases.
To export one or more files from a database
Select the database that you want to use by clicking on its Database ID or Database Name in the list of databases.
Click on the linkUtilities above the database overview screen, then click on the link Export in the navigation area. The Export dialog is displayed in the data area.
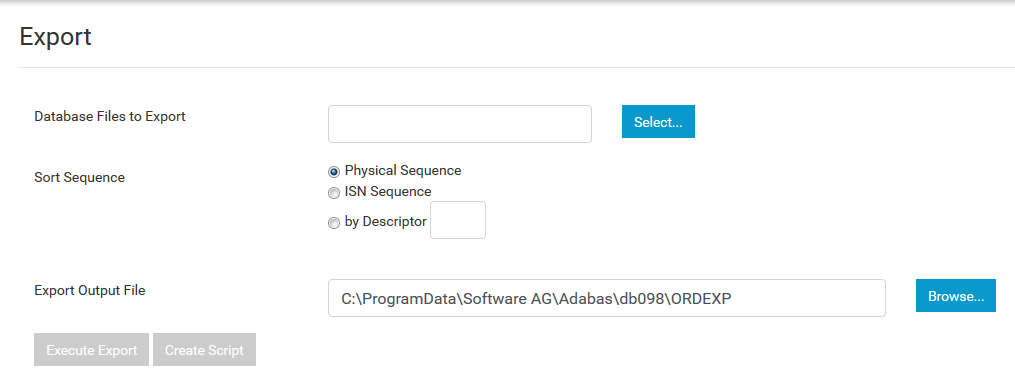
Click on the button to open the Select Adabas Files to export dialog in a pop-up window. Select the files that you want to export by checking the check box next to the file numbers. The file numbers of the files you select are displayed in the Selected Adabas File text box. Click on the button to close the pop-up and return to the main Export dialog.
Note:
If you select the base file of a LOB file, the associated
LOB file will also be selected automatically.
Select the sequence in which the Data Storage will be processed by clicking on the corresponding Sort sequence radio button, the following sequences are available:
Physical sequence - the data records are processed in the physical sequence in which they are stored in the Data Storage.
ISN sequence - the data records are processed in ascending ISN sequence.
By Descriptor - the data records are processed in ascending logical sequence of the descriptor values to which the field name refers. Enter the name of the descriptor that you want to use in the text box next to the radio button.
Specify a name for the export file to be created in the Export Output File text box; you cannot specify a file that already exists. By default, the export file will be created in the directory of the selected database. Click on the button to select a different directory and/or drive.
Click on the button to export the selected files.
Or:
Click on the button to
create a script file that can be executed at a later time. By default, the
script file is called script.bat and will be created in
the directory of the selected database. If you want to use a different name,
enter the new name (together with the full path) in the Create
Script pop-up window, and click on the
button to select a different directory and/or
drive. If a file with the same name already exists, check the
checkbox to replace the old file
with the new file.
The Import function imports one or more files into a database, using the data in the sequential file produced by a previous run of the Export function. You can use the Export/Import functions together to migrate files between databases.
To import one or more files into a database
Select the database that you want to use by clicking on its Database ID or Database Name in the list of databases.
Click on the linkUtilities above the database overview screen, then click on the link Import in the navigation area. The Import dialog is displayed in the data area.
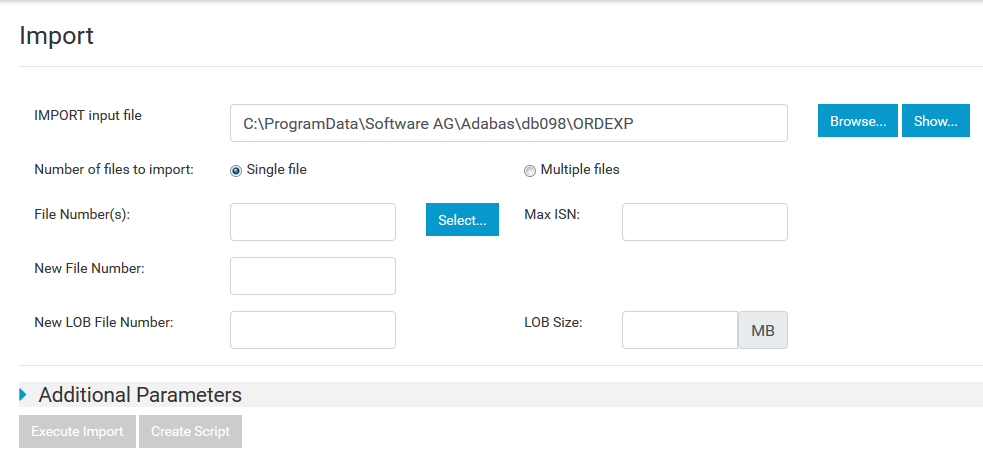
Enter the name (including full path name) of the backup file to be used as input for the restore function in the IMPORT input file text box, or click on the button to select an input file from the database's default directory or from another directory/drive. Once you have selected a file, you can click on the button to show the contents/summary of the input file that you have selected; the contents/summary are displayed in a pop-up window, click on to close the pop-up.
Click on the corresponding Number of files to import radio button to import either a single file or multiple files.
If you are importing multiple files, click on the select button next to the File Number(s) text box to open the Select Files for Import dialog in a pop-up window. Select the files that you want to import by checking the check box next to the file numbers; check the checkbox in the header of the table to select all files. The file numbers of the files you select are displayed in the File Selected text box. Click on the button to close the pop-up and return to the main Export dialog.
If you are importing a single file, click on the select button next to the File Number: text box to open the Select Adabas Files to import dialog in a pop-up window. Select the file that you want to import by checking the check box next to the file number. Click on the button to close the pop-up and return to the main Export dialog. If a file with the same number already exists in the database, enter the new number to be assigned to the file in the New File Number text box. The optional text box specifies the new file number for the LOB file; if no number is specified, the LOB file number (if it exists) remains unchanged. The optional text box Max ISN is used to specify the highest permissible ISN for the file; if no number is entered, the value of MAXISN currently in effect for the file's Address Converter is used. The optional text box LOB Size is used to specify the number of megabytes to be initially assigned to the LOB file's Data Storage.
Clicking on the arrow on the left of Additional Parameters provides you with further options to specify the sizes, RABNs and LOB RABNs for the Data Storage, Address Converter, Normal Index and Upper Index, as well as the padding factors for ASSO and DATA for the new file.
Click on the button to import the selected file(s).
Or:
Click on the button to
create a script file that can be executed at a later time. By default, the
script file is called script.bat and will be created in
the directory of the selected database. If you want to use a different name,
enter the new name (together with the full path) in the Create
Script pop-up window, and click on the
button to select a different directory and/or
drive. If a file with the same name already exists, check the
checkbox to replace the old file
with the new file.
The Unload function unloads data from a file in a database. The output can be subsequently used as input for the Load function.
To unload data from a file in a database
Select the database that you want to use by clicking on its Database ID or Database Name in the list of databases.
Click on the link Utilities above the database overview screen, then click on the link Unload. The Unload dialog is displayed in the data area.
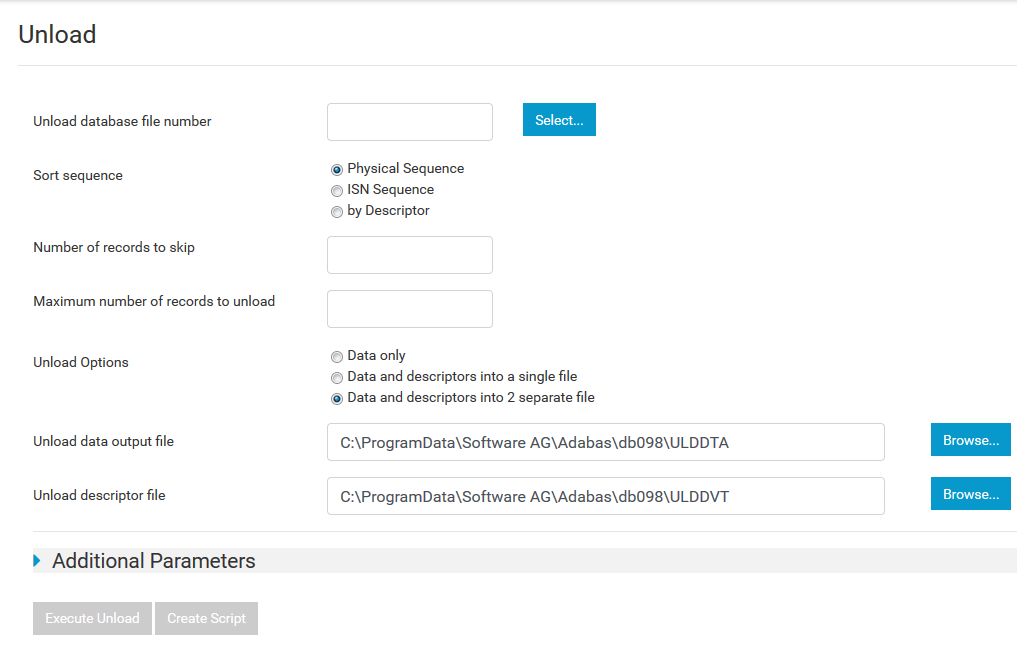
Enter the file number of the file that you want to unload in the Unload database file number text box, or click on the button to open the Select Adabas File dialog in a pop-up window; select the file you want to unload by clicking on it, then click on the button to return to the main Unload dialog.
Select the sequence in which the data will be unloaded by clicking on the corresponding radio button, the following sequences are available:
Physical sequence - the data records unloaded in the physical sequence in which they are stored in the Data Storage.
ISN sequence - the data records are unloaded in ascending ISN sequence.
by Descriptor - the data records are unloaded in ascending logical sequence of the descriptor values to which the field name refers. Enter the name of the descriptor that you want to use in the text box next to the radio button.
If you only want to unload some of the data records, enter the number of records to be skipped before unloading begins in the Number of records to skip text box. You can also limit the maximum number of records to be unloaded; enter the value in the Maximum number of records to unload text box.
Select the way in which the data and descriptors are to be unloaded by clicking on the radio button, the following options are available:
Data only - just the data is unloaded, no descriptor values are unloaded.
Data and descriptors into a single file - both the data and the descriptor values used to build up the index are unloaded to a single file.
Data and descriptors into 2 separate files - the data and the descriptor values used to build up the index are unloaded to separate files.
Specify a name for the unload data file to be created in the Unload data output file text box; you cannot specify a file that already exists. By default, the unload file will be created in the directory of the selected database. Click on the button to select a different directory and/or drive.
If you have selected to unload the data and the descriptors into 2 separate files, specify a name for the unload descriptor file to be created in the Unload descriptor file text box; you cannot specify a file that already exists. By default, the unload file will be created in the directory of the selected database. Click on the button to select a different directory and/or drive.
Click on the arrow on the left of Additional Parameters if you want to specify a search buffer and a value buffer. The search buffer is used to restrict the unloaded records to those which meet the selection criterion provided. The value buffer is used to supply the values which correspond to the selection criterion.
Click on the button to unload the selected file.
Or:
Click on the button to
create a script file that can be executed at a later time. By default, the
script file is called script.bat and will be created in
the directory of the selected database. If you want to use a different name,
enter the new name (together with the full path) in the Create
Script pop-up window, and click on the
button to select a different directory and/or
drive. If a file with the same name already exists, check the
checkbox to replace the old file
with the new file.
The Load function adds records to a file in a database. The output from a previous run of the Unload function is used as input.
To load data into a file in a database
Select the database that you want to use by clicking on its Database ID or Database Name in the list of databases.
Click on the link Utilities above the database overview screen, then click on the link Load in the navigation area. The Load dialog is displayed in the data area.
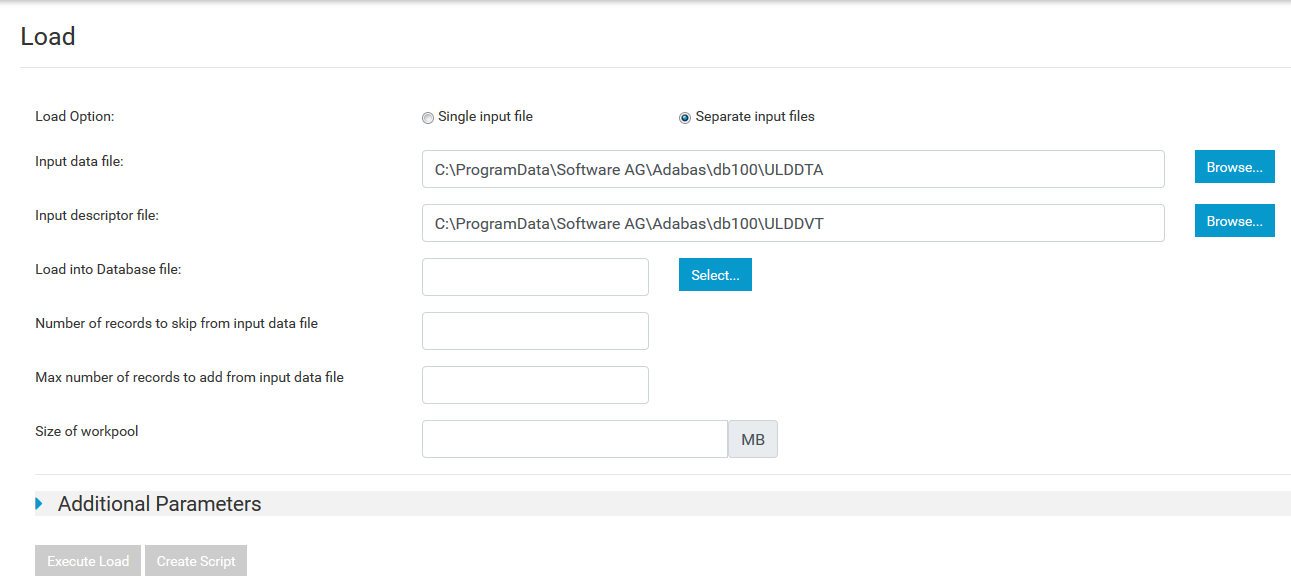
Select whether you are using a single input file (containing both data and descriptors) or separate input files (one for the data and one for the descriptor values) by clicking on the corresponding radio button.
If you are loading data from a single file, enter the name (including full path name) of the file to be used as input for the load function in the Input data file text box, or click on the button to select an input file from the database's default directory or from another directory/drive.
If you are loading data from 2 separate files, enter the names (including full path names) of the files to be used as input for the load function in the Input data file and the Input descriptor file text boxes, or click on the corresponding button to select an input file from the database's default directory or from another directory/drive.
Enter the number of the file into which the data is to be loaded in the Load into Database file text box, or click on the button to open the Select database file dialog in a pop-up window; select the file into which the data is to be loaded by clicking on it, then click on the button to return to the main Load dialog.
If you only want to load some of the data records from the input file(s), enter the number of records to be skipped before loading begins in the Number of records to skip in input data file text box. You can also limit the maximum number of records to be loaded; enter the value in the Max number of records to add from input data file text box.
Enter the size (in MB) of the work pool to be used for the sort during loading in the Size of workpool text box.
Clicking on the arrow on the left of Additional Parameters provides you with further options to specify the behaviour of the load function if it encounters a descriptor which is in the input file, but which has been removed from the database, or whether to continue loading if duplicate unique descriptors are encountered.
Click on the button to load the data into the selected file.
Or:
Click on the button to
create a script file that can be executed at a later time. By default, the
script file is called script.bat and will be created in
the directory of the selected database. If you want to use a different name,
enter the new name (together with the full path) in the Create
Script pop-up window, and click on the
button to select a different directory and/or
drive. If a file with the same name already exists, check the
checkbox to replace the old file
with the new file.
The Expert Utility Call can be used to generate a utility call in which you are able to specify any or all of the parameters, values and options that are available for that utility. This gives you complete control over how the utility is executed.
Caution:
The Expert Utility Call assumes detailed working knowledge
of the Adabas utilities; it should only be used by experienced DBAs.
Note:
The Expert Utility Call does not check to ensure that syntax
and keywords are correct before the utility is called.
The Expert Utility Call is available for the following utilities:
ADABCK
ADACMP
ADADBM
ADADCU
ADAFDU
ADAFIN
ADAMUP
ADAOPR
ADAORD
ADAREP
ADAULD
To make an Expert Utility Call
Select the database that you want to use by clicking on its Database ID or Database Name in the list of databases.
Click on the link Utilities above the database overview screen, then click on the link Expert Utility Call in the navigation area. The Expert Utility dialog is displayed in the data area.
Note:
The Expert Utility Call dialog includes a link to the
documentation for the utility that is selected from the Utility Name list box.
The documentation is displayed in a separate tab.
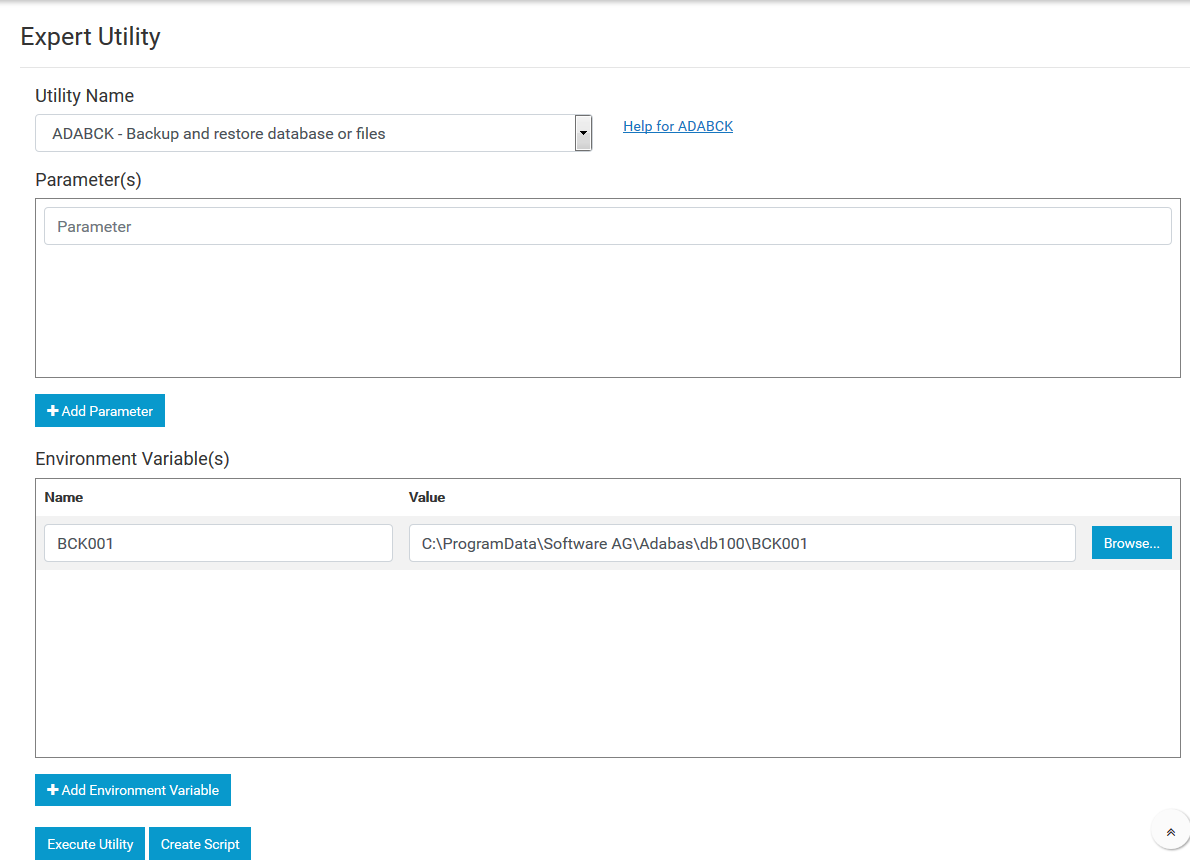
Select the utility that you want to execute from the Utility name list box.
If the utility that you select uses environment variables, their names are automatically entered in the Environment Variables table.
Enter the first parameter (together with appropriate values) and options that you want to use for the call in the first Parameters text box. Click on the button to add subsequent parameters.
If the utility uses environment variables, enter the name of the file to be used (together with the full path) in the Value column of the Environment Variables table; click on the button to show the files available in various directories and/or drives.
Once you have entered all the parameters and assigned values for the environment variables, click on the button to start the job.
Or:
Click on the button to
create a script file that can be executed at a later time. By default, the
script file is called script.bat and will be created in
the directory of the selected database. If you want to use a different name,
enter the new name (together with the full path) in the Create
Script pop-up window, and click on the
button to select a different directory and/or
drive. If a file with the same name already exists, check the
checkbox to replace the old file
with the new file.