
This document descibes how to use Adabas Manager to perform the system adminstration tasks necessary for Entire Net-Work operations.
Note:
This document assumes that you are familiar with the features,
functions and parameters of Entire-Network and Adabas Directory Server. Please
refer to the most-recent versions of the following documentation for detailed
information: Entire Net-Work Client Installation and
Administration, Entire Net-Work Server Installation and
Administration, Entire Net-Work Administration,
Adabas Directory Server
Administration.
 To access Entire Net-Work
Click on the icon Administer Entire Net-Work on the Adabas Manager home page.
The Entire Net-Work start screen is displayed.
This section describes how to manage Entire Net-Work using Adabas Manager.
The following icons are used on the Manage Net-Work page:
| Icon | Meaning/Element |
|---|---|
 |
Client |
 |
Client configuration |
 |
Server |
 |
Kernel |
The status of each element is indicated by one of the following colours:
| Colour | Status |
|---|---|
| Green | On/active |
| Red | Off/inactive |
| Yellow | Error |
| White | Pending |
To display the Manage Net-Work main page
Click on the link Manage Net-Work in the header of the Entire Net-Work start screen.
The Manage Net-Work screen is displayed.
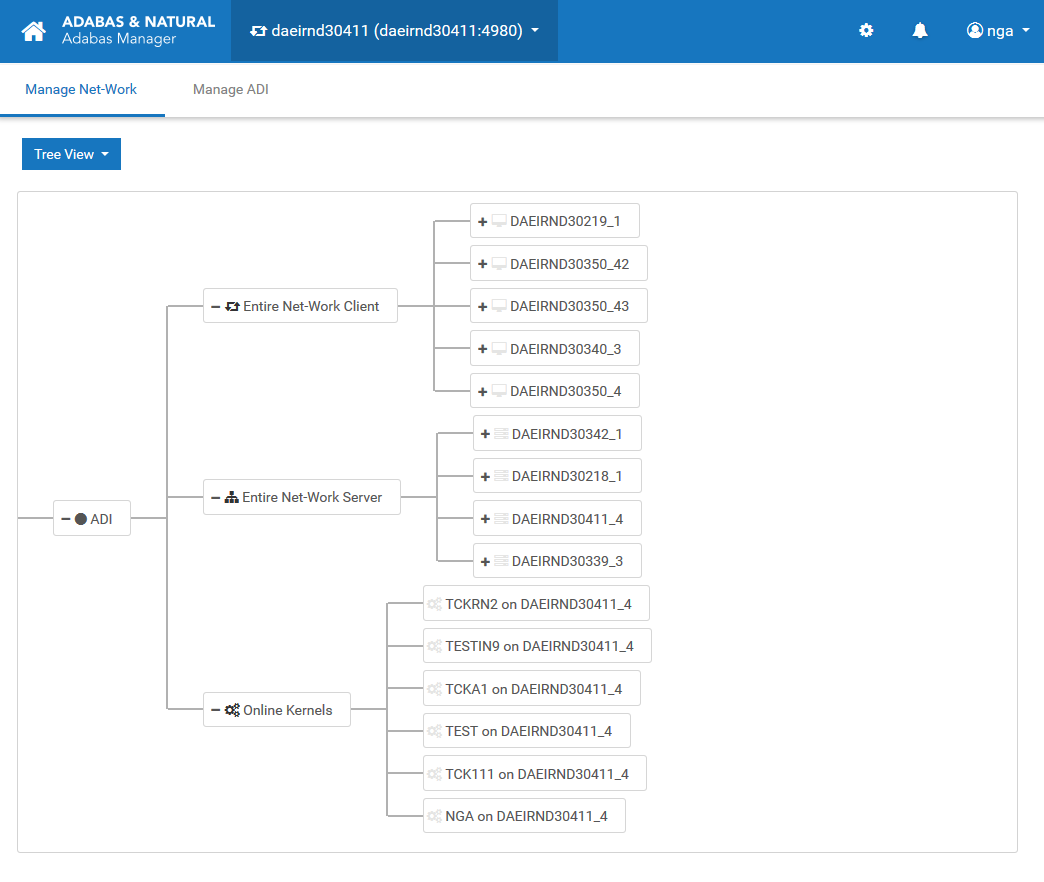
Selecting and expanding Entire Net-Work Client in the navigation area shows the client servers that are attached to it, and displays a list of the client servers in the display area, together with the following information: status, client name, version, TCPIP protocol and status description. Selecting an individual client server in the navigation area displays information about it in the display area, where you can also display/modify the client configuration, parameters, trace options, and the log file.
To display the list of client servers
Click on Entire Net-Work Client in the navigation area.
The list of client servers is displayed in the display area.
This section describes how to display, modify and save client server information for the following:
Client configuration
Parameters
Trace option
Log file
To display/modify the client server configuration
Click on Entire Net-Work Client and then on the client server that you want to use in the navigation area.
The client configuration is displayed in the display area.
If you want to delete a client configuration, click on the
waste bin icon  next to its
name.
next to its
name.
The pop-up Delete Client Configuration dialog box is displayed.
Click on the button to delete the client configuration.
I f you want to add a new client configuration, click on the button Add Client Configuration in the display area.
The Add Client Configuration dialog box is displayed.
Enter the client configuration name in the Configuration Name text box, and enter the path of the configuration in the Configuration File Path text box.
Click on the button to add the client configuration.
Click on the link Parameters in the display area to display the parameter settings for the client server.
The parameters settings for the client server are displayed in the display area.
Click on the button Edit if you want to modify any of the current parameter settings.
Make the changes that you want by entering new values in the text boxes or selecting them from the drop-down lists.
Select the check box if the changes are to be applied to all current client configurations.
Click on the button Save to save the new parameter settings.
Click on the link Trace Option in the display area to display the trace options for the client server.
The trace options for the client server are displayed in the display area.
Click on the button Edit if you want to modify any of the current trace options.
Note:
Software AG recommends that you perform this function
only on the advice of your Software AG support representative.
Modify the trace level parameters as requested by your Software AG support representative.
Click on the button Save to save the new trace option settings.
Click on the link Log File in the display area to display the contents of the console log file for the client server.
The contents of the console log file for the client server are displayed in the display area.
Click on the button New Log if you want to close the current log file and start a new one.
The pop-up Start New Log File dialog box is displayed.
Click on the button to start a new log file.
This section describes how to display, modify and save client information for the following:
Access
Parameters
Trace option
To display/modify the client configuration
Click on Entire Net-Work Client, then on the client server, and then on the client that you want to use in the navigation area.
The client configuration is displayed in the display area.
If you want to add a new client access configuration, click on the button Add Client Access in the display area.
The Add Client Configuration Access dialog box is displayed.
Define the new client access by entering values in the text boxes or selecting them from the drop-down lists.
Click on the button Add to add the new client access configuration.
If you want to edit a client configuration, click on the
edit icon  next to its name.
Make the changes that you want by entering new values in the text boxes or selecting them from the drop-down lists.
Click on the button Save to save the modified client access configuration settings.
If you want to delete a client access configuration, click
on the waste bin icon next to
its name.
The pop-up Delete Client Configuration Access dialog box is displayed.
Click on the button to delete the client access configuration.
Click on the link Parameters in the display area to display the parameter settings for the client.
The parameters settings for the client are displayed in the display area; the parameters are grouped according to their function (client configuration parameters, directory server parameters, ADASAF parameters, and LNK user exit parameters).
Click on the edit icon
in the header above a group display
if you want to modify any of the current parameter settings of that group.
Make the changes that you want by entering new values in the text boxes or selecting them from the drop-down lists.
Click on the save icon
 in the header above a group display
to save the new parameter settings.
in the header above a group display
to save the new parameter settings.
Click on the link Trace Option in the display area to display the trace options for the client.
The trace options for the client are displayed in the display area.
Click on the button Edit if you want to modify any of the current trace options.
Note:
Software AG recommends that you perform this function
only on the advice of your Software AG support representative.
Modify the trace level parameters as requested by your Software AG support representative.
Click on the button Save to save the new trace option settings.
Selecting and expanding Entire Net-Work Server in the navigation area shows the servers that are attached to it, and displays a list of the servers in the display area, together with the following information: status, server name, version, TCPIP protocol and status description. Selecting an individual server in the navigation area displays information about it in the display area, where you can also display/modify the kernel list, parameters, trace options, and the log file.
To display the list of servers
Click on Entire Net-Work Server in the navigation area.
The list of servers is displayed in the display area.
This section describes how to display, modify and save server information for the following:
Kernels
Parameters
Trace option
Log file
To display/modify the server configuration
Click on Entire Net-Work Server and then on the server that you want to use in the navigation area.
The server configuration/kernel list is displayed in the display area.
Click on the button Add Kernel in the display area if you want to add a new kernel to the server. The pop-up Add kernel dialog box is displayed. Define the new kernel by entering values in the text boxes or selecting them from the drop-down lists. Click on the button Add to add the new kernel.
If you want to stop a running kernel, click on the stop
icon  in the column
Start/Stop next to its name.
in the column
Start/Stop next to its name.
The pop-up Stop Net-Work kernel dialog box is displayed.
Click on the button to stop the kernel.
If you want to start a Net-Work kernel that is offline,
click on the start icon  in the
column Start/Stop next to its name
in the
column Start/Stop next to its name
The pop-up Start Net-Work kernel dialog box is displayed.
Click on the button to start the kernel.
If you want to delete a kernel from the server
configuration, click on the waste bin icon
next to its name.
The pop-up Delete Net-Work kernel dialog box is displayed.
Click on the button to delete the kernel from the server configuration.
Note:
You can only delete kernels that are offline.
Click on the link Parameters in the display area to display the parameter settings for the server.
The parameters settings for the server are displayed in the display area.
Click on the button Edit if you want to modify any of the current parameter settings.
Make the changes that you want by entering new values in the text boxes or selecting them from the drop-down lists.
Select the check box if the changes are to be applied to all kernels.
Click on the button Save to save the new parameter settings.
Click on the link Trace Option in the display area to display the trace options for the server.
The trace options for the server are displayed in the display area.
Click on the button Edit if you want to modify any of the current trace options.
Note:
Software AG recommends that you perform this function
only on the advice of your Software AG support representative.
Modify the trace level parameters as requested by your Software AG support representative.
Click on the button Save to save the new trace option settings.
Click on the link Log File in the display area to display the contents of the console log file for the server.
The contents of the console log file for the server are displayed in the display area.
Click on the button New Log if you want to close the current log file and start a new one.
The pop-up Start New Log File dialog box is displayed.
Click on the button to start a new log file.
This section describes how to display, modify and save kernel information for the following:
Kernel access
Parameters
Statistics
Databases
Connections
Clients
Access status
Trace option
Log file
To display/modify kernel configurations
Click on Entire Net-Work Server, then on the server, and then on the kernel that you want to use in the navigation area. Alternatively, you can click on the kernel in the display area.
The kernel access configuration (server access, client access, and configuration) is displayed in the display area.
Click on the edit icon
in the column
Action if you want to modify any of the current access
settings of the server. The pop-up Edit Server Access
dialog box is displayed. Make the changes that you want by entering new values
in the text boxes or selecting them from the drop-down lists. Click on the save
icon to save the new access
settings.
If you want to delete a server access configuration, click
on the waste bin icon next to
its name. The pop-up Delete Server Access dialog box is
displayed. Click on the button to delete the
server access.
Click on the edit icon
in the column
Action if you want to modify any of the current access
settings of the client. The pop-up Edit Client Access
dialog box is displayed. Make the changes that you want by entering new values
in the text boxes or selecting them from the drop-down lists. Click on the save
icon to save the new access
settings.
If you want to delete a client access configuration, click
on the waste bin icon next to
its name. The pop-up Delete Client Access dialog box is
displayed. Click on the button to delete the
client access.
Click on the edit icon
in the column
Action if you want to modify any of the current access
settings of a connection. The pop-up Edit Connection
Access dialog box is displayed. Make the changes that you want by
entering new values in the text boxes or selecting them from the drop-down
lists. Click on the save icon to
save the new access settings.
If you want to delete a connection access configuration,
click on the waste bin icon
next to its name. The pop-up Delete Connection Access
dialog box is displayed. Click on the button to
delete the connection.
Click on the link Parameters in the display area to display the parameter settings for the kernel.
The parameters settings for the server are displayed in the display area.
Click on the edit icon
in the header above a group display
if you want to modify any of the current parameter settings of that group.
Note:
You can only edit parameter settings for kernels that
are offline.
Click on the edit icon
next to the name of the parameter
that you want to modify.
Make the change that you want by entering a new value in the text box or selecting it from the drop-down list.
Click on the button Save to save the new parameter settings.
Click on the link Statistics in the display area to display the statistics for the kernel session.
Note:
You can only display statistics for kernels that are
online.
Select the check box if you want to collect and save more detailed statistics for the kernel. The pop-up Change Kernel Stats Level Online dialog box is displayed. Click on the button to kernel detailed statistics.
Click on the link Databases in the display area to display information about the databases attached to the kernel.
Note:
You can only display database information for kernels
that are online.
Click on the link Connections in the display area to display information about the outgoing and incoming connections of the kernel.
Click on the button Add in the display area if you want to add a new connection to the kernel. The pop-up Add Connection Online dialog box is displayed. Define the new connection by entering values in the text boxes or selecting them from the drop-down lists. Click on the button Add to add the new connection.
Click on the link Clients in the display area to display information about the clients associated with the kernel.
Click on the link Access Statistics in the display area to display information about the kernel's access statistics.
Click on the link Trace Option in the display area to display the trace options for the kernel.
The trace options for the kernel are displayed in the display area.
Click on the button Edit if you want to modify any of the current trace options.
Note:
Software AG recommends that you perform this function
only on the advice of your Software AG support representative.
Modify the trace level parameters as requested by your Software AG support representative.
Click on the button Save to save the new trace option settings.
Click on the link Log File in the display area to display the contents of the console log file for the kernel.
The contents of the console log file for the kernel are displayed in the display area.
Click on the button New Log if you want to close the current log file and start a new one.
The pop-up Start New Log File dialog box is displayed.
Click on the button to start a new log file.
Click on the button Dump if you want to dump the kernel configuration to the log file. The pop-up Dump Configuration of Kernel dialog box is displayed. Click on the button Dump Configuration to dump the kernel configuration to the log file.
This section describes how to display, modify and save online kernel information for the following:
Kernel access
Parameters
Statistics
Databases
Connections
Clients
Access status
Trace option
Log file
To display/modify kernel configurations
Click on the online kernel that you want to use in the navigation area.
The kernel access configuration (server access, client access, and configuration) is displayed in the display area.
Click on the edit icon
in the column
Action if you want to modify any of the current access
settings of the server. The pop-up Edit Server Access
dialog box is displayed. Make the changes that you want by entering new values
in the text boxes or selecting them from the drop-down lists. Click on the save
icon to save the new access
settings.
If you want to delete a server access configuration, click
on the waste bin icon next to
its name. The pop-up Delete Server Access dialog box is
displayed. Click on the button to delete the
server access.
Click on the edit icon
in the column
Action if you want to modify any of the current access
settings of the client. The pop-up Edit Client Access
dialog box is displayed. Make the changes that you want by entering new values
in the text boxes or selecting them from the drop-down lists. Click on the save
icon to save the new access
settings.
If you want to delete a client access configuration, click
on the waste bin icon next to
its name. The pop-up Delete Client Access dialog box is
displayed. Click on the button to delete the
client access.
Click on the edit icon
in the column
Action if you want to modify any of the current access
settings of a connection. The pop-up Edit Connection
Access dialog box is displayed. Make the changes that you want by
entering new values in the text boxes or selecting them from the drop-down
lists. Click on the save icon to
save the new access settings.
If you want to delete a connection access configuration,
click on the waste bin icon
next to its name. The pop-up Delete Connection Access
dialog box is displayed. Click on the button to
delete the connection.
Click on the link Parameters in the display area to display the parameter settings for the kernel.
The parameters settings for the server are displayed in the display area.
Click on the edit icon
in the header above a group display
if you want to modify any of the current parameter settings of that group.
Note:
You can only edit parameter settings for kernels that are
offline.
Click on the edit icon
next to the name of the parameter
that you want to modify.
Make the change that you want by entering a new value in the text box or selecting it from the drop-down list.
Click on the button Save to save the new parameter settings.
Click on the link Statistics in the display area to display the statistics for the kernel session.
Note:
You can only display statistics for kernels that are
online.
Select the check box if you want to collect and save more detailed statistics for the kernel. The pop-up Change Kernel Stats Level Online dialog box is displayed. Click on the button to kernel detailed statistics.
Click on the link Databases in the display area to display information about the databases attached to the kernel.
Note:
You can only display database information for kernels
that are online.
Click on the link Connections in the display area to display information about the outgoing and incoming connections of the kernel.
Click on the button Add in the display area if you want to add a new connection to the kernel. The pop-up Add Connection Online dialog box is displayed. Define the new connection by entering values in the text boxes or selecting them from the drop-down lists. Click on the button Add to add the new connection.
Click on the link Clients in the display area to display information about the clients associated with the kernel.
Click on the link Access Statistics in the display area to display information about the kernel's access statistics.
Click on the link Trace Option in the display area to display the trace options for the kernel.
The trace options for the kernel are displayed in the display area.
Click on the button Edit if you want to modify any of the current trace options.
Note:
Software AG recommends that you perform this function
only on the advice of your Software AG support representative.
Modify the trace level parameters as requested by your Software AG support representative.
Click on the button Save to save the new trace option settings.
Click on the link Log File in the display area to display the contents of the console log file for the kernel.
The contents of the console log file for the kernel are displayed in the display area.
Click on the button New Log if you want to close the current log file and start a new one.
The pop-up Start New Log File dialog box is displayed.
Click on the button to start a new log file.
Click on the button Dump if you want to dump the kernel configuration to the log file. The pop-up Dump Configuration of Kernel dialog box is displayed. Click on the button Dump Configuration to dump the kernel configuration to the log file.
This section describes how to manage ADI (Adabas Directory Server) using Adabas Manager.
The following icons are used on the Manage ADI page:
| Icon | Meaning/Element |
|---|---|
 |
Partition |
 |
Target |
To display the ADI main page
Click on the link Manage ADI in the header of the Entire Net-Work main page.
The ADI screen is displayed. From this screen you can display and modify information about partitions and targets.
To display/modify partition configurations
Click on the partition that you want to use in the navigation area.
The targets for that partition are displayed in the display area.
Click on the button Add Target in the display area if you want to add a new target to the partition. The pop-up Add Target dialog box is displayed. Define the new target by entering values in the text boxes or selecting them from the drop-down lists. Click on the button Add to add the new target.
To display/modify target configurations
Click on the target that you want to use in the navigation area.
The target configuration is displayed in the display area.
Click on the button Add Qualifier in the display area if you want to add a new qualifier to the target. The pop-up Add Qualifier dialog box is displayed. Define the new qualifier by entering values in the text boxes or selecting them from the drop-down lists. Click on the button Add to add the newqualifier.
Click on the button Delete Target in the display area if you want to delete a target definition from the partition. The pop-up Confirm Delete dialog box is displayed. Click on the button Delete to delete the target definition.
Click on the edit icon
in the column
Action if you want to modify any of the current settings
of a target. The pop-up Edit Qualifier dialog box is
displayed. Make the changes that you want by entering new values in the text
boxes or selecting them from the drop-down lists. Click on the Save button to
save the new qualifier settings.
If you want to delete a qualifier from a target, click on
the waste bin icon next to its
name. The pop-up Confirm Delete dialog box is displayed.
Click on the button to delete the qualifier.