
Directory Server target definitions and their associated qualified URLs can be maintained using the System Management Hub.
Note:
Some Software AG products that use the Directory Server may need to be
stopped and restarted if you make changes to Directory Server qualified URLs while
the Software AG product is running. One example of such a product is Entire
Net-Work 7 (open systems).
This document covers the following topics:
 To list the targets defined in a Directory Server:
Access the Directory Server administration area, as described in The Directory Server Administration Area.
Click and expand the name of the Directory Server or the partition within a Directory Server whose targets you wish to review in the tree-view frame of SMH.
The targets for that Directory Server are listed in the detail-view
frame and under the Directory Server or partition name in the tree-view frame.
Targets are identified by the red circle icon ( ).
).
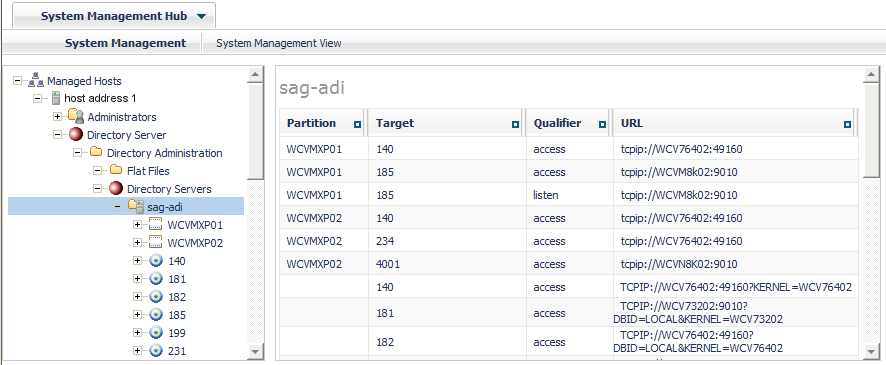
Targets are initially listed by partition, in the order they appear in the Directory Server. You can change the sort order of the target list by clicking on the arrows in the column headings of the table in the detail-view frame. If you click on an up arrow in the column heading, the display is sorted alphabetically by the contents in that column. If you click on a down arrow in the column heading, the display is sorted in reverse alphabetic order by the contents in that column.
You can add targets to the Directory Server directly, within a partition of the Directory Server, or both. For information on the use of partitions in a Directory Server, read Partitioning a Directory Server.
When you add a target definition, an "access" qualified URL and a "listen" qualified URL are automatically created. In the case of ADATCP and Entire Net-Work 7.x, the "listen" URL is not required and can be deleted. For information on deleting qualified URLs, read Deleting Qualified URLs.
Note:
ADATCP connections do not support IPv6 communication.
For information on modifying or adding additional qualified URLs for the target definition, including specifying parameters for the URL, read Maintaining Qualified URLs.
To add a target definition:
Access the Directory Server administration area, as described in The Directory Server Administration Area.
In the tree-view frame of SMH, click on the name of the Directory Server to which you want to define the target.
The partitions and targets already defined for that Directory Server are listed in the detail-view frame and under the Directory Server name in the tree-view frame.
Optionally, if you want to define the target to a specific partition, click and expand the a name of the partition in the tree-view frame of SMH.
Right-click on the name of the Directory Server or partition to which you wish to add the target and select from the resulting drop-down menu.
The first panel in the Add Target panel series appears in the detail-view frame. In the following sample panel, the target is being added to the Directory Server directly and not to a partition within the Directory Server.
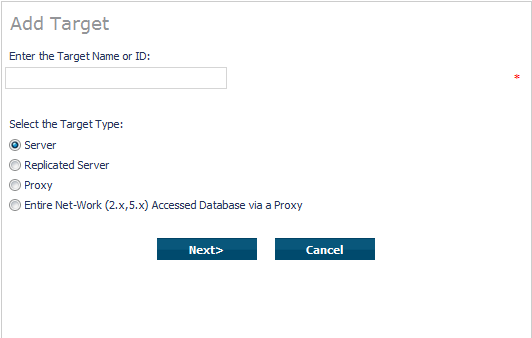
Enter the database ID (DBID) into the Target Name or ID field.
Ensure that the Server option is selected.
The Server option is usually the option you should select.
The Replicated Server option is reserved for future use by Software AG.
The Proxy option is only applicable to configurations requiring a proxy. It is provided for compatibility with Software AG products that still require a proxy. If your Software AG product requires a proxy, refer to the documentation for your Software AG product for information about proxies and how to configure them in SMH.
The Entire Net-Work (2.x, 5.x) Accessed Database via a Proxy option is only applicable to installations that still maintain Entire Net-Work version 2 (open systems) or Entire Net-Work version 5 (mainframe) systems . This option is provided only for compatibility with these older, unsupported versions of these Software AG products; connections to these older systems must be done via a proxy.
Click .
The next panel in the Add Target panel series appears in the detail-view frame.
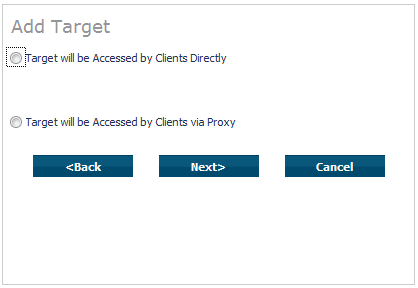
Select the Target will be Accessed by Clients Directly option, then click .
Note:
The Target will be Accessed by Clients via
Proxy option is only provided for compatibility with Software AG
products that still require a proxy. If your Software AG product requires a
proxy, refer to the documentation for your Software AG product for information
about them.
The next panel in the Add Target panel series appears in the detail-view frame.

Select the listen protocol, then click . In most cases, the listen protocol will be TCPIP. For a complete description of these protocols, read Protocols.
The final panel in the Add Target panel series appears in the detail-view frame.
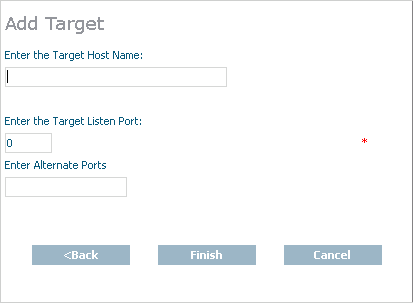
Specify the host name of the middleware in the Target Host Name field. This is the Entire Net-Work version 7 or ADATCP host name.
Note:
Host names are case-sensitive in SMH.
Or:
Specify an IP address as an alternative to a host name. We do
not recommend specifying IP addresses instead of host names as the IP address
may change.
Enter the middleware's listen port into the Target Listen Port field.
Note:
You can leave the Alternate Ports field
blank, unless you want to enter alternate listen ports. If the Target
Listen Port field is set to "0", you must
specify alternate listening ports.
Click .
A message displays indicating that the new target definition was added, and the added target displays in the tree-view frame.
Qualifiers identify the use of a target URL. Three qualifiers are supported in the Adabas Directory Server: access, connect, and listen. For more information about each qualifier, read Qualifiers.
Using SMH, you can add and delete qualified URLs for a target. For more information about qualified URLs, read Qualified URL Structure, elsewhere in this guide.
This section covers the following topics:
To list the qualified URLs of a target:
Access the Directory Server administration area, as described in The Directory Server Administration Area.
In the tree-view frame of SMH, click and expand the name of the Directory Server containing the qualified URLs you wish to list.
The partitions and targets for that Directory Server are listed in the detail-view frame.
Click and expand the target whose qualified URLs you wish to list. If the target is in a partition, you must first select the partition and then click on the target.
The qualified URLs for the target are listed in the detail-view frame and under the target in the tree-view frame.
When you add qualifiers (qualified URLs) for a target, the entire target entry is created, including the qualifier and full URL of the entry.
To add a qualified URL for a target:
Access the Directory Server administration area, as described in The Directory Server Administration Area.
In the tree-view frame of SMH, click and expand the name of the Directory Server in which you want to add a qualifier.
The partitions and targets for that Directory Server are listed in the detail-view frame.
Click and expand the target in which you want to add a qualifier. If the target is in a partition, you must first select the partition and then click on the target.
Right-click on the name of the target to which you want to add a qualifier and select from the resulting drop-down menu.
The first panel in the Add Qualifier panel series appears in the detail-view frame.
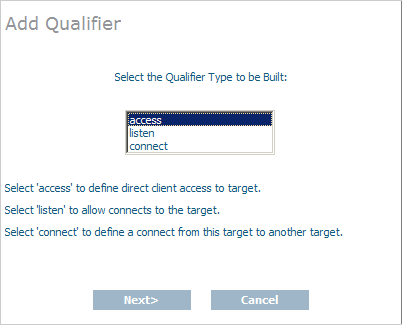
Select the qualifier type (URL use) to be defined for this target entry. Three types of qualifiers are supported in the Adabas Directory Server: access, connect, and listen. For complete information on these qualifiers, read Qualifiers.
Click .
Depending on the qualifier you specified in the previous step, different SMH panels appear. The rest of this section describes how to create target URL entries for each of these different qualifiers.
To create an access URL for a target:
Complete the first 4 steps described in Adding Qualified URLs for the Target. When you get to Step 5, select access for the qualifier type. Then click .
A second panel appears in the detail-view frame, asking you to indicate how this target will be accessed.
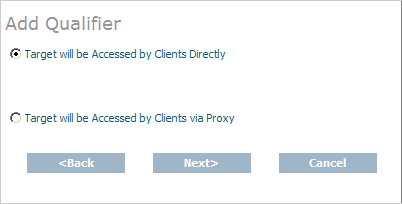
Select the first option, Target will be Accessed by Clients Directly, and click .
Note:
The Target will be Accessed by Clients via
Proxy option is only provided for compatibility with Software AG
products that still require a proxy. If your Software AG product requires a
proxy, refer to the documentation for your Software AG product for information
about them.
A protocol selection panel appears in the detail-view frame.
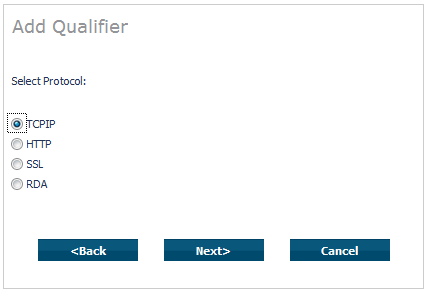
Select the protocol for the qualified URL and click . In most cases, the protocol will be TCPIP. For more information on the supported protocols, read Protocols.
The final panel in the Add Qualifier series of panels appears, requesting the host and port information for the qualified URL.
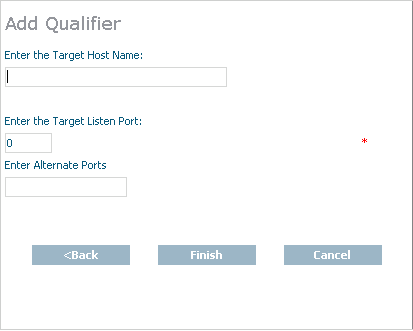
Specify the host name of the middleware in the Target Host Name field. This is the Entire Net-Work version 7 or ADATCP host name.
Note:
Host names are case-sensitive in SMH.
Or:
Specify an IP address as an alternative to a host name. We
do not recommend specifying IP addresses instead of host names as the IP
address may change.
Enter the middleware's listen port in the Enter the Target Listen Port field.
Note:
You can leave the Enter Alternate
Ports field blank, unless you want to enter alternate listen
ports.
Click .
A message displays indicating that the new qualified access URL was added, and the added URL appears in the tree-view frame.
To create a connect URL for a target:
Complete the first 4 steps described in Adding Qualified URLs for the Target. When you get to Step 5, select connect for the qualifier type. Then click .
A second panel appears in the detail-view frame, asking you to indicate to what this target will connect.
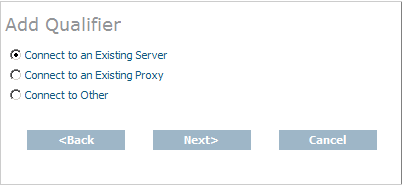
Select the Connect to an Existing Server or Connect to Other option, and click .
Note:
The Connect to an Existing Proxy
option is only provided for compatibility with Software AG products that still
require a proxy. If your Software AG product requires a proxy, refer to the
documentation for your Software AG product for information about them.
Depending on your selection, different panels appear.
If you selected the Connect to an Existing Server or the Connect to an Existing Proxy options, a list of servers or proxies to which this target can connect is listed.
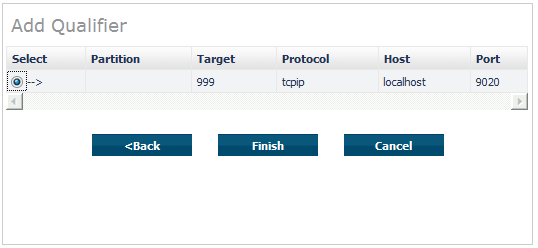
Select the server or proxy for the connection definition and click .
A message displays indicating that the new qualified connect URL was added, and the added URL appears in the tree-view frame.
If you selected the Connect to Other option, a protocol selection panel appears in the detail-view frame.
Select the protocol for the qualified URL and click . In most cases, the protocol will be TCPIP. For more information on the supported protocols, read Protocols.
The final panel in the Add Qualifier series of panels appears, requesting the host and port information for the qualified URL.
Specify the host name of the middleware in the Target Host Name field. This is the Entire Net-Work version 7 or ADATCP host name. Alternatively, you can specify an IP address instead of a host name. We do not recommend specifying IP addresses instead of host names as the IP address may change.
Note:
Host names are case-sensitive in SMH.
Enter the middleware's listen port in the Enter the Target Listen Port field.
Note:
You can leave the Enter Alternate
Ports field blank, unless you want to enter alternate listen
ports.
If you selected the Connect to an Existing Proxy option, a protocol selection panel appears in the detail-view frame.
Click .
A message displays indicating that the new qualified connect URL was added, and the added URL appears in the tree-view frame.
To create a listen URL for a target:
Complete the first 4 steps described in Adding Qualified URLs for the Target. When you get to Step 5, select listen for the qualifier type. Then click .
A protocol selection panel appears in the detail-view frame.
Select the protocol for the qualified URL and click . In most cases, the protocol will be TCPIP. For more information on the supported protocols, read Protocols.
The final panel in the Add Qualifier series of panels appears, requesting the host and port information for the qualified URL.
Specify the host name of the middleware in the Target Host Name field. This is the Entire Net-Work version 7 or ADATCP host name.
Note:
Host names are case-sensitive in SMH.
Or:
Specify an IP address as an alternative to a host name. We
do not recommend specifying IP addresses instead of host names as the IP
address may change.
Enter the middleware's listen port in the Enter the Target Listen Port field.
Note:
You can leave the Enter Alternate
Ports field blank, unless you want to enter alternate listen
ports.
Click .
A message displays indicating that the new qualified listen URL was added, and the added URL appears in the tree-view frame.
To delete a qualifier from a target:
Access the Directory Server administration area, as described in The Directory Server Administration Area.
In the tree-view frame of SMH, click and expand the name of the Directory Server containing the qualifier you wish to delete.
The partitions and targets for that Directory Server are listed in the detail-view frame.
Click and expand the target containing the qualifier you wish to delete. If the target is in a partition, you must first select the partition and then click on the target.
Click on the qualifier you wish to delete.
Right-click on the name of the qualifier you wish to delete and select from the resulting drop-down menu.
The Delete Qualifier panel appears in the detail-view frame.
Click .
The qualifier definition is deleted.
This section covers the following topics:
Using SMH, you can set or alter the values of the
reconnect, retry, and
retryint parameters for a qualified URL. These parameters
control:
Whether or not reconnection is attempted if the connection is disconnected due to some system failure
The number of times the reconnection is attempted
The interval, in seconds, between reconnection attempts.
To set the reconnect parameters for a qualified URL:
Locate and list the qualified URL you want to change as described in Listing Qualified URLs.
Click on the qualified URL whose reconnect parameters you want to change.
Right-click on the name of the qualifier and select in the resulting drop-down menu.
The Set Reconnect Parms panel appears in the detail-view frame of SMH.
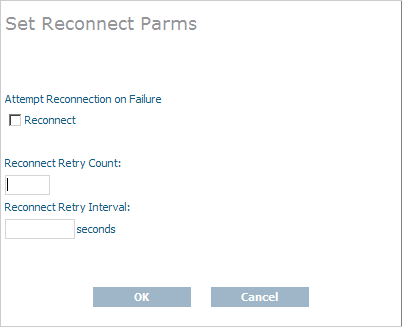
Click the Reconnect check box if you want reconnection attempts to occur if the connection is disconnected due to some failure in the system. If this check box is not checked, no reconnection attempt is made.
When this check box is checked, the reconnect
parameter appears in
the qualified URL.
Specify the number of times reconnection should be attempted in the Reconnect Retry Count field. The valid range is "0" through "2147483648". The default value is "0" (no reconnection attempts).
When a value other than "0" is
specified, the retry
parameter appears in the qualified URL.
Specify the number of seconds to wait between reconnection attempts. The valid range is "0" through "2147483648". The default value is "60000" seconds.
When a value other than "60000"
is specified, the retryint
parameter appears in the
qualified URL.
Click OK.
The reconnection parameters for the qualified URL are set.
Using SMH, you can set or alter the value of the
chirpinterval parameter for a qualified URL. This parameter controls
the interval, in seconds, at which the broadcast connection occurs. This
broadcast connection is the communication mechanism used to validate the
availability of the connection.
Note:
The ttl (Time To
Live) and priority (Message
Priority) parameters are not available at this time. They are
reserved for future use.
To set the basic parameters for a qualified URL:
Locate and list the qualified URL you want to change as described in Listing Qualified URLs.
Click on the qualified URL whose reconnect parameters you want to change.
Right-click on the name of the qualifier and select from the resulting drop-down menu.
The Set Basic Parms panel appears in the detail-view frame of SMH.
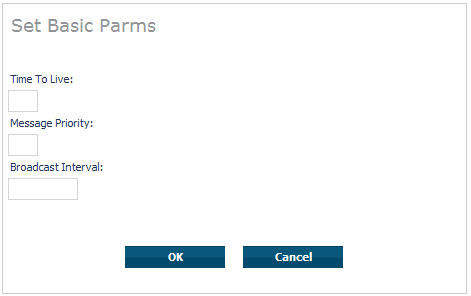
Note:
The ttl (Time To
Live) and priority (Message
Priority) parameters are not available at this time. They are
reserved for future use.
Specify the number of seconds to wait between broadcast connection attempts in the Broadcast Interval field. The valid range is "0" through the maximum integer that can be stored by your operating system. The default value is "300"seconds (5 minutes). A value of "0" implies the default, "300". This broadcast connection is the communication mechanism used to validate the availability of the connection specified by the URL.
When a value other than "300" is
specified, the chirpinterval
parameter appears
in the qualified URL.
Click OK.
The basic parameters for the qualified URL are set.
Using SMH, you can set or alter the values of advanced parameters
raw, recvtimeout,
sendtimeout, and various custom parameters for a qualified URL. These parameters
control:
Whether transport subsystem headers are sent
The timeout value in seconds to receive messages on this connection
The timeout value in seconds to send messages on this connection
Other custom parameter either set automatically by the Software AG application for the qualified URL or with assistance from Software AG Customer Support.
To set the advanced parameters for a qualified URL:
Locate and list the qualified URL you want to change as described in Listing Qualified URLs.
Click on the qualified URL whose reconnect parameters you want to change.
Right-click on the name of the qualifier and select from the resulting drop-down menu.
The Set Advanced Parms panel appears in the detail-view frame of SMH.

Click the Raw Mode check box if you want transport subsystem headers sent with messages on this connection. If this check box is checked, proxy operations are not possible.
When this check box is checked, the raw
parameter appears in the qualified URL.
Specify the number of seconds to wait before timing out a message being received on this connection in the Receive Timeout field. The valid range is "0" through the maximum integer that can be stored by your operating system. The default value is "60" seconds. A value of "0" implies the default, "60".
When a value other than "0" or
"60" is specified, the recvtimeout
parameter appears in
the qualified URL.
Specify the number of seconds to wait before timing out a message being sent on this connection in the Send Timeout field. The valid range is "0" through the maximum integer that can be stored by your operating system. The default value is "60" seconds. A value of "0" implies the default, "60".
When a value other than "0" or
"60" is specified, the sendtimeout
parameter appears in
the qualified URL.
Specify other custom parameters in the Custom Parameters field, as directed by Software AG Customer Support.
Note:
Some custom parameters are specified automatically when
the qualified URL is initially defined.
These custom parameters appear in the qualified URL.
Click OK.
The advanced parameters for the qualified URL are set.
Using SMH, you can set or alter the values of the Java security
KEYSTORE, KEYSTORE_PASSWD,
TRUSTSTORE, TRUSTSTORE_PASSWD,
VERSION, and VERIFY
parameters for a qualified URL. These parameters
control:
The Java keystore to use for the SSL connection
The password for the Java keystore
The Java truststore to use for the SSL connection
The password for the Java truststore
The SSL version that should be used for the SSL connection
The verification processing level for the SSL connection.
To set the JSSE parameters for a qualified URL:
Locate and list the qualified URL you want to change as described in Listing Qualified URLs.
Click on the qualified URL whose reconnect parameters you want to change.
Right-click on the name of the qualifier and select on the resulting drop-down menu.
The Set JSSE Parms panel appears in the detail-view frame of SMH.
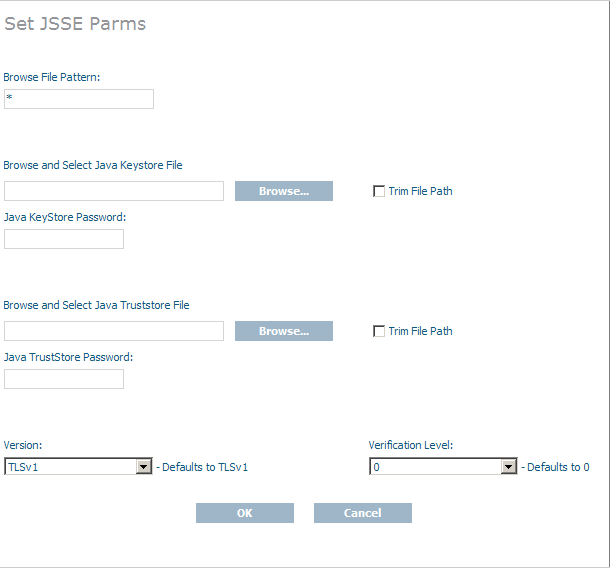
Optionally specify a browse file pattern in the Browse File Pattern field. This pattern is used to initially list files in the specified pattern when you click on any of the buttons on this panel. However, once you get to the Choose a File panel produced by clicking on a button, you can change the pattern if you choose.
Click in the Browse and Select Java Keystore File field and specify the name of the Java keystore. You can click the button for this field to locate and select the Java keystore file using a Choose a File panel.
Note:
The Trim File Path checkbox, when
checked, will trim off the path if you specify a fully qualified path and file
name.
When a value is specified, the keystore
parameter appears in the
qualified URL.
Click in the Java KeyStore Password field and specify the password required to extract information from the Java keystore.
When a value is specified, the keystore_passwd
parameter appears
in the qualified URL.
Click in the Browse and Select Java Truststore File field and specify the name of the Java truststore. You can click the button for this field to locate and select the Java truststore file using a Choose a File panel.
Note:
The Trim File Path checkbox, when
checked, will trim off the path if you specify a fully qualified path and file
name.
When a value is specified, the truststore
parameter appears in
the qualified URL.
Click in the Java TrustStore Password field and specify the password required to extract information from the Java truststore.
When a value is specified, the truststore_passwd
parameter
appears in the qualified URL.
Select the version of SSL that should be used by selecting one from the drop-down list provided for the Version field. The default is "TLSv1".
When a value other than "TLSv1"
is specified, the version
parameter appears in the
qualified URL.
Specify the certificate processing level by selecting one from the drop-down list provided for the Verification Level field. The default is "0".
For Java applications, valid values are:
0 (No peer verification occurs. This is the default
value.)
1 (The application requests that the peer certificate
be verified.)
2 (The application requests that the peer certificate
be verified. A fatal condition occurs if there is no certificate.)
Values 4 and 8 are not valid for Java.
When a value is specified, the verify
parameter appears in the
qualified URL.
Click OK.
The JSSE parameters for the qualified URL are set.
Using SMH, you can set or alter the values of the OpenSSL security
VERSION, VERIFY,
RANDOM_FILE, CAPATH,
CAFILE, CERT_FILE,
KEY_FILE, and CERT_PASSWD
parameters for a qualified URL. These parameters
control:
The SSL version that should be used for the SSL connection
The verification processing level for the SSL connection
The random file to use for the SSL connection
The path for the Certificate Authority file that stores the trusted CA certificates
The name of the Certificate Authority file that stores the trusted CA certificates
The name of the file containing the participant's certificate
The name of the file containing the server's private key
The password for extracting information from the participant's certificate.
To set the OpenSSL parameters for a qualified URL:
Locate and list the qualified URL you want to change as described in Listing Qualified URLs.
Click on the qualified URL whose reconnect parameters you want to change.
Right-click on the name of the qualifier and select on the resulting drop-down menu.
The Set OpenSSL Parms panel appears in the detail-view frame of SMH.
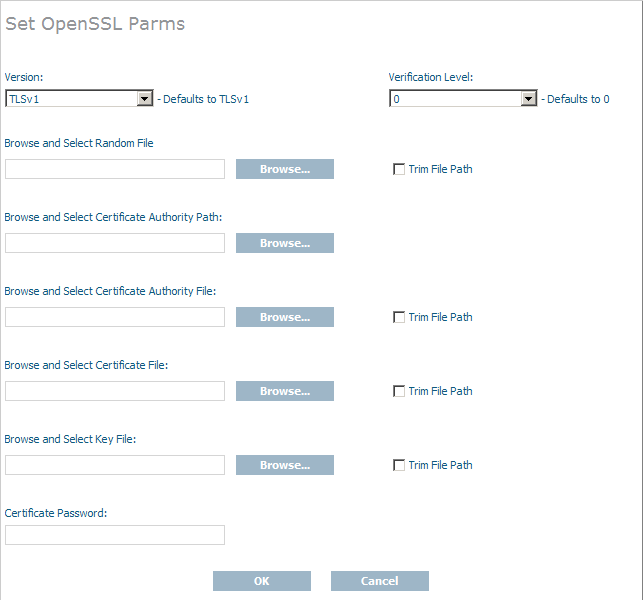
Select the version of SSL that should be used by selecting one from the drop-down list provided for the Version field. The default is "TLSv1".
When a value other than "TLSv1"
is specified, the version
parameter appears in the
qualified URL.
Specify the certificate processing level by selecting one from the drop-down list provided for the Verification Level field. The default is "0".
For C applications, valid values are:
0 (No peer verification occurs. This is the default
value.)
1 (The application requests that the peer certificate
be verified.)
2 (The application requests that the peer certificate
be verified. A fatal condition occurs if there is no certificate.)
4 (The application requests that the peer certificate
be verified only once.)
8 (The application requests that the issuer name is
checked against the host name.)
Values "1", "2", and "4" can be specified simultaneously, but only if you use the Custom Parameter field on the Set Advanced Parms panel.
If no client certificate is available, certification fails.
When a value is specified, the verify
parameter appears in the
qualified URL.
Click in the Browse and Select Random File field and specify the name of the text file to be used by encryption routines to ensure that encryption itself occurs in a random manner. This text file contains at least 14 random characters. You can click the button for this field to locate and select the random text file using a Choose a File panel.
Note:
The Trim File Path checkbox, when
checked, will trim off the path if you specify a fully qualified path and file
name.
When a value is specified, the random_file
parameter appears in
the qualified URL.
Click in the Browse and Select Certificate Authority Path field and specify the path where the Certificate Authority file that stores the trusted CA certificates resides. You can click the button for this field to locate and select the path using a Choose a File panel.
When a value is specified, the capath
parameter appears in the
qualified URL.
Click in the Browse and Select Certificate Authority File field and specify the name of the Certificate Authority file that stores the trusted CA certificates. You can click the button for this field to locate and select the file using a Choose a File panel.
Note:
The Trim File Path checkbox, when
checked, will trim off the path if you specify a fully qualified path and file
name.
When a value is specified, the cafile
parameter appears in the
qualified URL.
Click in the Browse and Select Certificate File field and specify the name of the file containing the participant's certificate. You can click the button for this field to locate and select the file using a Choose a File panel.
Note:
The Trim File Path checkbox, when
checked, will trim off the path if you specify a fully qualified path and file
name.
When a value is specified, the cert_file
parameter appears in
the qualified URL.
Click in the Browse and Select Key File field and specify the name of the file containing the server's private key. You can click the button for this field to locate and select the file using a Choose a File panel.
Note:
The Trim File Path checkbox, when
checked, will trim off the path if you specify a fully qualified path and file
name.
When a value is specified, the key_file
parameter appears in the
qualified URL.
Click in the Certificate Password field and specify the password required to extract information from the certificate file.
When a value is specified, the cert_passwd
parameter appears in
the qualified URL.
Click OK.
The OpenSSL parameters for the qualified URL are set.
Using SMH, you can set or alter the values of the RDA
node, nodename,
charset, and security
parameters for a qualified URL. These parameters
control:
The node ID by which this node is known to a classic Entire Net-Work installation
The node name by which this node is known to a classic Entire Net-Work installation
The character encoding of the classic Entire Net-Work node associated with the URL
The name of a security file containing a list of IP addresses authorized to access this protocol..
To set the RDA parameters for a qualified URL:
Locate and list the qualified URL you want to change as described in Listing Qualified URLs.
Click on the qualified URL whose reconnect parameters you want to change.
Right-click on the name of the qualifier and select on the resulting drop-down menu.
The Set RDA-MHDR Parms panel appears in the detail-view frame of SMH.
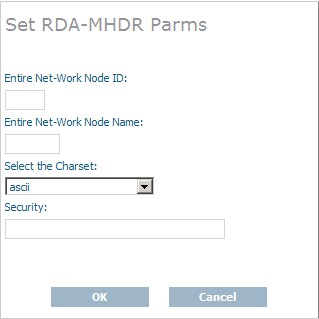
Specify the node ID by which this node is known to a classic Entire Net-Work installation in the Entire Net-Work Node ID field.
When a value is specified for this field, the
node
parameter appears in the qualified URL.
The name of a security file containing a list of IP addresses authorized to access this protocol..
Specify the node name by which this node is known to a classic Entire Net-Work installation in the Entire Net-Work Node Name field.
When a value is specified for this field, the
nodename
parameter appears in the
qualified URL.
Specify the character encoding of the classic Entire Net-Work node associated with the URL in the Select the Charset field.
When a value is specified for this field, the
charset
parameter appears in the
qualified URL.
Specify the name of a security file containing a list of IP addresses authorized to access this protocol in the Security field.
When a value is specified for this field, the
security
parameter appears in the
qualified URL.
Click OK.
The RDA-MHDR parameters for the qualified URL are set.
Using SMH, you can change the protocol, host name, host IP address, port, or alternate ports for a qualified URL.
To change these values for a qualified URL:
Locate and list the qualified URL you want to change as described in Listing Qualified URLs.
Click on the qualified URL whose reconnect parameters you want to change.
Right-click on the name of the qualifier and select on the resulting drop-down menu.
The Set Protocol, Host, and Port Values panel appears in the detail-view frame of SMH.
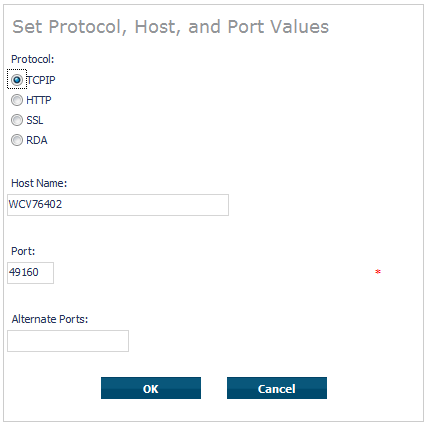
Click on the appropriate protocol checkbox in the Protocol field. In most cases, the protocol will be TCPIP. For a complete description of these protocols, read Protocols.
Specify the host name of the middleware in the Host Name field. This is the Entire Net-Work version 7 or ADATCP host name.
Note:
Host names are case-sensitive in SMH.
Or:
Specify an IP address as an alternative to a host name. We do
not recommend specifying IP addresses instead of host names as the IP address
may change.
Enter the middleware's listen port into the Port field.
Note:
You can leave the Alternate Ports
field blank, unless you want to enter alternate listen ports.
Click OK.
The protocol, host, and port values for the qualified URL are set.
You can globally change the target type of a target definition using the System Management Hub. When you do this, some of the qualified URLs assigned the target definition are updated with the new target type, as appropriate for the protocol specified in the URL.
To change the target type of a target definition:
Access the Directory Server administration area, as described in The Directory Server Administration Area.
In the tree-view frame of SMH, click and expand the name of the Directory Server containing the target definition you want to modify.
The partitions and targets already defined for that Directory Server are listed in the detail-view frame and under the Directory Server name in the tree-view frame.
Click on the target you want to modify. If the target is in a partition, you must first select the partition and then click on the target.
Right-click on the name of the target and select from the resulting drop-down menu.
The Set Target Type panel appears in the detail-view frame.
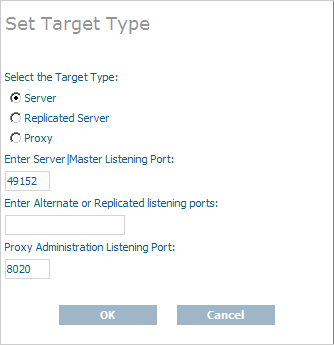
Select the appropriate option in the Select the Target Type area for the target type you want used for the target definition.
The Server option is usually the option you should select.
The Replicated Server option is reserved for future use by Software AG.
The Proxy option is only applicable to configurations requiring a proxy. It is provided for compatibility with Software AG products that still require a proxy. If your Software AG product requires a proxy, refer to the documentation for your Software AG product for information about proxies and how to configure them in SMH.
Optionally, change the listening ports used by the target in the Enter Server/Master Listening Port, Enter Alternate or Replicated listening ports, or Proxy Administration Listening Port fields.
Note:
The Proxy Administration Listening Port
field is only applicable to configurations requiring a proxy. It is provided
for compatibility with Software AG products that still require a proxy. If your
Software AG product requires a proxy, refer to the documentation for your
Software AG product for information about them.
Click .
The target type is changed for the target definition and the qualified URLs of the target definition are updated with the new target type, depending on the protocol specified in each URL.
You can change the name of a target definition using the System Management Hub. When you do this, all of the qualified URLs assigned the target definition are updated with the new name.
To change the name of a target:
Access the Directory Server administration area, as described in The Directory Server Administration Area.
In the tree-view frame of SMH, click and expand the name of the Directory Server containing the target definition you want to modify.
The partitions and targets already defined for that Directory Server are listed in the detail-view frame and under the Directory Server name in the tree-view frame.
Click on the target you want to modify. If the target is in a partition, you must first select the partition and then click on the target.
Right-click on the name of the target and select from the resulting drop-down menu.
The Change Target Name panel appears in the detail-view frame.
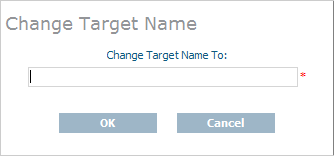
Specify a new target name in the Change Target Name To field.
Note:
Target names are case-sensitive.
Click .
The name of the target definition is changed and all of its qualified URLs are updated with the new name.
You can globally change the host setting of URLs in a target definition using the System Management Hub. For information on doing this, read Changing Hosts.
You can globally change the protocol settings of URLs in a target definition using the System Management Hub.
To change the protocol settings of URLs in a target
definition:
Access the Directory Server administration area, as described in The Directory Server Administration Area.
In the tree-view frame of SMH, click and expand the name of the Directory Server containing the target definition you want to modify.
The partitions and targets already defined for that Directory Server are listed in the detail-view frame and under the Directory Server name in the tree-view frame.
Click on the target you want to modify. If the target is in a partition, you must first select the partition and then click on the target.
Right-click on the name of the target and select from the resulting drop-down menu.
The Change Protocol panel appears in the detail-view frame.
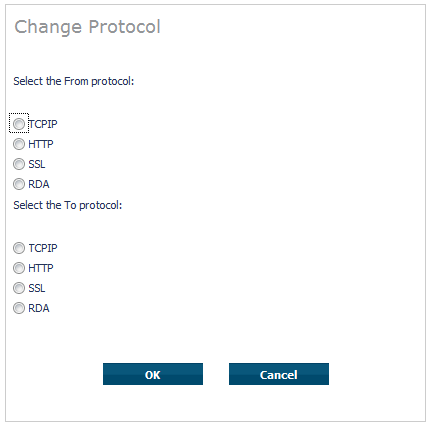
Click on the checkbox in the Select the From protocol area for the protocol you want to change. All URLs for the target definition using this protocol will be changed when these steps are completed.
Click on the checkbox in the Select the To protocol area for the protocol you want to use instead. The URLs using the protocol you specified in the previous step will be changed to use the protocol you select in this step.
Click .
A URLs in the target definition with the protocol selected in the Select the From protocol area are changed to use the protocol selected in the Select the To protocol area.
To delete a target definition:
Access the Directory Server administration area, as described in The Directory Server Administration Area.
In the tree-view frame of SMH, click on the name of the Directory Server containing the the target definition you wish to delete.
The partitions and targets for that Directory Server are listed in the detail-view frame.
Click on the target you wish to delete. If the target is in a partition, you must first select the partition and then click on the target.
Right-click on the name of the target and select from the resulting drop-down menu.
The Delete Target panel appears in the detail-view frame.
Click OK.
The target definition is deleted.