This document describes the functions used for Data Archiving for Adabas administration.
Data Archiving for Adabas services is maintained and monitored using Software AG's cross-product and cross-platform product management framework System Management Hub (SMH). If you are not familiar with using SMH, please refer to the SMH documentation for further information.
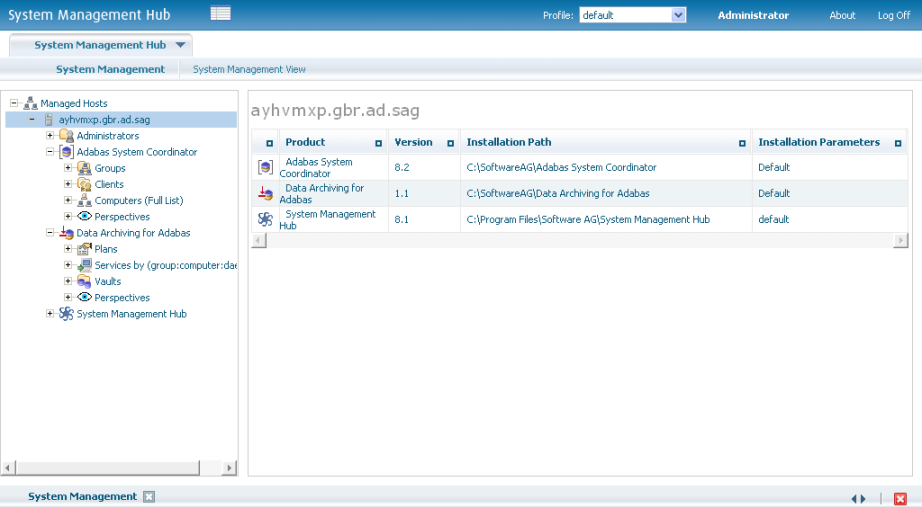
The SMH screen is divided into two frames: the navigation frame on the left; and the content frame on the right. You can navigate within the navigation tree using expand (+) and minimize (-), selecting an object and then left clicking or right clicking on the object depending on the type of operation you wish to perform.
The following is a typical SMH screen:
A vault is a flat-file store which contains all the accumulated archived data taken since the inception of the archive for the whole of one or more archive Plans. More than one vault can be defined (to keep different business areas separate for example) but all parts of a single Plan must use the same vault. In addition, all the paths (for all different computers) to a vault should lead to the same area of the file system. Different paths for the same vault are not meant to point to separate parts of the vault, all must point to the same vault; the different paths allow different computer type syntax to resolve to the same file system area.
![]() To define a new vault:
To define a new vault:
Using the SMH interface, select and then right click Vaults within Data Archiving for Adabas, then select Add Vault. The Add Vault window will appear.
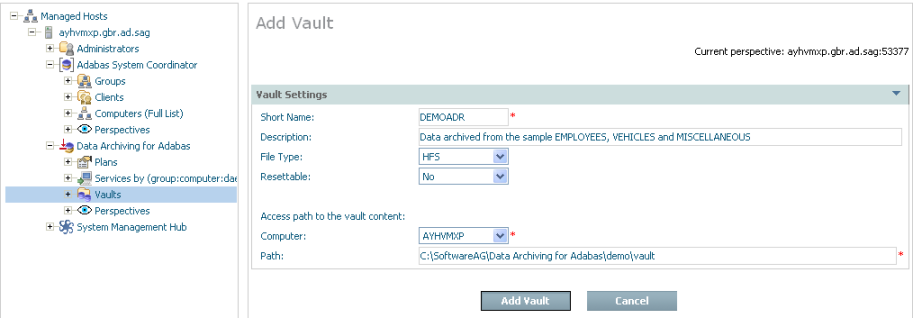
Enter the following information for the new vault:
| Field | Description |
|---|---|
| Short Name | 1-8 characters to be used as the short name for the vault. This is the name that appears in the left-side tree within the browser. |
| Description | A textual description of the vault. |
| File Type | Choose the type of file system used for the vault. |
| Resettable | YES allows the entire vault content to be erased. This is used only in situations where testing is being performed, a real vault would be set to NO. |
| Access paths to the vault content |
Note: |
| Computer | Choose the computer whose path is to be entered below. |
| Path | Type the path to be used by the archive software to access the vault in the computer identified above. |
Select Add Vault to add the new vault.
An archiving plan allows you to bring together the archiving rules that you require for one or more related actions. For example, you may use a plan to define all the archiving that is required for a particular business application, or perhaps a whole business division or department, etc. You decide what you want to put together in one plan. For each action within the plan, you define what the data source is, where it is located, how data is to be extracted from it, when, where it is to be archived, how long the data is to be kept, etc.
![]() To add a new plan:
To add a new plan:
Using the SMH browser interface, select and then right click Plans within Data Archiving for Adabas, then select Add Plan. The Add Plan window will appear.
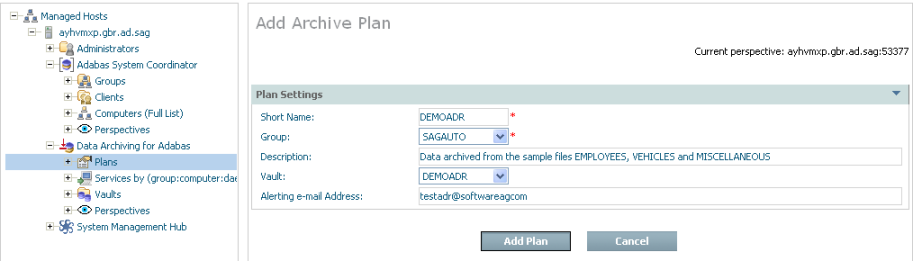
Enter the following information for the new plan:
| Field | Description |
|---|---|
| Short Name | 1-8 characters to be used as the short name for the plan. This is the name that appears in the left-side tree within the browser. |
| Group | The Adabas System Coordinator Group for the plan. The group defines the logical network of computers where all the constituent parts of the plan are found. |
| Description | A textual description of the plan to help people who use the browser to understand the reasons why the plan exists, etc. |
| Vault | The vault which is to be used to store archived data for this plan. One or more of the actions in the plan may use the vault as the destination for archive data, if they do this is the vault that is used for this plan. |
| Alerting e-mail Address | The e-mail address which is to be used to send an alert message in the event that a problem or potential problem has been detected during execution of this plan. |
Select Add Plan to add the new plan.
This section describes how to define the actions for an archive plan:
A plan consists of one or more actions. An action identifies where data is to be acquired from, where it is to go and how it is to get there as well as how it is to look when it gets there.
![]() To add a new action:
To add a new action:
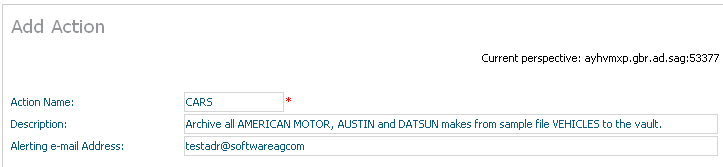
Select and right click on Actions for the plan, then select Add Action. The Add Action window will appear.
Enter the following information for the action:
| Field | Description |
|---|---|
| Action Name | 1-8 characters to be used as the short name for the action in the left-side tree within the browser. This action name must be unique within the plan. |
| Description | A textual description of the action. |
| Alerting e-mail Address | The e-mail address which is to be used to send an alert message in the event that a problem or potential problem has been detected for this action. |
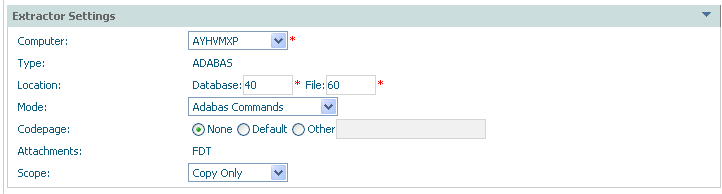
Extractor settings describe where the data is to come from…
| Field | Description |
|---|---|
| Extractor Settings: | |
| Computer | Choose a computer from the list where the Extractor is to run and will find the data. The list of computers comes from the Adabas System Coordinator group (previously defined) that the archive plan uses. |
| Type | Adabas: The data source is an Adabas file. |
| Location | Based upon Type (above) this defines the identification of the data source. For Adabas data this requires a database and file number to locate the data. |
| Codepage |
None: The codepage of the extractor process is used at
runtime. |
| Mode | Adabas commands: The Extractor acquires the
archive data using Adabas commands.
Note: |
| Attachments | The FDT is taken with the data in order to be able to determine the layout of the data source. |
| Scope |
Full archive: The classic archive scope is to
Copy only: The data is only copied to the archive destination; it is not removed from its current location. Delete only: The data is only deleted from its current location; nothing is stored in the archive destination. Simulate (with data or without data): Simulation is used to
|
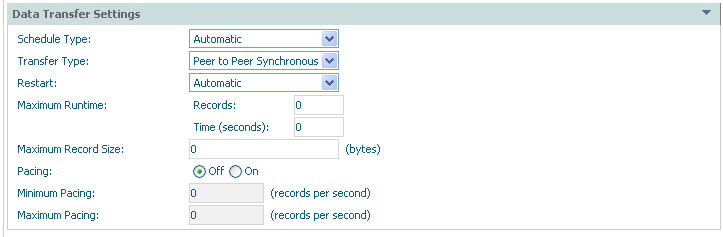
Data transfer settings describe how the data is to be transported…
| Field | Description |
|---|---|
| Data Transfer Settings: | |
| Schedule Type |
Automatic: The archive processing occurs without manual effort, according to the regular schedule you set. When you set this option (and save the changes) a new node appears in the tree called Schedule where you can right-click to modify the details. Manual: You decide when the archive processing takes place by using right-click and choosing run. Ad hoc: The archive processing occurs without manual effort, according to the irregular schedule you set. When you set this option (and save the changes) a new node appears in the tree called Schedule where you can right-click to modify the details. |
| Transfer Type |
Peer to peer synchronous: The Extractor and Accumulator components run at the same time and communicate directly, even across computers. Note: Peer to peer buffered: The Extractor and Accumulator components run at the same time; communicate directly but there is some latency allowed. Queued: The Extractor and Accumulator components run independently. They do not communicate directly; the data is passed by a designated flat-file queue. |
| Restart |
Note: Automatic: Any recoverable failures in the archive process will be handled automatically in order to get to successful completion. Manual: Any recoverable failures in the archive process will cause the operation to stop, pending manual permission to attempt recovery. None: Any failures in the archive process cause the process to stop. |
| Maximum runtime |
When first doing archiving for a particular action there may be many millions of records but not enough time to archive them all. This setting means one archive run can be limited to do as much as it can up to a limit, and no more. Future runs will eventually catch up with what needs to be archived and then eventually the frequency reduced. The runtime can be limited by either time or the number of records processed. |
| Pacing |
ON: indicates the activity level of the Extractor and Accumulator are to be regulated so that a level of service can be maintained according to your requirements. This is accompanied by minimum and/or maximum numbers of records to be processed per second (approximately). Using these settings it is possible to be alerted by e-mail if the level of service cannot be maintained high, or low enough. |
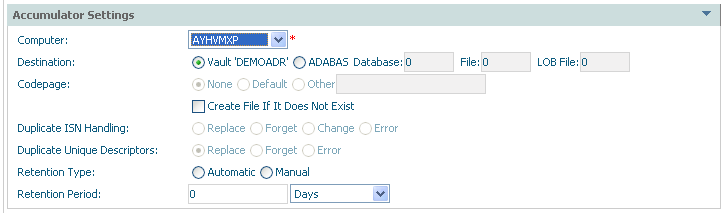
Accumulator settings describe where data is to be sent to…
| Field | Description |
|---|---|
| Accumulator Settings: | |
| Computer |
Choose a computer from the list where the Accumulator will find the data source when it runs. The list of computers comes from the Adabas System Coordinator group that the archive plan uses. Note: |
| Destination |
Vault: The Accumulator will place the extracted data into the vault indicated in the definition of the plan. Adabas: The Accumulator will place the extracted data into the nominated Adabas file. |
| Codepage | Used when destination is a normal Adabas file. Refer to extractor settings for more information. |
| Create (checkbox) | If the destination is a normal Adabas file you can check this box to dynamically create a new file at runtime if you wish. |
| Duplicate ISN handling |
For a normal Adabas file, you can use this settting to control duplicate ISN handling:
Replace: The existing ISN already in the file is
replaced. |
| Duplicate unique descriptor handling |
For a normal Adabas file, you can use this settting to control duplicate unique descriptor handling:
Replace: The existing unique descriptor in the file is
replaced. |
| Retention Type |
Automatic: The archived data will be automatically discarded when the retention period is reached. Manual: Expired archived data must be discarded manually. |
| Retention Period |
Select the length of time archived data is to be kept for Retention Type automatic. |
Select Add Action to add the new action.
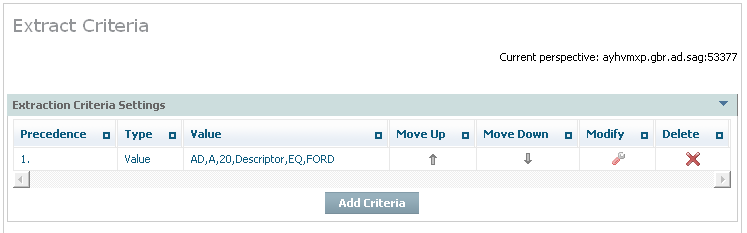
You must specify extraction criteria in order to identify the data to be acquired by the Extractor when it runs, and any filtering criteria that is to be used when the data is extracted and/or accumulated into the destination.
![]() To add extraction and filtering criteria for an action:
To add extraction and filtering criteria for an action:
Select and right click on Extract Criteria for the action. A summary list of any criteria already defined so far will be displayed (up to 8 separate criteria can be defined).
| Field | Description |
|---|---|
| Precedence | The rows are listed in order from row 1 to the last, the extraction criteria is resolved in this order of precedence at runtime. |
| Type | The type of criteria shown in the row. |
| Value | The value of the criteria (dependent upon type) to be extracted. |
| Move up | Select and click to alter the position of the criteria in the order of precedence. |
| Move down | Select and click to alter the position of the criteria in the order of precedence. |
| Modify | Select and click to modify the criteria. |
| Delete | Select and click to delete the criteria. |
To add a new criteria select and click Add Criteria. The following window appears:
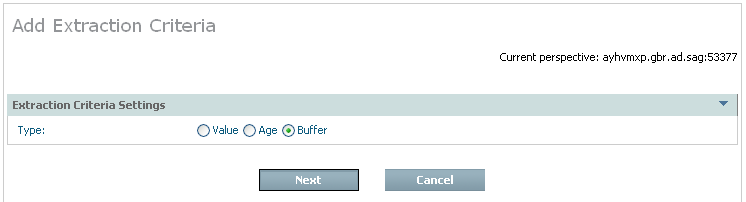
| Field | Description |
|---|---|
| Value | The criteria identify the Adabas field where a date-based age of the data cannot be automatically derived. The Extractor will select data for the Adabas field that matches the criteria to be stated. |
| Age | The criteria identify a specific Adabas field where a date-based age of the data can be derived automatically. The Extractor will select data for the Adabas field by the stated age, according to the defined date pattern (etc) below. |
| Buffer | The criteria identify a Search Buffer and Value Buffer combination. The Extractor will use the criteria as defined. |
Choose the type of criteria that is to be added by selecting the appropriate radio button and also select and click Next.
If you are adding criteria by value the following window appears:
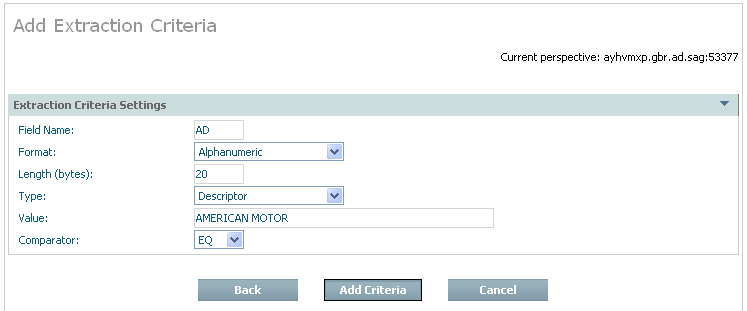
| Field | Description |
|---|---|
| Field name | Identify the short name of the Adabas field. |
| Format | Select the appropriate field format from the selection list. |
| Length (bytes) | Select the appropriate number of bytes for the field/format. For packed fields allow for 2 decimal digits for each byte, except the rightmost byte which must contain one decimal digit and the sign. |
| Type | Choose the appropriate descriptor type for the field. |
| Value | Identify the value for the data to be extracted. |
| Comparator | Choose the selection comparator. |
Enter the required information then select and click Add Criteria.
If you are adding criteria by age the following window appears:
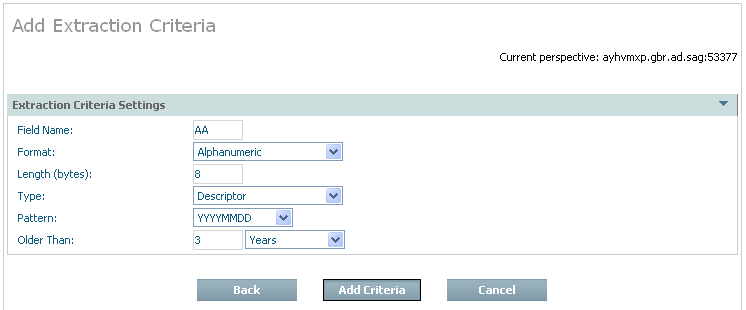
| Field | Description |
|---|---|
| Field name | Identify the short name of the Adabas field. |
| Format | Select the appropriate field format from the selection list. |
| Length (bytes) | Select the appropriate number of bytes for the field/format. For packed fields allow for 2 decimal digits for each byte, and the sign (and one digit) in at least one byte. |
| Type | Choose the appropriate descriptor type for the field. |
| Pattern | Identify the pattern masking for the date selection to be extracted. |
| Records older than | Choose the number to represent the age (not a date). |
| Units (of age) | Choose the units by which the age of the date can be derived. |
Enter the required information then select and click Add Criteria.
If you are adding criteria by buffer the following window appears:

| Field | Description |
|---|---|
| Search Buffer | Enter the exact Search Buffer to be used by the Extractor. |
| Value Buffer | Enter the exact Value Buffer to accompany the Search Buffer, both will be used by the Extractor. |
Enter the required information then select and click Add Criteria.
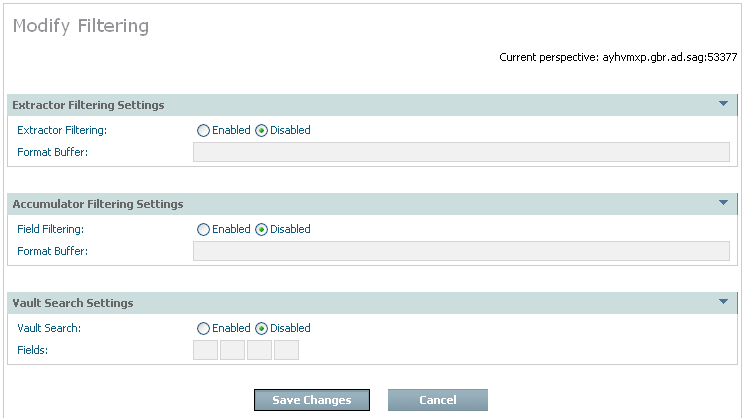
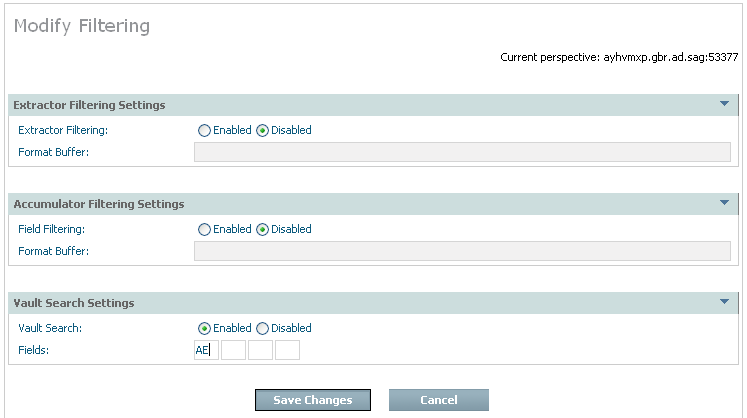
You can also define filtering that is to take place when the data is extracted and/or accumulated into the destination. The default setting for filtering is disabled. If you wish to enable filtering, select and right click the filtering part of the Actions tree; then select modify filtering. The following screen appears:
| Field | Description |
|---|---|
| Extractor filtering settings | |
| Extractor filtering |
Disabled is the normal setting which means the Extractor defaults to taking compressed records from Adabas. Filtering is usually disabled in the Extractor to minimize the impact in Adabas and in the computer where Adabas is running. Enabled allows you to define a precise Format Buffer the Extractor will use. Note: |
| Format Buffer | If Extractor filtering settings are enabled (above) then you must provide a precise Format Buffer to be used by the Extractor. |
| Accumulator filtering settings: | |
| USERISN | If ISNs are to be preserved (in future recall operations) select the radio button for YES. |
| Field filtering |
Enabled is the normal setting which means the Accumulator will perform filtering from the whole (compressed) record. The Accumulator usually does the filtering so the overheads are taken away from where the origin Adabas is running. Disabled means the data will be archived in the form it came from the Extractor. Note: |
| Format Buffer | If Accumulator filtering settings are enabled (above) then you must provide a precise Format Buffer to be used by the Extractor. |
| Vault search fields:
Note: |
|
| Vault search |
Enabled causes the Accumulator to do more filtering to identify the fields that will be made eligible for future searches of the vault content. Disabled searching of the vault content is not permitted for this type of data within the Plan. |
| Fields | Identify up to 8 fields that can be used in searches of the vault content in the future, if necessary. |
Enter the required information then select and click Add Criteria.
When an archive action uses the vault as destination it is possible to search the vault for information. You can also recall specific search results too, rather than the whole of a previous archive action.
Over time there are vast amounts of data stored in archives, usually because the data is no longer productive in a full function database because there is no need to keep massive database indexes to such data. Therefore searching full archives over long periods is a very intensive process. Consequently it is very important to make sure the search fields are carefully planned, and limited to only the most critical of fields, otherwise overheads of archive searches (and other processing) will be too expensive.
![]() To recall one (or more) complete archiving runs for an Action:
To recall one (or more) complete archiving runs for an Action:
When defining the action you must carefully choose which fields can be searched (now and in the future) making sure this is absolutely minimized. Please note that once a minimal search is done through the archive, the results can be recalled back to Adabas for further detailed processing. The following image shows the search field AE being enabled in the filtering node (as described earlier):
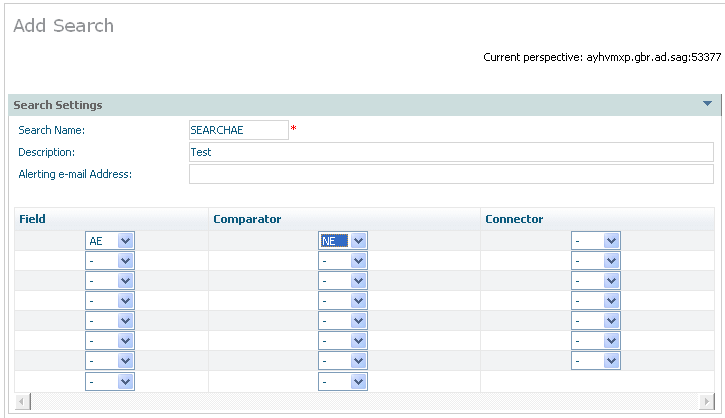
A search can be defined via the right click Add
Search command on the search node. The example below shows a
search for AE that is to be for a not equal comparison:
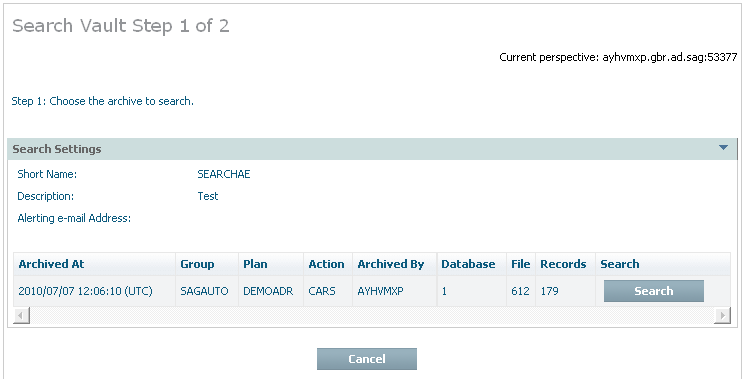
Once the action is set up then any time after archive actions have run (manually or automatically) you can right click on a search to run it. You will see a list of all the archive actions that have run as stage 1 of 2. Select the one that you wish to search, see below:
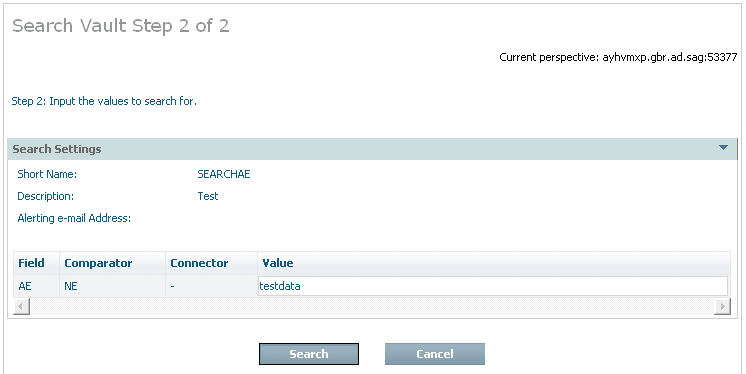
Having chosen which archive run you wish to search, you must now enter the values for which you wish to search, and then click search to submit the search. See below:
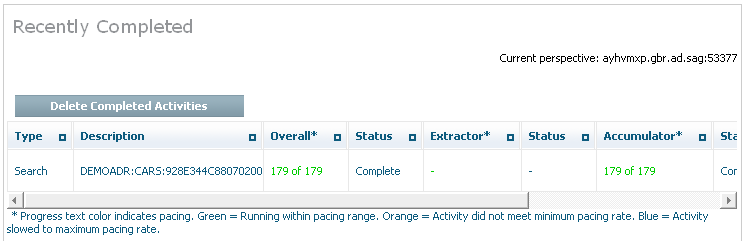
When you confirm the search is to run you can then watch the search running in the activity monitor. Below you can see the activity monitor showing a completed search:
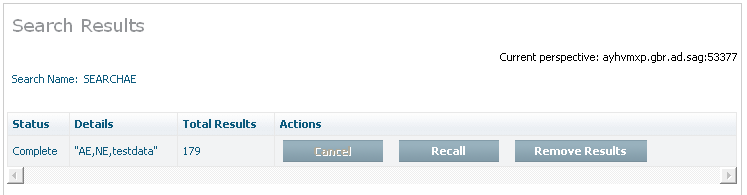
You can look back at completed searches, and either remove them or choose to recall them back to Adabas. Here is an example:
Note:
Recall is used for data previously archived to the vault destination
only. There is no specific recall when the destination for an archive operation
is a normal Adabas file. The reason is that when a normal Adabas file is the
destination there is no chance for the software to store all the meta-data
normally stored into the vault. If you wish to copy data back from an Adabas
file where you previously passed data you must define an Action to extract data
from the Adabas file where the data was sent, sending it to another destination
(potentially back to the original file).
You can recall one or more of the complete archive runs back to an Adabas file at any time.
![]() To recall one (or more) complete archiving runs for an Action:
To recall one (or more) complete archiving runs for an Action:
Select and left click a specific Action from the plan in order to expose the Action’s inner tree. Then select and left click the Recall part of the tree. The following window will appear.
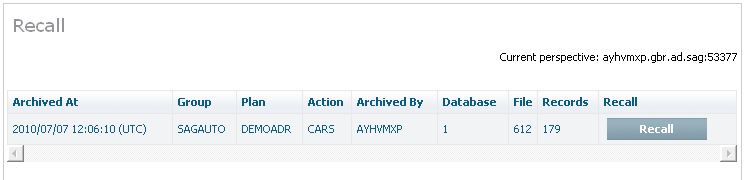
The following information is displayed:
| Column | Description |
|---|---|
| Archived at | The occasion when the data operation took place. |
| Group | The name of the group for the plan. |
| Plan | The name of the Plan. |
| Action | The name of the Action. |
| Archived by | The computer where the accumulation took place. |
| Database | The Adabas database number. |
| File | The Adabas file number. |
| Size | The amount of data involved. |
| Recall | Check the rows from which you wish to recall the whole runs. |
Note:
This feature is not yet
implemented.
Validation of the vault is aimed at protecting information previously stored in the vault over a long period; it operates asynchronously to normal archive operations not directly with them.
There are studies that show the vast majority of archived data is never used again. This does not mean the data doesn’t need to be archived because there are legal reasons, customer care reasons and basic just-in-case reasons why archiving is an important part of the information lifecycle.
If archived data has a tendency to lie unused for very long periods then it is likely to have been migrated out of the main (disk) storage area network into other types of media (tape, CD, DVD, etc.). This is especially likely considering archives are built up over many years, even decades. Consequently, in the end the main system has a catalog of the data it owns without necessarily having immediate access to all of it instantly. What tends to happen is that data that is referenced after a long period is dynamically migrated back into the storage area network so it can then be used (on a delay of varying length).
This means it is possible that the media used to store archives that have not been referenced for long periods could be lost, damaged, etc without the main system becoming aware of it. Consequently, if such a loss takes place it may be that several years later that particular part of the archive is needed (for important reasons) but only when it is referenced do you find that it was lost, potentially many years ago and so is unrecoverable.
Data Archiving for Adabas provides a way to detect whether archived data becomes unusable for any reason. You decide how often this detection (validation) takes place based upon how far back you feel comfortable trusting the ability of your systems to recover lost media (from alternate back-up sites etc.).
You may choose the validation is to run continuously, constantly scanning the entire archive making sure all the data is reachable. Or, you may choose to run the validation automatically on a regular schedule. And of course you can run the validation manually at anytime.
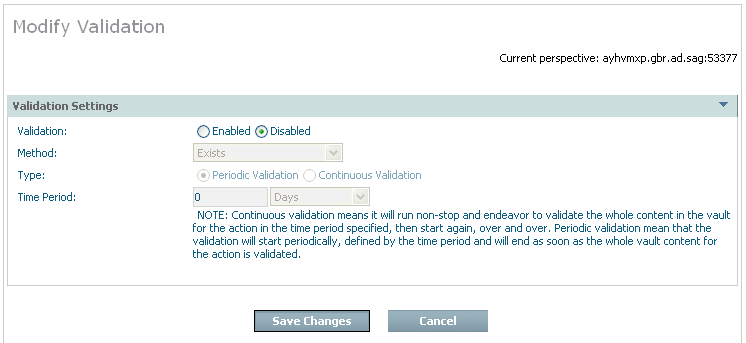
Validation can only be used for data archived to the vault. For these Actions a validation node appears in the tree, and when you right-click it you are able to modify the settings:
| Field | Description |
|---|---|
| Validation settings | |
| Validation |
Disabled is the normal setting which means there is no validation. Enabled allows you to define the validation you require… |
| Method |
There are levels of processing overhead that can be undertaken to validate each part of the archive entries.
|
| Type |
Periodic: Validation is to run periodically according to a schedule. Continuous: Validation is to run continuously, when it gets to the end it starts all over again. |
| Time period | This setting operates differently depending on whether validation is periodic or continuous (see above). It basically covers how fast one complete scan of the whole archive should take (approximately). This governs the pace at which it will run based upon the amount of data that is in the archive. |
Old data can be automatically discarded from the archive vault (see retention type and retention period). When you choose automatic expiration an expiry process will be automatically launched at various times. You will see these appear in the activity monitor screens from time to time. Most of the time it is likely (in new systems) that there is no data that is old enough to be expired, so nothing will happen apart from seeing the activity recorded in the activity monitor. But where data is actually discarded a note will be logged in the archive history to record an audit record for the expiry.
This section describes how to view the history of archive activity in the vault.
![]() To view the history for an archiving plan’s action:
To view the history for an archiving plan’s action:
Select and left click a specific Action from the plan to expose the inner tree. Then select and left click the History part of the tree. The following window will appear.
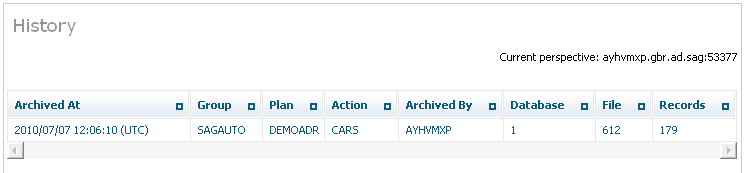
The following is displayed:
| Column | Description |
|---|---|
| Archived at | The occasion when the data operation took place. |
| Group | The name of the group for the plan. |
| Plan | The name of the Plan. |
| Action | The name of the Action. |
| Archived by | The computer where the accumulation took place. |
| Database | The Adabas database number. |
| File | The Adabas file number. |
| Size | The amount of data involved. |
The Archiving Services and Activities can be monitored from the browser.
![]() To monitor the archiving services:
To monitor the archiving services:
Using the SMH interface, select and then right click Services within Data Archiving for Adabas, then select the Group for which you wish to montior the services. The following window will appear.
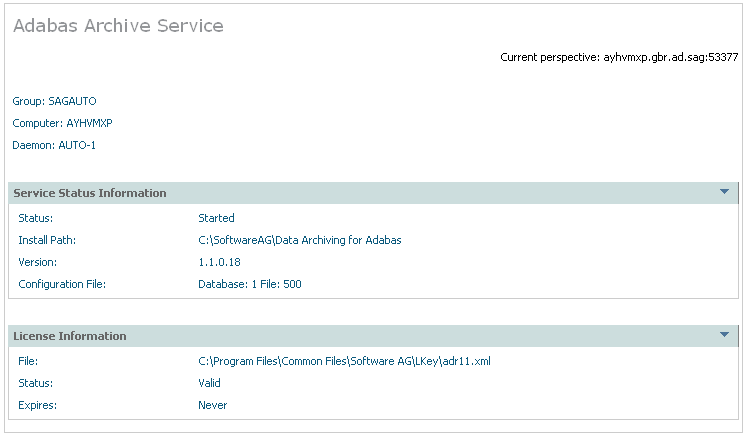
The following information will be displayed:
| Field | Description |
|---|---|
| Group/Computer/Member | The name of the group, computer and member for which status information is being provided. |
| Service Status Information | |
| Status | Indicates whether or not the service has been started. |
| Install Path | The install path used defined for this service. |
| Version | Version number. |
| Configuration File | The Adabas data base and file number used for the configuration file for this service. |
| Service Settings | |
| Queue Location | Queue location. |
![]() To monitor the current activities for a service:
To monitor the current activities for a service:
Select Activities for a service. The following information will be displayed:
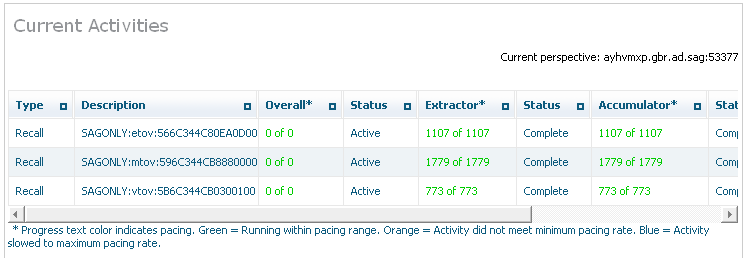
| Column | Description |
|---|---|
| Type | The type of activity that is listed. This could be an extractor, accumulator, recall, etc. |
| Description | The name of the group, plan, action, etc.
Note: |
| Overall | Overall progress, in the case where there may be more than one component collaborating. |
| Status | The overall status of the activity. |
| Extractor | Progress of the first of two components (or the only one). |
| Status | The status of the activity. |
| Accumulator | Progress of the second of two components. |
| Status | The status of the activity. |
| Started | Time started. |
| Detail | Click for further information. |
| Cancel | Kill the operation. |