
This document covers the following topics:
Adabas provides a powerful and flexible set of commands to perform database operations.
This section provides an overview of the Adabas commands.
The commands have been categorized by function:
The S1, S2 and S4 commands are used to perform database query. The S8 and S9 commands perform special processing of ISN lists resulting from a database query.
The S1/S4 command selects a set of records which satisfy given search criteria. The search criteria may be constructed using a single field/derived descriptor or several field/derived descriptors connected by logical operators.
Adabas returns, as a result of an S1/S4 command, the number of records which satisfy the search criteria, and a list of the ISNs of the selected records.
An option is available which permits the record identified by the first ISN in the resulting ISN list to be read from Data Storage.
The S4 command may be used to place the record identified by the first ISN in the ISN list in hold status. This prevents another user from updating the record until it is released.
The S2 command is similar to the S1 command, but the ISNs of the records selected are returned in the sort sequence of the user-specified search criteria. Also, the search criteria can specify non-descriptor fields. Ascending or descending sequence may be specified.
The S8 command performs logical operations on two ISN lists previously created by an S1/S4, S8 or S9 command.
The logical operations AND, OR, and NOT are permitted.
AND results in an ISN list containing ISNs that are present in both ISN lists.
OR results in an ISN list containing ISNs that are present in either ISN list.
NOT results in an ISN list containing ISNs that are present in the first list but not in the second list.
The S9 command sorts an ISN list created previously by a S1/S4, S2, S8 or S9 command.
The ISN list may be sorted by ascending ISN sequence, or by one to three user-specified fields (ascending or descending sequence).
The ISN lists resulting from any Sx command may be saved on the Adabas temporary working space for later retrieval during the user session.
The L1-L6 commands are used to read records from Data Storage.
The L1 command reads a single record from Data Storage.The user specifies the file number, ISN of the record to be read and the fields for which values are to be returned. Adabas returns the requested field values in the desired format.
The L4 command is the same as the L1 command, except that the record is placed in hold status. This prevents other users from updating the record until it is released.
The GET NEXT option may be used to read one or more records identified by ISNs contained in an ISN list without the user having to specify each ISN.
The READ ISN SEQUENCE option may be used to read records in ISN sequence. The record with the ISN specified by the user is read, unless it is not present, in which case the record which has the next-highest ISN is read.
The L2 command reads the records from a file in the sequence in which they are physically stored in Data Storage. The user specifies the file to be read and the fields for which values are to be returned. Adabas returns the requested field values.
The L5 command is the same as the L2 command, except that the record read is placed in hold status. This prevents other users from updating the record until it is released.
The L3 command reads records from Data Storage in the logical sequence of a user-specified descriptor. The user specifies the file to be read, the descriptor to be used for sequence control, the value(s) at which the command is to begin and/or end and the fields for which values are to be returned. The records are returned in ascending or descending sequence of the specified descriptor's values.
The L6 command is the same as the L3 command, except that the record read is placed in hold status. This prevents other users from updating the record until it is released.
The L9 and LF commands read information directly from the Associator.
The L9 command returns each value contained in the inverted list for a given descriptor and the number of records in which the value is contained.
The user specifies the file and descriptor for which values are to be returned and the value(s) at which the command is to begin and/or end.
The values are returned in ascending or descending sequence.
The LF command returns the field definitions for a file.
The user specifies the file for which the field definitions are to be returned.
The field definitions for all the fields in the file are returned. Each field definition consists of the field name, level number, standard format, standard length and definition options.
The A1, E1 and N1/N2 commands are used to modify the database. The record to be modified with A1 or to be deleted with E1 must be held before the modification or deletion can be performed.
The A1 command updates the contents of one or more fields within a record. The user specifies the file and the ISN of the record to be updated, together with the fields to be updated and the values to be used for updating.
Adabas performs all necessary modifications to the Associator and Data Storage. Associator updating is required only if one or more descriptors are updated.
The E1 command deletes a record. The user specifies the file and ISN of the record to be deleted.
Adabas performs all necessary modifications to the Associator and Data Storage.
The N1/N2 command adds a new record to a file. The user specifies the file to which the record is to be added together with the fields and field values to be used.
Adabas performs all necessary modifications to the Associator and Data Storage.
If the N1 command is used, the ISN for the new record is assigned by Adabas. If N2 is used, the ISN is provided by the user.
The BT, ET and RE commands are used for logical transaction processing. The primary purpose of using logical transaction commands is to permit a user restart beginning after the last successfully processed transaction in the event of an abnormal termination of the user or Adabas. The concept of subtransactions allows you to back out a unit of work within the current transaction, which is not the complete transaction.
The BT command backs out the current transaction or one or more subtransactions being processed.
All modifications resulting from updates, add and delete records performed during the transaction are removed, and all records placed in hold status during the transaction are released.
The ET command indicates the end of the current transaction or subtransaction.
An ET command causes Adabas to physically store all data protection information related to the transaction. This information is used to apply all the updates performed during the transaction at the start of the next Adabas session if the current session is terminated before these updates are physically applied to the database.
The ET command releases all the records which have been placed in hold status during the transaction.
The ET command may be used to store user data in an Adabas system file. This data may be retrieved with an OP or RE command and may be used in conjunction with a user restart.
The RE command reads user data previously stored in an Adabas system file with a CL or ET command.
The C1 command is used for user or Adabas checkpointing.
The C1 command causes a checkpoint to be taken.
The C1 command results in the physical writing of all current data protection information to the data protection log, and the writing of a checkpoint entry to the data protection log and the system checkpoint file. This checkpoint entry may be needed as a reference point for subsequent removal or reapplication of updates.
The CL command terminates a user session.
The CL command results in the physical writing of all current data protection information to the data protection log; the release of all records currently in hold status for the user; the release of all the command IDs (and corresponding ISN lists) currently assigned to the user and the storage of user data in an Adabas system file (optional).
The C5 command writes user data to the Adabas protection log.
The HI command places a record in hold status. The user specifies the file and ISN of the record to be placed in hold status.
A record placed in hold status cannot be updated by another user until it is released.
The MC command groups other Adabas commands together as subcalls in a single multi-call.
The MC command is only allowed with the ACB interface. If MC commands are performed with the ACBX interface, the result is undefined - this behaviour may be changed in one of the following update packages.
The OP command indicates the beginning of a user session. An OP command is required for:
Users performing exclusive control updating;
Access-only users;
Users who wish to store user data in an Adabas system file for retrieval during a subsequent session;
Users who are restricted to a subset of files in the database;
Users who want to use subtransactions.
The RC command releases a command ID (or all command IDs) currently active for the user.
The RI command releases a record from hold status if it was not updated.
The user specifies the file and ISN of the record to be released. The user may also request that all records currently held by the user are to be released, provided that none of the records was updated.
Depending on the type of file access and update performed by the user, Adabas recognizes several user types:
Access-only user (user type "AC")
ET logic user (user type "ET")
Exclusive control user (user type "EX")
Exclusive control user with ET logic (user type "EX, ET")
Utility user (user type "UT")
An access-only user makes read-only accesses to files. Such a user may not issue hold, update, delete, add record, ET or BT commands.
Note:
Although shared locks may also seem to be useful for users who
only want to read data, shared locks also require transactions, which are only
supported for ET users. Therefore, L4-6 commands and S4 commands, which place
records in shared or exclusive hold status are generally not allowed for
access-only users: access-only users can only perform dirty-read operations.
A user becomes an access-only user for the current session by issuing an OP command with only the ACC parameter specified in the record buffer (see the OP command for more details).
Access-only users are identified in the ADAOPR DISPLAY=UQ display by "AC" in the Type column.
An ET logic user uses transaction logic for the current session (see the section Logical Transaction Processing for further details). This means that all records that are updated during the course of a transaction must be kept in hold status. The transaction must end with an ET, BT or CL command, otherwise the whole transaction is backed out after the corresponding transaction duration time limit (TT) is exceeded (see the section Time Limits for further details).
An ET logic user can be at ET status or not. Being at ET status means that no record is held by this user.
A user becomes an ET logic user in each of the following cases (see the OP command for more details):
by issuing an OP command with the UPD parameter specified in the record buffer.
by starting the session without an OP command (implicit OP command).
ET logic users are identified in the ADAOPR DISPLAY=UQ display by "ET" in the Type column.
An exclusive control user opens a file for reading or updating, and access to the file by other users is either restricted to read-only, or is prevented altogether while the exclusive control user session is active.
In addition to preventing competitive access or updating, exclusive control may be used to simplify recovery procedures, in that the file(s) may be restored regardless of other user activity.
There are two types of file access for an exclusive control user:
Exclusive file updating: A file is opened for updating. Other users can read but not update the file. A user becomes an exclusive control user with exclusive file updating for the current session by issuing an OP command with the EXU parameter specified in the record buffer (see the OP command for more details).
Exclusive file open: A file is opened for updating. Other users can neither read nor update the file. A user becomes an exclusive control user with exclusive file open for the current session by issuing an OP command with the EXF parameter specified in the record buffer (see the OP command for more details).
In general, exclusive control user sessions do not use transaction logic (see however the following section on exclusive control users with ET logic). They write an OPEN checkpoint at the start of the session and a CLSE checkpoint at the end of the session.
The decision whether to use record hold commands depends not only on the open mode of the current file but also on the user type. An exclusive user working with ET logic must keep all records in hold before they can be modified, in the same way as for real transaction processing, regardless of whether the file is opened in an exclusive update mode or not. Only an exclusive control user without ET logic can update records without ISN hold logic in files opened for exclusive use.
An exclusive control user cannot add an update file to its file list. This is, however, possible for an exclusive control user with ET logic (see the next section for further information).
Users performing exclusive control may use the C1 command to request a checkpoint to be written. This checkpoint may be subsequently used as a reference point to remove updates which have been applied after the checkpoint, or to re–apply the updates that were applied before the checkpoint.
Exclusive control users are identified in the ADAOPR DISPLAY=UQ display by "EX" in the Type column.
This applies when an exclusive control user wishes to use transaction logic for the current session. This means that all updates to a file are performed with transaction logic, even though the user has exclusive update access to the file. The OPEN and CLSE checkpoints are written at the beginning and end of the session, in the same way as for an exclusive control user.
An exclusive user working with ET logic must keep all records in hold before they can be modified, in the same way as for real transaction processing, regardless of whether the file is opened in an exclusive update mode or not.
A user becomes an exclusive control user with ET logic in each of the following cases (see the OP command for more details):
The user issues an OP command, specifying in the record buffer either exclusive file updating (EXU) or exclusive file open (EXF), as well as concurrent file updating (UPD).
The user issues an ET command in an exclusive control user session.
An exclusive control user with ET logic can add an update file to its file list. This is not possible for an exclusive control user without ET logic.
Users performing exclusive control may use the C1 command to request a checkpoint to be written. This checkpoint may be subsequently used as a reference point to remove updates which have been applied after the checkpoint, or to reapply the updates that were applied before the checkpoint.
Exclusive control users with ET logic are identified in the ADAOPR DISPLAY=UQ display by "EX,ET" in the Type column.
A utility user is defined if the session is started by an Adabas utility.
Utility users are identified in the ADAOPR DISPLAY=UQ display by "UT" in the Type column.
This section describes the Adabas facilities used to ensure data integrity in a competitive updating environment.
Competitive database access is in effect when two or more users are accessing the same Adabas file(s). Adabas addresses the following integrity problems that can come up in such a situation:
Update transactions - it must not happen that updates are lost as a result of two users updating the same record at the same time.
Read transactions - it must not happen that the records found by a search transaction are not consistent as a result of several records being updated in the same transaction; then you could see some records in the state before the update and some records in the state after the update.
Acquiring and releasing shared and exclusive locks, resource interlock and exclusive control updating, are presented in this section.
For this purpose Adabas supports shared or read (S) locks and exclusive or write (X) locks of records:
A user can only get a shared lock for a record if no other user has an exclusive lock for the record or is waiting for an exclusive lock for the record. More than one user can have a shared lock for the same record at the same time. Acquiring a shared lock for a record is also called placing a record in shared hold status.
A user can only get an exclusive lock for a record if no other user has a shared lock or an exclusive lock for the record. Acquiring an exclusive lock for a record is also called placing a record in exclusive hold status.
These locks are not sufficient to fulfil all of the integrity requirements that can be necessary: Adabas first determines which records fulfill a search criterion, but only acquires a lock for the resulting records one after the other. Therefore, it may happen that at the time the records are read, some records may no longer fulfil the search criterion, or other records fulfilling the search criterion may exist before all records have been processed. If using shared and exclusive locks is not sufficient, you can lock the complete file for updates.
A record is locked by using the FIND WITH HOLD command (S4), READ WITH HOLD commands (L4, L5, L6), or a HOLD ISN (HI) command. An N1/N2 command issued by an ET Logic user also puts the record being added in exclusive hold status. A1 commands with an appropriate option and E1 commands can also cause a record to be exclusively locked.
The successful completion of any of these commands results in the record (ISN) being shared or exclusively locked. If this is not possible, because the record is already locked by another user, the user issuing the record hold command is placed in a wait status until the record becomes available, at which time Adabas automatically reactivates the command.
If the return option is used with any of the record hold commands and the record to be held is held by another user, Adabas returns response code 145 instead of placing the user in a wait status.
A user who issues a FIND (S1) or READ (L1, L2, L3) command is able to read the record regardless of the fact that the record is locked for another user (so-called dirty read).
You can specify a given lock type by specifying the appropriate command option 3 for the commands HI, L4, L5, L6 and S4 (see table below). If the lock cannot be granted, Adabas does the following:
If the Adabas command was issued with the return option, Adabas returns response code 145;
If Adabas detects a deadlock situation, it returns response code 9 and rolls back the transaction to resolve the deadlock situation;
Otherwise Adabas suspends the command execution until either the requested locking mode can be granted or the transaction time limit is exceeded.
The return option is specified in command option 1, which is also used to specify whether the multifetch option is used. The following table shows the mapping between command option 1 and multifetch option and return option:
| Command Option 1 | Multifetch Option | Return Option |
|---|---|---|
| M | Yes | No |
| O | Yes | Yes |
| R | No | Yes |
| Blank | No | No |
The lock type is specified with command option 3. This command option also specifies when a shared lock is released again. The following table shows the usage of command option 3:
| Command Option 3 | Lock Type | Time When Lock Is Released |
|---|---|---|
| Blank | X |
|
| C (not for HI) | S |
|
| Q (not with multifetch, L4 only with command option 2 = N, S4 only with non-blank, non-zero CID and ISN buffer length 4, not for HI) | S |
|
| S | S |
|
Notes:
A user may update/delete any record in exclusive hold status for that user by issuing an A1 or E1 command.
An A1 command will only be executed if the record is in exclusive hold status or the H, R, L, T or ' option was specified. If none of these options is used, and the record is not in hold status, response code 144 is returned. If the record is currently locked by another user and the R or U option is used, response code 145 is returned. If the record is currently locked by another user and the H or L option is used, the A1 command waits until the record is available again. If a deadlock is detected, response code 9 is returned.
For more information on using the T option with the A1 command, please refer tp Programming Considerations, System Generated Fields.
If an E1 command is issued for a record which is not in hold status for the user, Adabas will place the record in hold status for the user provided that the record is not in hold status for another user. If the record is currently locked by another user and the R option is used, response code 145 is returned. If the R option is not available, the E1 command waits until the record becomes available again. If a deadlock is detected, response code 9 is returned.
If a user does not place a record to be deleted in hold status when he reads the record before issuing the E1 command, there is no guarantee that the record will not be updated or deleted by another user before the E1 command is executed.
Response code 9 is returned when Adabas detects a deadlock situation and performs a backout transaction to resolve the deadlock.
Response code 47 is returned if the user has reached the maximum number of held records allowed for one user (NISNHQ parameter of ADANUC and ADAOPR).
Response code 144 is returned when an A1 command is issued and the record is not in hold status for the user.
Response code 145 is returned if any of the following conditions arise:
A command is issued which requires a record to be placed in hold status, the record is already held by another user and the return option (command option 1 field = R) was specified with the command. In this case, the value 0 is returned in the Additions 2 field;
An A1, E1 or N1/N2 command was issued and there was no available entry in the hold queue for the record. In this case, the hexadecimal value FFFFFFFF is returned in the Additions 2 field.
ET, BT, CL or OP commands, which commit or roll back a transaction, release the locks for all records locked by the user; for ET and BT it is also possible to keep the lock for a subset of the records.
The lock for a single record can also be released with the RI command. However the lock will not be released if the record has been updated in the current transaction.
The following example shows how commands must wait because of record hold logic:
     USER 1                 USER 2                           USER 3

     S4 with CO3=S:
     Find ISN 1 and 2
     Shared lock for ISN 1
     Read ISN 1

                            S4 with CO3=C:
                            Find ISN 1 and 2
                            Shared lock for ISN 1
                            Read ISN 1
                            Release shared lock for ISN 1

                                                            S4 with CO3=blank:
                                                            Find ISN 1 and 2
     L4 with CO3=S:                                         Wait for ISN 1
     Shared Lock for ISN 2                                  ¦
     Read next ISN 2                                        ¦
                                                            ¦
     L4 with CO3=S:                                         ¦
     EOF                                                    ¦
                                                            ¦
     ET:                                                    ¦
     Release ISNs 1 and 2                                   V
                                                            Exclusive lock for ISN 1
                                                            Read ISN 1

                                                            A1:
                                                            Update ISN 1

                                                            L4 with CO3=blank:
                                                            Exclusive lock for ISN 2
                                                            Read ISN 2

                           L4 with CO3=C:
                           Wait for next ISN 2
                           ¦                                A1:
                           ¦                                Update ISN 2
                           ¦
                           ¦                                ET:
                           ¦                                Commit updates
                           ¦                                Release ISNs 1 and 2
                           V
                           Read ISN 2

                           L4 with CO3=C:
                           EOF
A record lock can be upgraded from shared to exclusive by using the same commands that acquire an exclusive lock for a record that is not yet locked in any way.
A record lock can be downgraded from exclusive to shared by an RI command with command option 3 = S, but only if the record has not been updated in the current transaction.
Normally when a transaction is committed or rolled back, all records locked for this transaction are released from hold status. However, it is also possible to keep some or all of the records in hold status:
If you specify an ET or BT command with command option 1 = M, only the records specified in the ISN buffer are released from hold status. The remaining locks for the user remain unchanged.
If you specify an ET or BT command with command option 3 = H, all records locked by the user remain in hold status, but exclusive locks are downgraded to shared locks.
The concept of subtransactions allows you to back out a unit of work within the current transaction, which is not the complete transaction. In Adabas, subtransactions include the delay of uniqueness checks and referential integrity checks until the end of a subtransaction.
A user session is enabled for subtransactions by an OP command with the S option. This OP command starts the first subtransaction:
A subsequent ET command with the S option terminates the current subtransaction and starts a new subtransaction. A savepoint is defined; a savepoint means that you subsequently can back out all updates in the database performed after this savepoint. Each savepoint has a savepoint ID, which is returned in the command ID field in the Adabas control block for an ET command with S option. The start of a transaction always gets the savepoint ID 0. Usually the savepoint ID is incremented by 1 at the start of a new subtransaction, but the savepoint ID can remain unchanged if there were no locking or update activities in the previous subtransaction.
A subsequent BT command with the S option backs out all updates performed after the savepoint which is specified in this BT command.
Note:
If you performed an RI command in a subtransaction that is
rolled back, the lock for the record remains lost. This is necessary since
other users may have locked the record in the meantime. If the lock for an ISN
is still required in the case of a backout subtransaction, you must not perform
an RI command for this ISN.
A subsequent BT command without the S option backs out the current complete transaction and also starts a new subtransaction.
A subsequent ET command without the S option commits the current complete transaction and also starts a new subtransaction.
This example assumes the following command sequence:
ET=>CID=7… ET-S=>CID=1… ET-S=>CID=2… BT-S(CID=2)… ET-S=>CID=3… BT-S(CID=1)… ET=>CID=8
Note that there is a semantic difference between the CID returned by an end of transaction and the CID returned by an end of subtransaction:
An end of transaction returns the transaction sequence number of the committed transaction.
An end of subtransaction returns the current savepoint ID. The savepoint at the start of the first subtransaction always gets the savepoint ID 0; therefore, the savepoint ID of the first end of subtransaction after the ET gets the savepoint ID 1.
The first BT-S command is specified with CID=2, the last subtransaction (with savepoint ID 2) is rolled back, all update operations after the ET-S=>CID=2 are rolled back.
The second BT-S command is specified with CID=1, the previously started subtransaction is rolled back, all update operations after the last ET-S=>CID=1 are rolled back.
This means that the transaction finally contains the operations marked by the right (black) arrows where no left arrow is below; and the left (red) arrows show the update operations rolled back:
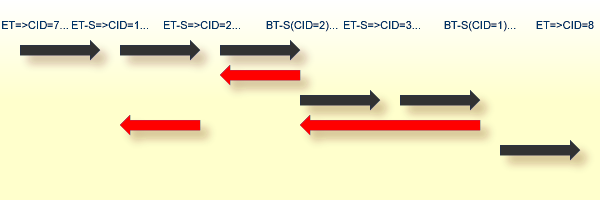
Note that for a BT command, independent of the BT command that is issued for a subtransaction or for the whole transaction, Adabas must not roll back operations again which already have been rolled back by a previous BT subtransaction.
Within a subtransaction, all Adabas commands and all Ux commands that log their modifications on WORK are permitted. A combination of both command types is also accepted.
Note:
If a user session with subtransaction logic disappears after
returning response code 9, a new OP command with the S option is necessary to
continue with subtransaction logic.
The start and roll back of a subtransaction are always logged on WORK and PLOG.
If referential integrity constraints are defined for a file, the referential integrity is checked at the end of a subtransaction, if subtransactions are activated, and at the end of a store/update delete command for the file otherwise. Please refer to Administration, FDT Record Structure, Referential Constraints for further information about how to define referential integrity constraints.
Note:
A referential integrity check can result in a large number of
implied database operations, e.g. cascaded deletes.
Resource interlock would occur when two users are placed in wait status because each has requested a record which is currently in hold status for the other user. However, Adabas detects this situation, and resolves it by backing out the transaction of the user who would have caused the deadlock
           USER 1               ADABAS               USER 2
     READ WITH HOLD (L4)
     FILE 1 ISN 1
                           ISN 1 HELD FOR
                           USER 1
                                                 READ WITH HOLD
                                                 (L4) FILE 1 ISN 2
                           ISN 2 HELD FOR
                           USER 2
     READ WITH HOLD (L4)
     FILE 1 ISN 2
                           USER 1 MUST WAIT...
                           ISN 2 HELD BY USER 2
                                                 READ WITH HOLD
                                                 (L4) FILE 1 ISN 1
                           DEADLOCK DETECTED
                           THE CURRENT TRANSACTION
                           OF USER 2 IS BACKED OUT.
                           USER 2 RECEIVES RESPONSE 9
                           AND 'DEADLOCK DETECTED' IN
                           THE ADDITIONS 2 FIELD OF THE
                           CONTROL BLOCK.
Resource interlock is automatically resolved by Adabas by means of a transaction-duration time limit.
The time measurement for a transaction begins when the first command which results in a record being placed in hold status is issued, and ends when an ET, BT or CL command is issued.
If a transaction exceeds the prescribed limit, Adabas automatically generates a backout transaction (BT) command. This results in the removal of all the updates performed during the transaction and the release of all the records held during the transaction. Response code 9 is returned on the next call issued by the user.
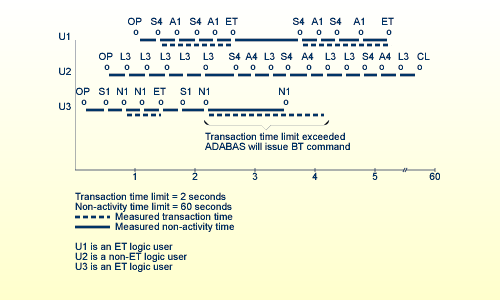
Two types of time limits are defined:
The transaction time limit (TT), that is the maximum time interval in which a transaction must be performed. The transaction time limit applies only to ET users not at ET status;
The non–activity time limits (TNAx), i.e. time intervals after which certain actions are taken if no user activity occurred during these time intervals.
The values for these time limits can be set by an OP call, or by ADANUC or ADAOPR (see the Adabas Utilities for further information). User-defined values specified in the OP call for the current session override values defined in ADANUC or ADAOPR.
A user activity can be stopped with the STOP command in ADAOPR.
The following actions are performed if a time limit is exceeded and the nucleus is running without OPTIONS=OPEN_REQUIRED (the abbreviations used here are described after the tables):
| USER TYPE | TIME OUT | ||||||
|---|---|---|---|---|---|---|---|
| TT | TNAx | STOP | |||||
| ID User | Non-ID User | ID User | Non-ID User | ||||
| Access only | - | SUQE | CL | SUQE | CL | ||
| ET logic user at ET status | - | SUQE | CL | SUQE | CL | ||
| ET logic user not at ET status | BT, RSP9 | BT, SUQE | BT,SUQE | ||||
| Exclusive control user with ET logic, at ET status | - | CLSE checkpoint, SUQE | CLSE checkpoint, SUQE | ||||
| Exclusive control user with ET logic, not at ET status | BT, RSP9 | BT, CLSE checkpoint, SUQE | BT, CLSE checkpoint, SUQE | ||||
| Exclusive control user without ET logic | - | CLSE checkpoint, SUQE | CLSE checkpoint, SUQE | ||||
| Utility user | - | - | CL | ||||
The following actions are performed if a time limit is exceeded and the nucleus is running with OPTIONS=OPEN_REQUIRED:
| USER TYPE | TIME OUT | ||
|---|---|---|---|
| TT | TNAX | STOP | |
| Access only | - | CL | CL |
| ET logic user at ET status | - | CL | CL |
| ET logic user not at ET status | BT, RSP9 | BT, CL | BT, CL |
| Exclusive control user with ET logic, at ET status | - | CL | CL |
| Exclusive control user with ET logic, not at ET status | BT, RSP9 | BT, CL | BT, CL |
| Exclusive control user without ET logic | - | CL | CL |
| Utility user | - | - | CL |
Note that user queue elements arising from global transactions will be handled differently. See the Administration Manual, section XA Support, User Queue Handling for related information.
SUQE (Scratch a user queue element) means: release all command IDs, scratch the file list, scratch the User ID (if any), scratch the user type, and set response 9 for the next call. After the next call has received this response 9, the user queue element is deleted: such user queue elements are not subject to timeout. (See the OP command for additional information about the user queue element).
BT means: Adabas backs out the user's current transaction.
CL means: Adabas closes the user session.
RSP9 means: Adabas will return response code 9 for the next user command.
ID User means: a user who has specified an identification during opening of a session, which is used later on to mark entries in logs caused by this user's activities.
In the example shown in the figure below, user 1 will eventually exceed the transaction time limit first, causing Adabas to backout user 1's transaction, thereby permitting user 2 to resume processing.
Adabas informs user 1 that his current transaction has been backed out by returning response code 9 for the next command issued by user 1. User 1 may repeat the backed–out transaction from the beginning, or may issue another transaction.
The transaction time limit applies only to programs which employ ET logic.
           USER 1              ADABAS                 USER 2
                           ISN 1 HELD FOR
                           USER 1
                                                  READ WITH HOLD
                                                  (L4) FILE 1 ISN 2
                          ISN 2 HELD FOR USER 2
      READ WITH HOLD
      (L4) FILE 1 ISN 2
                           USER 1 MUST WAIT*
                          (ISN 2 HELD BY USER 2)
                                                  READ WITH HOLD
                                                  (L4) FILE 1 ISN 1
                           USER 2 MUST WAIT*
                          (ISN 1 HELD BY USER 1)
                           (BOTH USERS WAITING)
                           USER 1 HAS EXCEEDED
                           TRANS. TIME LIMIT.
                           ADABAS ISSUES BT
                           FOR USER 1.
                           ISN 1 RELEASED.
                           USER 1 NOTIFIED THAT
                           HIS TRANSACTION HAS
                           BEEN BACKED OUT
                           (RESPONSE CODE = 9).
                           ISN 1 READ AND HELD
                           FOR USER 2.
      USER 1 MAY                                  NEXT COMMAND
      REISSUE TRANSACTION
      OR ISSUE
      ANOTHER TRANSACTION.
(*) If the RETURN option is used for the hold command, the user is not placed in wait status, but will receive response code 145 instead.
This section describes the Adabas command facilities related to data protection, recovery and user restart.
The two types of Adabas users which may perform database updating (ET logic and exclusive control) are presented, checkpointing procedures for each are summarized and the autobackout feature is described.
The logical transaction commands ET, BT and RE are used to ensure a transaction restart capability. Transaction restart is the ability to begin a user session starting with the first transaction which follows the last successful transaction of the user's previous session. Users who use logical transaction commands are called ET logic users.
A logical transaction is the smallest unit of work (as defined by the user) which must be performed in its entirety to ensure that the information contained in the database is logically consistent.
A logical transaction may consist of one or more Adabas commands, which together cause the database updating required to complete a logical unit of work. A logical transaction begins with the first command which places a record in hold status and ends when an ET (or BT or CL) command is issued.
The ET command must be issued at the end of each logical transaction. Successful execution of an ET command ensures that all the updates performed during the transaction will be physically applied to the database, regardless of subsequent user or Adabas session interruption.
Updates performed within transactions for which ET commands have not been successfully executed will be backed out by Adabas.
The ET command results in the release of all records held by the user during the transaction. Adabas returns a unique transaction sequence number which the user may use to identify the transaction for auditing or restart purposes.
The ET command may also be used to store user data in an Adabas system file. This data may be used for user restart purposes and may be read with an OP or RE command.
          USER PROGRAM                          ADABAS
      FIND (S4), UPDATE (A1)
                                       RECORD UPDATED IN ADABAS
                                       BUFFER BUT NOT NECESSARILY
                                       WRITTEN TO THE DATABASE
      FIND (S1), HOLD ISN (HI),
      UPDATE (A1)
                                       RECORD UPDATED IN ADABAS
                                       BUFFER BUT NOT NECESSARILY
                                       WRITTEN TO THE DATABASE
      END TRANSACTION (ET)
                                       DATA PROTECTION INFORMATION
                                       FOR THE TRANSACTION IS WRITTEN
                                       TO THE ADABAS WORK AND LOG
      FIND (S4), UPDATE (A1)
                                       RECORD UPDATED IN ADABAS
                                       BUFFER BUT NOT NECESSARILY
                                       WRITTEN TO THE DATABASE
      FIND (S1), HOLD ISN (HI),
      UPDATE (A1)
                                       RECORD UPDATED IN ADABAS
                                       BUFFER BUT NOT NECESSARILY
                                       WRITTEN TO THE DATABASE
      . . . ADABAS OR USER SESSION INTERRUPTION . . .
When the next Adabas session is started, or when the user is timed out, both the updates for transaction 1 will be physically written to the database (if they had not been previously written). The updates for transaction 2 will not be physically written (or will be backed out) because no ET command was processed for this transaction.
The BT command may be issued to remove all the updates which have been performed during the transaction currently being processed. This may be necessary because of a program error or the determination that the entire transaction cannot be successfully completed.
A BT command causes all the records held during the transaction to be released from hold status.
The command sequence
FIND (S4)
UPDATE (A1) (modify field XX to value 20)
FIND (S4)
UPDATE (A1) (modify field YY to value 50)
END TRANSACTION (ET)

FIND (S4)
UPDATE (A1) (modify field XX to value 10)
BACKOUT TRANSACTION (BT)
will result in the field values XX = 20 and YY = 50. The second update to field XX is removed as a result of the BT command.
Adabas automatically generates a BT command if the user transaction exceeds the transaction time limit or non–activity time limit. Adabas will return response code 9 to the user to indicate that the last transaction has been backed out. All records held during the back out transaction are released from hold status.
This backout procedure:
Removes all the updates performed within a partially-completed transaction that was issued by a user who has terminated abnormally;
Resolves a resource interlock between two users (see the section Resource Interlock for additional information).
If a logical transaction is backed out for an active user, the user may reissue the backed-out transaction, or issue another transaction.
BT command generated by Adabas (user still active)
FIND (S4)
UPDATE (A1)
FIND (S4)
UPDATE (A1)
END TRANSACTION (ET) (end transaction 1)

FIND (S4)
UPDATE (A1)
FIND (S4)
User must wait (record not available)

-------TRANSACTION TIME LIMIT EXCEEDED

BACKOUT  (BT) issued by Adabas; logical transaction
2 backed out; user receives response code 9 for  S4
command.
BT command generated by Adabas (user no longer active)
FIND (S4)
UPDATE (A1)
FIND (S4)
UPDATE (A1)

-------USER PROGRAM TERMINATES ABNORMALLY

BACKOUT  (BT)  issued  by  Adabas; both updates are
backed out and all held records are released.
Autobackout is performed by the Adabas nucleus at the beginning of each Adabas session to remove all the updates which were performed within partially-completed transactions issued by ET logic users.
Autobackout is performed for ET logic users only.
Adabas files can contain fields for which the values are automatically generated by Adabas itself. These fields are called system-generated fields.
System-generated fields can have the following values:
The time stamp of when a record was created or the last time it was updated;
Information about the user who created a record or who performed the last update of the record.
Please refer to Administration, FDT Record Structure, Definition Options, System-Generated Fields for further information.