
This document describes the administration tasks you can perform for Adabas Administration Services using SMH. It is organized as follows:
| Starting and Stopping Adabas Administration Services | Describes how to start and stop Adabas Administration Services. |
| The Adabas Administration Services SMH Administration Area |
Describes how to access the Adabas Administration Services SMH administration area, how to get online help for it, and how to refresh the data that appears in the area. |
| Listing, Selecting, and Reviewing Installed Services |
Describes how to list, review, and select services. |
| Reviewing the Access Status of a Service |
Describes how to review the access status of a service. |
| Reviewing Service Statistics | Describes how to review the statistics for a service. |
| Dynamically Collecting Detailed Statistics | Describes how to activate the collection of detailed service statistics. |
| Generating a Service Configuration Dump | Describes how to generate a service configuration dump in the log file. |
| Setting Service Parameters Offline | Describes how you can set service parameters offline. |
| Reviewing the Service Parameter Summary | Describes how to review a summary of parameter settings for a service. |
| Setting Basic Service Parameters | Describes how to set basic service parameters. |
| Setting Advanced Service Parameters | Describes how to set advanced service parameters. |
| Specifying Adabas Administration Services Scalability | Describes how to set Adabas Administration Services scalability settings, as a way of improving the performance of your system. |
| Maintaining Adabas Administration Services Filters | Describes how to apply filters to the databases, Kernels, clients, and client hosts that can interact with Adabas Administration Services. |
| Changing the Adabas Directory Server | Describes how to change the Adabas Directory Server used by the service. |
| Reviewing Service Status | Describes how to review the status of a service. |
| Checking Service Databases | Describes how to check the status of the databases managed by Adabas Administration Services. |
| Pinging Databases | Describes how to pink a database managed by Adabas Administration Services. |
| Dynamically Managing Direct Clients and Adabas Contexts | Describes how to dynamically manage direct clients and Adabas contexts of a service. |
| Dynamically Managing Service Client Hosts | Describes how to dynamically connect and disconnect to host machines of a service. |
| Shutting Down a Service | Describes how to shut down a service. |
| Managing Adabas Administration Services Log Files | Describes how to view and manage Adabas Administration Services log files. |
| Tracing Adabas Administration Services Processing | Describes the different ways you can trace Adabas Administration Services processing. Tracing should be used only for problem analysis and, preferably, with the assistance of a Software AG technical support representative. |
This section describes what you need to do to start and stop Adabas Administration Services.
During installation of Adabas Administration Services, the Adabas Administration Services service or daemon is started automatically when the computer is started.
Note:
The Adabas Administration Services service is for the Adabas Administration Services alone and is named
"Software AG Adabas Administration Service". If a
given system does not have Adabas Administration Services installed, no service will be
available.
If, for some reason, the Adabas Administration Services service or daemon is manually stopped, you will need to manually start it before Adabas Administration Services can function correctly.
![]() To manually start the Adabas Administration Services service on Windows systems:
To manually start the Adabas Administration Services service on Windows systems:
Start it from the Windows Services window (usually located under Administrative Tools on the Control Panel). For more information on the Windows Services window, refer to the documentation for your Windows system.
The Adabas Administration Services service is started.
You can shut down (stop) the Adabas Administration Services Windows service using SMH or using the Windows Services window. You can shut down (stop) the Adabas Administration Services UNIX daemon using SMH or using a shell script. This section describes all methods.
![]() To stop the Adabas Administration Services Windows service from the Windows Services
window:
To stop the Adabas Administration Services Windows service from the Windows Services
window:
Stop it from the Windows Services window (usually located under Administrative Tools on the Control Panel). For more information on the Services window, refer to the documentation for your Windows system.
The Adabas Administration Services service is stopped.
![]() To stop the Adabas Administration Services Windows service or
daemon from the System Management Hub (SMH):
To stop the Adabas Administration Services Windows service or
daemon from the System Management Hub (SMH):
Read Shutting Down a Service, elsewhere in this guide for complete information.
This section describes how to access the Adabas Administration Services SMH administration area, how to get online help for it, and how to refresh the data that appears in the area.
![]() To access the Adabas Administration Services administration area of the System Management Hub
(SMH):
To access the Adabas Administration Services administration area of the System Management Hub
(SMH):
Make sure you have started and logged into the System Management Hub.
Select the name of the managed host on which Adabas Administration Services is installed.
Expand the tree-view frame for the managed host by clicking on the plus sign (+) to the left of its name.
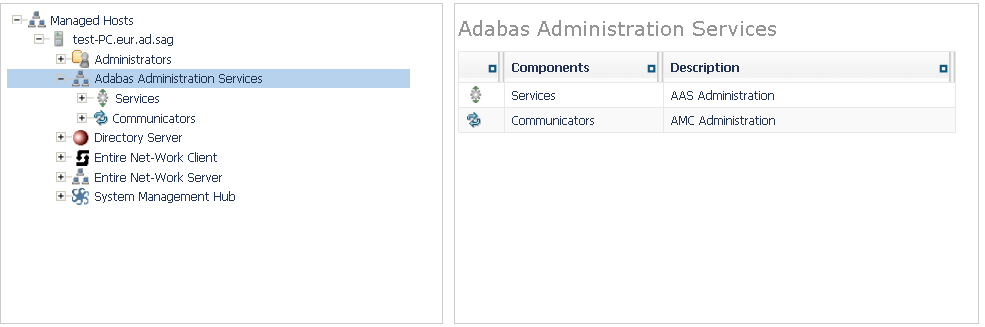
Select Adabas Administration Services in the tree-view under the managed host.
The Adabas Administration Services administration area of the System Management Hub becomes available to you.
The Adabas Administration Services administration area lists the services and communicators you can manage.
The following commands are available in the command menu for the Adabas Administration Services administration area or by right-clicking on Adabas Administration Services in tree-view:
Note:
You must have Adabas Administration Services selected in the tree-view
frame to see these commands.
| Command | Use this command to: |
|---|---|
| Add a node in tree-view to your browser favorites. | |
| Add a node in tree-view to System Management View. For more information about System Management View, read your System Management Hub documentation. | |
| Link to help for your use of SMH as it pertains to the Adabas Administration Services administration area. | |
| Refresh the screen. | |
| Remove a node in tree-view from System Management View. For more information about System Management View, read your System Management Hub documentation. |
The remainder of this section describes administrative tasks for services. For information on administrative tasks for communicators, refer to your Adabas Manager Communication Client documentation.
![]() To get help on an Adabas Administration Services management task or SMH panel:
To get help on an Adabas Administration Services management task or SMH panel:
Access the Adabas Administration Services SMH administration area, as described in Accessing the Adabas Administration Services SMH Administration Area.
Right-click Adabas Administration Services in tree-view and select the option from the resulting drop-down menu.
Or:
Navigate to any panel within the Adabas Administration Services SMH administration area and
click the button on the panel.
Help for the panel or Adabas Administration Services SMH administration area appears.
![]() To refresh the displays in the Adabas Administration Services SMH administration area:
To refresh the displays in the Adabas Administration Services SMH administration area:
Access the Adabas Administration Services SMH administration area, as described in Accessing the Adabas Administration Services SMH Administration Area.
Right-click Adabas Administration Services or other Adabas Administration Services SMH administration item in tree-view and select the option from the resulting drop-down menu.
The data for the Adabas Administration Services SMH administration area is refreshed.
![]() To list and review the services managed by SMH:
To list and review the services managed by SMH:
Make sure you have accessed the System Management Hub.
Select the name of the managed host on which Adabas Administration Services is installed.
Expand the tree-view frame for the managed host by clicking on the plus sign (+) to the left of its name.
Select Adabas Administration Services in the tree-view under the managed host.
The Adabas Administration Services administration area of the System Management Hub becomes available to you.
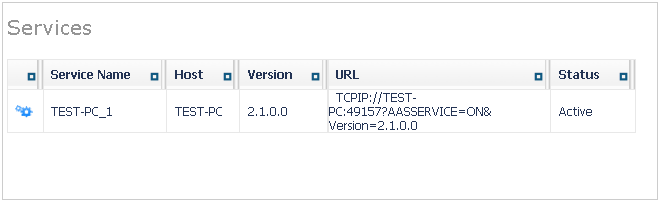
Expand Services in tree-view, by clicking on the plus sign (+) to the left of its label.
The list of installed services appears.
The following commands are available:
Note:
You must right-click on Services in the
tree-view frame to see these commands.
| Command | Use this command to: |
|---|---|
| Add a node in tree-view to your browser favorites. | |
| Add a node in tree-view to System Management View. For more information about System Management View, read your System Management Hub documentation. | |
| Link to help for your use of SMH as it pertains to the Adabas Administration Services administration area. | |
| Refresh the screen. | |
| Remove a node in tree-view from System Management View. For more information about System Management View, read your System Management Hub documentation. |
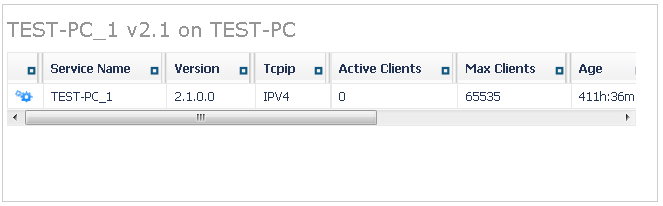
Expand the name of a service in the server list in tree-view, by clicking on the plus sign (+) to the left of its label.
The databases, clients, and client hosts that are supported by the service are listed in groups in tree-view, as well as access to the offline service parameters you can set. In addition, details about the selected service are displayed in detail-view.
The following commands are available for each service:
Note:
You must right-click on a specific service in the tree-view frame
to see these commands.
| Command | Use this command to: |
|---|---|
| Review the access status of the selected service. For more information, read Reviewing the Access Status of a Service | |
| Add a node in tree-view to your browser favorites. | |
| Add a node in tree-view to System Management View. For more information about System Management View, read your System Management Hub documentation. | |
| Generate a service configuration dump in the log file. For more information, read Generating a Service Configuration Dump. | |
| Link to help for your use of the System Management Hub (SMH) as it pertains to the Adabas Administration Services administration area. | |
| Close the current Adabas Administration Services log file and start a new one. For more information, read Managing Adabas Administration Services Log Files. | |
| Refresh the screen. | |
| Remove a node in tree-view from System Management View. For more information about System Management View, read your System Management Hub documentation. | |
| Indicate whether detailed statistics should be collected. For more information, read Dynamically Collecting Detailed Statistics. | |
| Shut down the service. For more information, read Shutting Down a Service. | |
| Set the Adabas Administration Services trace level. For more information, read Dynamically Setting the Trace Level. | |
| View statistics about the service. For more information, read Reviewing Service Statistics. | |
| View the current Adabas Administration Services log file. For more information, read Managing Adabas Administration Services Log Files. |
![]() To review the access status of a service:
To review the access status of a service:
Make sure you have accessed the System Management Hub.
Select the name of the managed host on which Adabas Administration Services is installed.
Expand the tree-view frame for the managed host by clicking on the plus sign (+) to the left of its name.
Select Adabas Administration Services in the tree-view under the managed host.
The Adabas Administration Services administration area of the System Management Hub becomes available to you.
Expand Services in tree-view, by clicking on the plus sign (+) to the left of its label.
The list of installed services appears.
Expand the name of a service in the server list in tree-view, by clicking on the plus sign (+) to the left of its label.
The databases, clients, and client hosts that are supported by the service are listed in groups in tree-view, as well as access to the offline service parameters you can set. In addition, details about the selected service are displayed in detail-view.
Right-click on the name of the service whose access status you want to review and select the Access Status command from the drop-down menu.
The access status for the selected service is displayed in the detail-view frame:
![]() To review the statistics for a service:
To review the statistics for a service:
Make sure you have accessed the System Management Hub.
Select the name of the managed host on which Adabas Administration Services is installed.
Expand the tree-view frame for the managed host by clicking on the plus sign (+) to the left of its name.
Select Adabas Administration Services in the tree-view under the managed host.
The Adabas Administration Services administration area of the System Management Hub becomes available to you.
Expand Services in tree-view, by clicking on the plus sign (+) to the left of its label.
The list of installed services appears.
Expand the name of a service in the server list in tree-view, by clicking on the plus sign (+) to the left of its label.
The databases, clients, and client hosts that are supported by the service are listed in groups in tree-view, as well as access to the offline service parameters you can set. In addition, details about the selected service are displayed in detail-view.
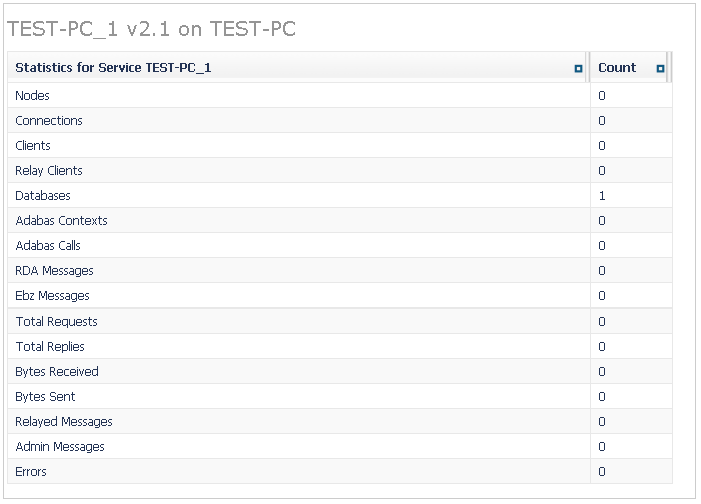
In tree-view, right-click on the name of the service for which you want to review statistics, and select Statistics.
Statistics for the service appears in detail-view. For example:
Collecting detailed statistics for a service can provide useful data in resolving problems. However, we do not recommend that you collect detailed statistics all the time as the performance of your system may be affected by their collection.
![]() To dynamically turn on the collection of detailed statistics for a
service:
To dynamically turn on the collection of detailed statistics for a
service:
Make sure you have accessed the System Management Hub.
Select the name of the managed host on which Adabas Administration Services is installed.
Expand the tree-view frame for the managed host by clicking on the plus sign (+) to the left of its name.
Select Adabas Administration Services in the tree-view under the managed host.
The Adabas Administration Services administration area of the System Management Hub becomes available to you.
Expand Services in tree-view, by clicking on the plus sign (+) to the left of its label.
The list of installed services appears.
Expand the name of a service in the server list in tree-view, by clicking on the plus sign (+) to the left of its label.
The databases, clients, and client hosts that are supported by the service are listed in groups in tree-view, as well as access to the offline service parameters you can set. In addition, details about the selected service are displayed in detail-view.
In tree-view, right-click on the name of the service for which you want to set detailed statistics, and select Set Detailed Statistics On Line.
The Set Detailed Statistics Online panel appears in detail-view. For example:
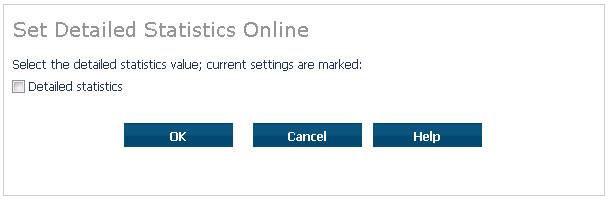
Click to turn on the collection of detailed statistics.
Detailed statistic collection for the service is started.
You can request that a service configuration dump be written to the log file. This dump information includes the servers, database IDs, connections, clients, host machines, and Adabas contexts associated with the service.
![]() To generate a service configuration dump in the log file:
To generate a service configuration dump in the log file:
Make sure you have accessed the System Management Hub.
Select the name of the managed host on which Adabas Administration Services is installed.
Expand the tree-view frame for the managed host by clicking on the plus sign (+) to the left of its name.
Select Adabas Administration Services in the tree-view under the managed host.
The Adabas Administration Services administration area of the System Management Hub becomes available to you.
Expand Services in tree-view, by clicking on the plus sign (+) to the left of its label.
The list of installed services appears.
Expand the name of a service in the server list in tree-view, by clicking on the plus sign (+) to the left of its label.
The databases, clients, and client hosts that are supported by the service are listed in groups in tree-view, as well as access to the offline service parameters you can set. In addition, details about the selected service are displayed in detail-view.
In tree-view, right-click on the name of the service for which you want to generate a configuration dump, and select Dump configuration.
The Dump Configuration panel appears in detail-view. For example:
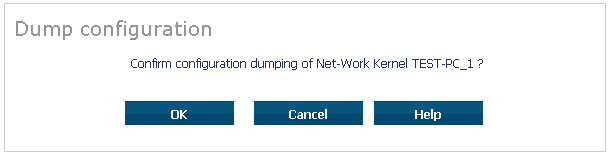
Click to dump the service configuration.
The dump is generated
You can set service parameters offline using the Set Parameters Offline node in tree-view.
![]() To set service parameters offline:
To set service parameters offline:
Make sure you have accessed the System Management Hub.
Select the name of the managed host on which Adabas Administration Services is installed.
Expand the tree-view frame for the managed host by clicking on the plus sign (+) to the left of its name.
Select Adabas Administration Services in the tree-view under the managed host.
The Adabas Administration Services administration area of the System Management Hub becomes available to you.
Expand Services in tree-view, by clicking on the plus sign (+) to the left of its label.
The list of installed services appears.
Expand the name of a service in the server list in tree-view, by clicking on the plus sign (+) to the left of its label.
The databases, clients, and client hosts that are supported by the service are listed in groups in tree-view, as well as access to the offline service parameters you can set. In addition, details about the selected service are displayed in detail-view.
Expand the specific service name in tree-view, by clicking on the plus sign (+) to the left of its label and then select the node in tree-view.
The following commands are available for each service:
Note:
You must right-click on in the tree-view frame to see these commands.
| Command | Use this command to: |
|---|---|
| This command is not currently functional. | |
| Add a node in tree-view to your browser favorites. | |
| Add a node in tree-view to System Management View. For more information about System Management View, read your System Management Hub documentation. | |
| Link to help for your use of the System Management Hub (SMH) as it pertains to the Adabas Administration Services administration area. | |
| Review a summary of parameter settings for the selected service. For more information, read Reviewing the Service Parameter Summary. | |
| Refresh the screen. | |
| Remove a node in tree-view from System Management View. For more information about System Management View, read your System Management Hub documentation. | |
| Apply a filter to the databases, Kernels, clients, and client hosts that can interact with this service. For more information, read Maintaining Adabas Administration Services Filters | |
| Set advanced parameters for the service. For more information, read Setting Advanced Service Parameters. | |
| Set basic parameters for the service. For more information, read Setting Basic Service Parameters. | |
| Change the Adabas Directory Server used by the service. For more information, read Changing the Adabas Directory Server | |
| Set Adabas Administration Services scalability settings, as a way of improving the performance of your system. For more information, read Specifying Adabas Administration Services Scalability. | |
| Set the Adabas Administration Services trace level. For more information, read Permanently Setting the Trace Level. | |
| Shut down the service. For more information, read Shutting Down a Service. | |
| Review the status of a service. For more information, read Reviewing Service Status. |
![]() To review a summary of parameter settings for a service:
To review a summary of parameter settings for a service:
Make sure you have accessed the System Management Hub.
Select the name of the managed host on which Adabas Administration Services is installed.
Expand the tree-view frame for the managed host by clicking on the plus sign (+) to the left of its name.
Select Adabas Administration Services in the tree-view under the managed host.
The Adabas Administration Services administration area of the System Management Hub becomes available to you.
Expand Services in tree-view, by clicking on the plus sign (+) to the left of its label.
The list of installed services appears.
Expand the name of a service in the server list in tree-view, by clicking on the plus sign (+) to the left of its label.
The databases, clients, and client hosts that are supported by the service are listed in groups in tree-view, as well as access to the offline service parameters you can set. In addition, details about the selected service are displayed in detail-view.
Expand the specific service name in tree-view, by clicking on the plus sign (+) to the left of its label and then select the node in tree-view.
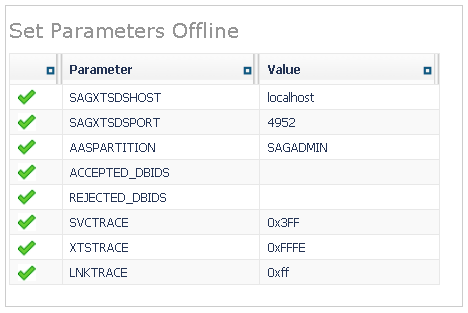
In tree-view, right-click on and select the command from the resulting drop-down menu.
A summary of the service definition parameters appears in detail-view.
![]() To set basic Adabas Administration Services definition parameters:
To set basic Adabas Administration Services definition parameters:
Make sure you have accessed the System Management Hub.
Select the name of the managed host on which Adabas Administration Services is installed.
Expand the tree-view frame for the managed host by clicking on the plus sign (+) to the left of its name.
Select Adabas Administration Services in the tree-view under the managed host.
The Adabas Administration Services administration area of the System Management Hub becomes available to you.
Expand Services in tree-view, by clicking on the plus sign (+) to the left of its label.
The list of installed services appears.
Expand the name of a service in the server list in tree-view, by clicking on the plus sign (+) to the left of its label.
The databases, clients, and client hosts that are supported by the service are listed in groups in tree-view, as well as access to the offline service parameters you can set. In addition, details about the selected service are displayed in detail-view.
Expand the specific service name in tree-view, by clicking on the plus sign (+) to the left of its label and then select the node in tree-view.
In tree-view, right-click on and select the command from the resulting drop-down menu.
The Service Basic Parameters panel appears in detail-view.
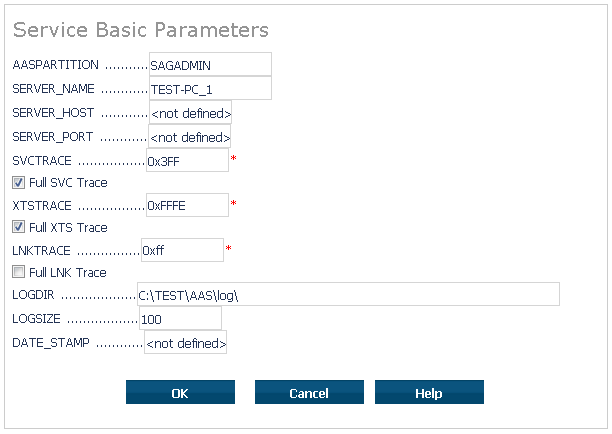
Modify the parameters on the Service Basic Parameters panel, as described in the following table. When all parameters are set as you want, click to save them.
| Parameter | Description |
|---|---|
| AASPARTITION | Specify the partition in which the service is assigned, if any. For more information, read Understanding Partitioning. |
| SERVER_NAME | Optionally, specify the name for this service
definition. Service names are required for connections between mainframe and
open systems nodes, but if you do not specify one for the service in this
parameter, Adabas Administration Services will generate one for you. In fact, whenever a new service is
defined, a random name is automatically generated for it.
Note: Adabas Administration Services generates a random name for a new service. However, there is a small risk that a duplicate name might be generated with a service that is not started. You will want to check any generated service names against your service name list to ensure the generated name is unique. |
| SERVER_HOST | Optionally, specify the server host name for this service. |
| SERVER_PORT | Optionally, specify the server port number for this service. |
| SVCTRACE | Set the hexadecimal service trace level using
this parameter. Valid values are any of the following hexadecimal values:
Do not specify full tracing unless specifically instructed to do so by a Software AG technical support representative. If you do, your installation could be overrun with trace messages that would be meaningless to you and would likely affect system performance. For more information about service tracing, read Tracing Adabas Administration Services Processing. |
| Full SVC Trace | Click in this checkbox to set the SVCTRACE value to obtain full tracing of this service's processing. Do not check this checkbox unless specifically instructed to do so by a Software AG technical support representative. If you do, your installation could be overrun with trace messages that would be meaningless to you and would likely affect system performance. |
| XTSTRACE | Set the hexadecimal XTS trace level using this
parameter. This is the trace level for Software AG transport services. Valid
values are any of the following hexadecimal values:
Do not specify full tracing unless specifically instructed to do so by a Software AG technical support representative. If you do, your installation could be overrun with trace messages that would be meaningless to you and would likely affect system performance. For more information about service tracing, read Tracing Adabas Administration Services Processing. |
| Full XTS Trace | Click in this checkbox to set the XTSTRACE value to obtain full tracing of Software AG transport services processing. Do not check this checkbox unless specifically instructed to do so by a Software AG technical support representative. If you do, your installation could be overrun with trace messages that would be meaningless to you and would likely affect system performance. |
| LNKTRACE | Set the hexadecimal ADALNK trace level using
this parameter. This is the trace level for Adabas calls. Valid values are the
hexadecimal values "00" (no tracing) or
"0x1F" (full tracing). At this time, there is no
granularity to ADALNK trace levels. Do not specify full tracing unless
specifically instructed to do so by a Software AG technical support
representative. If you do, your installation could be overrun with trace
messages that would be meaningless to you and would likely affect system
performance.
For more information about service tracing, read Tracing Adabas Administration Services Processing. |
| Full LNK Trace | Click in this checkbox to set the LNKTRACE value to obtain full tracing of ADALNK processing. Do not check this checkbox unless specifically instructed to do so by a Software AG technical support representative. If you do, your installation could be overrun with trace messages that would be meaningless to you and would likely affect system performance. |
| LOGDIR | Specify the fully-qualified path of the directory where service log files should be written. For more information, read Specifying the Adabas Administration Services Log File Location. |
| LOGSIZE | Specify the number of megabytes (MB) to which a service log file can grow before it is automatically closed and a new log file is started. The default is 500 MB. For more information about service log files, read Managing Adabas Administration Services Log Files. |
| DATE_STAMP | Indicate whether or not you want the date and time stamp to be added to every Adabas Administration Services trace statement written. Valid values are "YES" (include the date and time stamp) or "NO" (do not include the date and time stamp). The default is "NO". |
The Adabas Administration Services basic parameters are updated in the appropriate service definition file. You must restart Adabas Administration Services in order for these parameter changes to take effect.
![]() To set advanced Adabas Administration Services definition parameters:
To set advanced Adabas Administration Services definition parameters:
Make sure you have accessed the System Management Hub.
Select the name of the managed host on which Adabas Administration Services is installed.
Expand the tree-view frame for the managed host by clicking on the plus sign (+) to the left of its name.
Select Adabas Administration Services in the tree-view under the managed host.
The Adabas Administration Services administration area of the System Management Hub becomes available to you.
Expand Services in tree-view, by clicking on the plus sign (+) to the left of its label.
The list of installed services appears.
Expand the name of a service in the server list in tree-view, by clicking on the plus sign (+) to the left of its label.
The databases, clients, and client hosts that are supported by the service are listed in groups in tree-view, as well as access to the offline service parameters you can set. In addition, details about the selected service are displayed in detail-view.
Expand the specific service name in tree-view, by clicking on the plus sign (+) to the left of its label and then select the node in tree-view.
In tree-view, right-click on and select the command from the resulting drop-down menu.
The Service Advanced Parameters panel appears in detail-view.
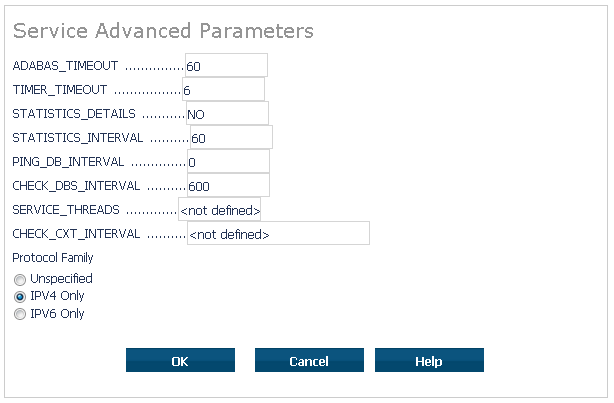
Modify the parameters on the Service Advanced Parameters panel, as described in the following table. When all parameters are set as you want, click to save them.
| Parameter | Description | ||
|---|---|---|---|
| ADABAS_TIMEOUT | Specify the number of seconds the service should wait for a response from either a local or remote Adabas call before it times out. The default is 60 seconds; the minimum value you can specify is 5 seconds. | ||
| TIMER_TIMEOUT | Specify the frequency (in seconds) at which the service should check to see if it needs to run the STATISTICS_INTERVAL, PING_DB_INTERVAL, or CHECK_DBS_INTERVAL processing. The default is 6 seconds. | ||
| STATISTICS_DETAILS | Indicate whether detail statistics should be collected and displayed for clients and client hosts. Valid values for this parameter are "YES" and "NO"; the default is "NO". Note that there is the performance of your system could be affected when statistic details are collected. | ||
| STATISTICS_INTERVAL | Specify the frequency at which statistics are collected for the service, in minutes. The default is 60 minutes. | ||
| PING_DB_INTERVAL | Specify the frequency at which remote databases should be pinged to determine their status, in minutes. The default is zero (0) minutes (no pinging). | ||
| CHECK_DBS_INTERVAL | Specify the frequency at which local databases should be pinged to determine their status, in seconds. The default is 20 seconds. | ||
| SERVICE_THREADS | Specify the number of threads available for a network node. When this limit is exceeded, service requests will wait until a thread becomes available. Use this parameter to tune how your network processes requests. The default (and minimum) is 5 threads; the maximum is 1024 threads. | ||
| CHECK_CXT_INTERVAL | Specify how old the Adabas contexts that are
created by Adabas Administration Services clients can be, in seconds. Valid values are zero (0) or an
integer between 60 and 43,200 seconds (30 days).
Anytime a client connects with Adabas Administration Services, a context (a memory table with client information) for that specific client is created. When a client disconnects, the context is deleted. In situations when clients are disconnected abnormally (for example, they crash) or they are not disconnected for a long time (for example, when navigating on a web page), the size of Adabas Administration Services unused memory increases significantly, which can affect Adabas Administration Services performance. To avoid such situations, you can use this parameter to indicate how long contexts should be allowed to remain. If CHECK_CXT_INTERVAL is not zero, an Adabas Administration Services thread periodically (every minute) checks the Adabas contexts created by clients connected to Adabas Administration Services. Contexts older than the time set by this parameter are deleted. |
||
| Protocol Family | Select the TCP/IP protocol family used for the
service. Click (check) Unspecified, IPV4
Only, or IPV6 Only. If you select
IPV4 Only or IPV6 Only, only the
selected protocol is used for communications with this service. If you select
Unspecified, the domain name server (DNS) will determine
which protocol is used; Unspecified is the default.
|
The Adabas Administration Services advanced parameters are updated in the appropriate service definition file. You must restart Adabas Administration Services in order for these parameter changes to take effect.
Use Adabas Administration Services scalability settings to adjust the amount in which the service is used as a way of improving the performance of your system.
![]() To specify Adabas Administration Services scalability settings:
To specify Adabas Administration Services scalability settings:
Make sure you have accessed the System Management Hub.
Select the name of the managed host on which Adabas Administration Services is installed.
Expand the tree-view frame for the managed host by clicking on the plus sign (+) to the left of its name.
Select Adabas Administration Services in the tree-view under the managed host.
The Adabas Administration Services administration area of the System Management Hub becomes available to you.
Expand Services in tree-view, by clicking on the plus sign (+) to the left of its label.
The list of installed services appears.
Expand the name of a service in the server list in tree-view, by clicking on the plus sign (+) to the left of its label.
The databases, clients, and client hosts that are supported by the service are listed in groups in tree-view, as well as access to the offline service parameters you can set. In addition, details about the selected service are displayed in detail-view.
Expand the specific service name in tree-view, by clicking on the plus sign (+) to the left of its label and then select the node in tree-view.
In tree-view, right-click on and select the command from the resulting drop-down menu.
The Service Scalability panel appears in detail-view.

Modify the parameters on the Service Scalability panel, as described in the following table. When all parameters are set as you want, click to save them.
| Parameter | Description |
|---|---|
| MAX_CLIENTS | Specify the maximum number of client requests that can be processed concurrently by this service. When this limit is exceeded, client requests are rejected. The minimum value you can specify is "5"; the maximum value you can specify is "65535" or the number of clients allowed by your product license, whichever is lower. |
| MAX_CPU_THRESHOLD | Specify the maximum CPU usage (the threshold) for this service that can be used by clients of this service. When this CPU usage is exceeded, new clients are not accepted by the service. Valid CPU usage thresholds are expressed as percentages. The minimum value you can specify is "10"; the maximum value you can specify is "99". |
The Adabas Administration Services scalability settings are updated in the appropriate service definition file. You must restart Adabas Administration Services in order for these settings to take effect.
![]() To maintain the Adabas Administration Services filter list:
To maintain the Adabas Administration Services filter list:
Make sure you have accessed the System Management Hub.
Select the name of the managed host on which Adabas Administration Services is installed.
Expand the tree-view frame for the managed host by clicking on the plus sign (+) to the left of its name.
Select Adabas Administration Services in the tree-view under the managed host.
The Adabas Administration Services administration area of the System Management Hub becomes available to you.
Expand Services in tree-view, by clicking on the plus sign (+) to the left of its label.
The list of installed services appears.
Expand the name of a service in the server list in tree-view, by clicking on the plus sign (+) to the left of its label.
The databases, clients, and client hosts that are supported by the service are listed in groups in tree-view, as well as access to the offline service parameters you can set. In addition, details about the selected service are displayed in detail-view.
Expand the specific service name in tree-view, by clicking on the plus sign (+) to the left of its label and then select the node in tree-view.
In tree-view, right-click on and select the command from the resulting drop-down menu.
The Service Filters panel appears in detail-view.
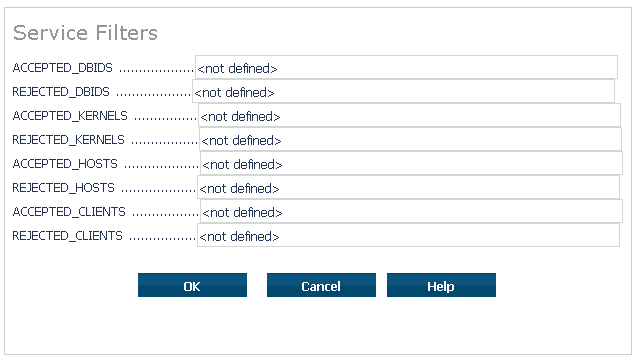
Modify the parameters on the Service Filters panel, as described in the following table. When all parameters are set as you want, click to save them.
| Parameter | Description |
|---|---|
| ACCEPTED_DBIDS | Specify the database IDs for which requests
should be processed by this service. If more than one database ID is needed,
separate them with commas. If a range of database numbers is needed, separate
them with a dash. For example, "4,12-15,62"
indicates that the service should process requests to databases 4, 62, and any
databases with numbers between 12 and 15 (inclusive). For more information,
read Understanding
Filtering.
If no databases are listed in the ACCEPTED_DBIDS field, the service will process all requests to all databases defined in the Adabas Directory Server, except those listed in the REJECTED_DBIDS field. |
| REJECTED_DBIDS | Specify the database IDs for which requests
should not be processed by this service. If more than one database ID
is needed, separate them with commas. If a range of database numbers is needed,
separate them with a dash. For example, "4,12-15,62"
indicates that the service should not process requests to databases 4,
62, and any databases with numbers between 12 and 15 (inclusive). For more
information, read Understanding
Filtering.
If no databases are listed in the REJECTED_DBIDS field, the service will process all requests to all databases defined in the Adabas Directory Server, unless a specific list is provided in the ACCEPTED_DBIDS field. |
| ACCEPTED_KERNELS | Specify the Kernel names for which requests should be processed by this service. If more than one Kernel name is needed, separate them with commas. For more information, read Understanding Filtering. |
| REJECTED_KERNELS | Specify the Kernel names for which requests should not be processed by this service. If more than one Kernel name is needed, separate them with commas. For more information, read Understanding Filtering. |
| ACCEPTED_HOSTS | Specify the host machine names from and to which requests should be processed by this service. If more than host machine name is needed, separate them with commas. For more information, read Understanding Filtering. |
| REJECTED_HOSTS | Specify the host machine names from and to which requests should not be processed by this service. If more than host machine name is needed, separate them with commas. For more information, read Understanding Filtering. |
| ACCEPTED CLIENTS | Specify the client names from which requests should be processed by this service. If more than client name is needed, separate them with commas. For more information, read Understanding Filtering. |
| REJECTED CLIENTS | Specify the client names from which service requests should not be processed by this service. If more than client name is needed, separate them with commas. For more information, read Understanding Filtering. |
The Adabas Administration Services filters are updated in the appropriate service definition file. You must restartAdabas Administration Services in order for these filter changes to take effect.
While you can specify that different Directory Servers be used by Adabas Administration Services, this is not recommended. The ability to do this is useful for testing only, but when your network testing is complete, we recommend that the same Directory Server be used for all Software AG products.
![]() To change the Directory Server for Adabas Administration Services:
To change the Directory Server for Adabas Administration Services:
Make sure you have accessed the System Management Hub.
Select the name of the managed host on which Adabas Administration Services is installed.
Expand the tree-view frame for the managed host by clicking on the plus sign (+) to the left of its name.
Select Adabas Administration Services in the tree-view under the managed host.
The Adabas Administration Services administration area of the System Management Hub becomes available to you.
Expand Services in tree-view, by clicking on the plus sign (+) to the left of its label.
The list of installed services appears.
Expand the name of a service in the server list in tree-view, by clicking on the plus sign (+) to the left of its label.
The databases, clients, and client hosts that are supported by the service are listed in groups in tree-view, as well as access to the offline service parameters you can set. In addition, details about the selected service are displayed in detail-view.
Expand the specific service name in tree-view, by clicking on the plus sign (+) to the left of its label and then select the node in tree-view.
In tree-view, right-click on and select the command from the resulting drop-down menu.
The Directory Server Parameters panel appears in detail-view.
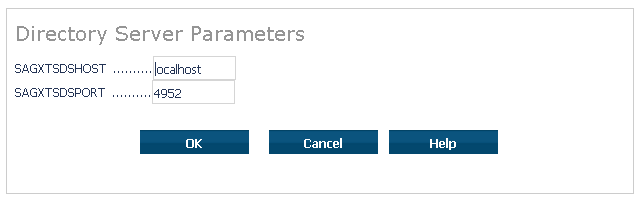
Fill in the fields on this panel, as described in the following table:
| Field | Description | Required? |
|---|---|---|
| SAGXTSDSHOST |
The host name on which the Directory Server is installed. |
Yes |
| SAGXTSDSPORT |
The port number assigned the Directory Server. The default is 4952. If this field is set to zero (0) or left blank, the default will be used. |
No |
Click .
The Directory Server is changed for Adabas Administration Services. You must restart Adabas Administration Services in order for this change to take effect.
You can review the status of a service.
![]() To review the status of a service:
To review the status of a service:
Make sure you have accessed the System Management Hub.
Select the name of the managed host on which Adabas Administration Services is installed.
Expand the tree-view frame for the managed host by clicking on the plus sign (+) to the left of its name.
Select Adabas Administration Services in the tree-view under the managed host.
The Adabas Administration Services administration area of the System Management Hub becomes available to you.
Expand Services in tree-view, by clicking on the plus sign (+) to the left of its label.
The list of installed services appears.
Expand the name of a service in the server list in tree-view, by clicking on the plus sign (+) to the left of its label.
The databases, clients, and client hosts that are supported by the service are listed in groups in tree-view, as well as access to the offline service parameters you can set. In addition, details about the selected service are displayed in detail-view.
Expand the specific service name in tree-view, by clicking on the plus sign (+) to the left of its label and then select the node in tree-view.
In tree-view, right-click on and select the command from the resulting drop-down menu.
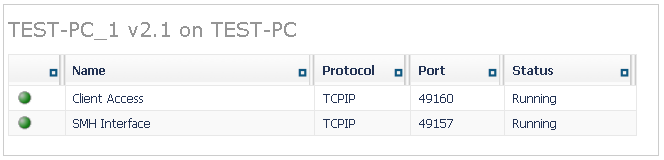
The status of the service appears in detail-view.
You can check the databases managed by a service. Checking the databases causesAdabas Administration Services to search for any Adabas databases that were started recently and to refresh its internal table and corresponding SMH information. This is useful, for example, when you want to obtain the latest status of the databases that a specific service manages.
![]() To check the databases managed by a service:
To check the databases managed by a service:
Make sure you have accessed the System Management Hub and that the service is started. For complete information about starting services, read Starting Adabas Administration Services.
Select the name of the managed host on which Adabas Administration Services is installed.
Expand the tree-view frame for the managed host by clicking on the plus sign (+) to the left of its name.
Select Adabas Administration Services in the tree-view under the managed host.
The Adabas Administration Services administration area of the System Management Hub becomes available to you.
Expand Services in tree-view, by clicking on the plus sign (+) to the left of its label.
The list of installed services appears.
Expand the name of a service in the server list in tree-view, by clicking on the plus sign (+) to the left of its label.
The databases, clients, and client hosts that are supported by the service are listed in groups in tree-view, as well as access to the offline service parameters you can set. In addition, details about the selected service are displayed in detail-view.
Expand the specific service name in tree-view, by clicking on the plus sign (+) to the left of its label.
Right-click on Databases in tree-view and select from the resulting drop-down menu.
A Check Databases panel appears in detail-view.
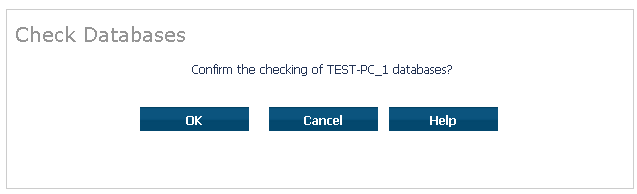
Click to check the service databases.
The databases are checked and the list and status of the databases is refreshed.
![]() To ping a database managed by Adabas Administration Services:
To ping a database managed by Adabas Administration Services:
Make sure you have accessed the System Management Hub and that the service is started. For complete information about starting services, read Starting Adabas Administration Services.
Select the name of the managed host on which Adabas Administration Services is installed.
Expand the tree-view frame for the managed host by clicking on the plus sign (+) to the left of its name.
Select Adabas Administration Services in the tree-view under the managed host.
The Adabas Administration Services administration area of the System Management Hub becomes available to you.
Expand Services in tree-view, by clicking on the plus sign (+) to the left of its label.
The list of installed services appears.
Expand the name of a service in the server list in tree-view, by clicking on the plus sign (+) to the left of its label.
The databases, clients, and client hosts that are supported by the service are listed in groups in tree-view, as well as access to the offline service parameters you can set. In addition, details about the selected service are displayed in detail-view.
Expand the specific service name in tree-view, by clicking on the plus sign (+) to the left of its label.
Expand Databases in tree-view, by clicking on the plus sign (+) to the left of its label.
The databases managed by the service are listed in tree-view.
Right-click on the database you want to ping and select from the resulting drop-down menu.
A Ping panel appears in detail-view.
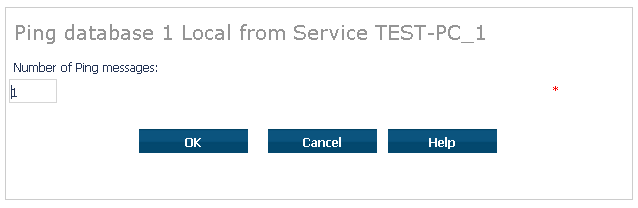
Specify the number of ping messages that should be sent from the service to the database in the Number of Ping messages box.
Click to start pinging.
The results of the ping attempts appears in detail-view, indicating whether or not the database is active.
Direct clients are clients that process Adabas calls on the current service. Using Adabas Administration Services you can dynamically manage the direct clients of a service. You can also view statistical information about clients and contexts.
Adabas contexts are memory tokens that associate clients and Adabas databases and are used for Adabas session identification and statistics purposes.
This section covers the following topics:
![]() To dynamically list the clients and Adabas contexts of a service:
To dynamically list the clients and Adabas contexts of a service:
Make sure you have accessed the System Management Hub and that the service is started. For complete information about starting service, read Starting Adabas Administration Services.
Select the name of the managed host on which Adabas Administration Services is installed.
Expand the tree-view frame for the managed host by clicking on the plus sign (+) to the left of its name.
Select Adabas Administration Services in the tree-view under the managed host.
The Adabas Administration Services administration area of the System Management Hub becomes available to you.
Expand Services in tree-view, by clicking on the plus sign (+) to the left of its label.
The list of installed services appears.
Expand the name of a service in the server list in tree-view, by clicking on the plus sign (+) to the left of its label.
The databases, clients, and client hosts that are supported by the service are listed in groups in tree-view, as well as access to the offline service parameters you can set. In addition, details about the selected service are displayed in detail-view.
Expand the specific service name in tree-view, by clicking on the plus sign (+) to the left of its label.
Expand Clients in tree-view, by clicking on the plus sign (+) to the left of its label.
The client and Adabas context definitions for the service are listed in categories in tree-view. Two categories are listed: Direct Clients and Adabas Contexts.
Expand the appropriate category (Direct Clients or Adabas Contexts) in tree-view, by clicking on the plus sign (+) to the left of its label.
The client or Adabas context definitions for the category you selected are listed in tree-view.
To activate this feature, set the
STATISTICS_DETAILS parameter to
"YES" on the Service Advanced Parameters
screen.
![]() To dynamically view statistics for a direct client or Adabas
context:
To dynamically view statistics for a direct client or Adabas
context:
Make sure you have accessed the System Management Hub and that the service is started. For complete information about starting services, read Starting Adabas Administration Services.
Select the name of the managed host on which Adabas Administration Services is installed.
Expand the tree-view frame for the managed host by clicking on the plus sign (+) to the left of its name.
Select Adabas Administration Services in the tree-view under the managed host.
The Adabas Administration Services administration area of the System Management Hub becomes available to you.
Expand Services in tree-view, by clicking on the plus sign (+) to the left of its label.
The list of installed services appears.
Expand the name of a service in the server list in tree-view, by clicking on the plus sign (+) to the left of its label.
The databases, clients, and client hosts that are supported by the service are listed in groups in tree-view, as well as access to the offline service parameters you can set. In addition, details about the selected service are displayed in detail-view.
Expand the specific service name in tree-view, by clicking on the plus sign (+) to the left of its label.
Expand Clients in tree-view, by clicking on the plus sign (+) to the left of its label.
The client and Adabas context definitions for the service are listed in categories in tree-view. Two categories are listed: Direct Clients and Adabas Contexts.
Direct Clients: Direct clients are clients directly connected to this service. These clients are included in Adabas Administration Services counts for currently active clients.
Adabas Contexts: Adabas contexts are memory tokens that associate clients and Adabas databases and are used for Adabas session identification and statistics purposes.
Expand the appropriate category (Direct Clients or Adabas Contexts) in tree-view, by clicking on the plus sign (+) to the left of its label.
The client or Adabas context definitions for the category you selected are listed in tree-view.
Click on the client or Adabas context name whose statistics you wish to view.
A panel appears in detail-view listing statistics about the client or Adabas context.
![]() To dynamically disconnect a direct client of a service:
To dynamically disconnect a direct client of a service:
Make sure you have accessed the System Management Hub and that the service is started. For complete information about starting services, read Starting Adabas Administration Services.
Select the name of the managed host on which Adabas Administration Services is installed.
Expand the tree-view frame for the managed host by clicking on the plus sign (+) to the left of its name.
Select Adabas Administration Services in the tree-view under the managed host.
The Adabas Administration Services administration area of the System Management Hub becomes available to you.
Expand Services in tree-view, by clicking on the plus sign (+) to the left of its label.
The list of installed services appears.
Expand the name of a service in the server list in tree-view, by clicking on the plus sign (+) to the left of its label.
The databases, clients, and client hosts that are supported by the service are listed in groups in tree-view, as well as access to the offline service parameters you can set. In addition, details about the selected service are displayed in detail-view.
Expand the specific service name in tree-view, by clicking on the plus sign (+) to the left of its label.
Expand Clients in tree-view, by clicking on the plus sign (+) to the left of its label.
The client and Adabas context definitions for the service are listed in categories in tree-view. Two categories are listed: Direct Clients and Adabas Contexts.
Expand the Direct Clients category in tree-view, by clicking on the plus sign (+) to the left of its label.
The client definitions are listed in tree-view.
Right-click on the name of the client you wish to disconnect and select from the resulting drop-down menu.
A panel appears in detail-view requesting confirmation of the disconnect request.
Click to disconnect the selected client.
The client is disconnected.
![]() To dynamically delete an Adabas context of a service:
To dynamically delete an Adabas context of a service:
Make sure you have accessed the System Management Hub and that the service is started. For complete information about starting services, read Starting Adabas Administration Services.
Select the name of the managed host on which Adabas Administration Services is installed.
Expand the tree-view frame for the managed host by clicking on the plus sign (+) to the left of its name.
Select Adabas Administration Services in the tree-view under the managed host.
The Adabas Administration Services administration area of the System Management Hub becomes available to you.
Expand Services in tree-view, by clicking on the plus sign (+) to the left of its label.
The list of installed services appears.
Expand the name of a service in the server list in tree-view, by clicking on the plus sign (+) to the left of its label.
The databases, clients, and client hosts that are supported by the service are listed in groups in tree-view, as well as access to the offline service parameters you can set. In addition, details about the selected service are displayed in detail-view.
Expand the specific service name in tree-view, by clicking on the plus sign (+) to the left of its label.
Expand Clients in tree-view, by clicking on the plus sign (+) to the left of its label.
The client and Adabas context definitions for the service are listed in categories in tree-view. Two categories are listed: Direct Clients and Adabas Contexts.
Expand Adabas Contexts category in tree-view, by clicking on the plus sign (+) to the left of its label.
The Adabas context definitions for the service are listed in tree-view.
Right-click on the name of the Adabas context you wish to delete and select from the resulting drop-down menu.
A panel appears in detail-view requesting confirmation of the deletion request.
Click to delete the selected Adabas context.
The Adabas context is deleted.
Client hosts are the host machines from which client requests are sent to the service. Adabas Administration Services lets you dynamically manage your service's interaction with client hosts.
This section covers the following topics:
![]() To dynamically list the client hosts of a service:
To dynamically list the client hosts of a service:
Make sure you have accessed the System Management Hub and that the service is started. For complete information about starting service, read Starting Adabas Administration Services.
Select the name of the managed host on which Adabas Administration Services is installed.
Expand the tree-view frame for the managed host by clicking on the plus sign (+) to the left of its name.
Select Adabas Administration Services in the tree-view under the managed host.
The Adabas Administration Services administration area of the System Management Hub becomes available to you.
Expand Services in tree-view, by clicking on the plus sign (+) to the left of its label.
The list of installed services appears.
Expand the name of a service in the server list in tree-view, by clicking on the plus sign (+) to the left of its label.
The databases, clients, and client hosts that are supported by the service are listed in groups in tree-view, as well as access to the offline service parameters you can set. In addition, details about the selected service are displayed in detail-view.
Expand the specific service name in tree-view, by clicking on the plus sign (+) to the left of its label.
Expand Client Hosts in tree-view, by clicking on the plus sign (+) to the left of its label.
The client host definitions for the service are listed in tree-view.
![]() To dynamically view statistics for a service client host:
To dynamically view statistics for a service client host:
Make sure you have accessed the System Management Hub and that the service is started. For complete information about starting service, read Starting Adabas Administration Services.
Select the name of the managed host on which Adabas Administration Services is installed.
Expand the tree-view frame for the managed host by clicking on the plus sign (+) to the left of its name.
Select Adabas Administration Services in the tree-view under the managed host.
The Adabas Administration Services administration area of the System Management Hub becomes available to you.
Expand Services in tree-view, by clicking on the plus sign (+) to the left of its label.
The list of installed services appears.
Expand the name of a service in the server list in tree-view, by clicking on the plus sign (+) to the left of its label.
The databases, clients, and client hosts that are supported by the service are listed in groups in tree-view, as well as access to the offline service parameters you can set. In addition, details about the selected service are displayed in detail-view.
Expand the specific service name in tree-view, by clicking on the plus sign (+) to the left of its label.
Expand Client Hosts in tree-view, by clicking on the plus sign (+) to the left of its label.
The client host definitions for the service are listed in tree-view.
Click on the client host name whose statistics you wish to view.
A panel appears in detail-view listing statistics about the client host.
![]() To dynamically disconnect all the clients and context of a client
host:
To dynamically disconnect all the clients and context of a client
host:
Make sure you have accessed the System Management Hub and that the service is started. For complete information about starting service, read Starting Adabas Administration Services.
Select the name of the managed host on which Adabas Administration Services is installed.
Expand the tree-view frame for the managed host by clicking on the plus sign (+) to the left of its name.
Select Adabas Administration Services in the tree-view under the managed host.
The Adabas Administration Services administration area of the System Management Hub becomes available to you.
Expand Services in tree-view, by clicking on the plus sign (+) to the left of its label.
The list of installed services appears.
Expand the name of a service in the server list in tree-view, by clicking on the plus sign (+) to the left of its label.
The databases, clients, and client hosts that are supported by the service are listed in groups in tree-view, as well as access to the offline service parameters you can set. In addition, details about the selected service are displayed in detail-view.
Expand the specific service name in tree-view, by clicking on the plus sign (+) to the left of its label.
Expand Client Hosts in tree-view, by clicking on the plus sign (+) to the left of its label.
The client host definitions for the service are listed in tree-view.
Right-click on the name of the client host whose clients and Adabas contexts you wish to disconnect and select from the resulting drop-down menu.
A panel appears in detail-view requesting confirmation of the disconnect request.
Click to disconnect all of the clients on the selected client host.
The clients and Adabas contexts are disconnected.
![]() To shut down a service:
To shut down a service:
Make sure you have accessed the System Management Hub.
Select the name of the managed host on which Adabas Administration Services is installed.
Expand the tree-view frame for the managed host by clicking on the plus sign (+) to the left of its name.
Select Adabas Administration Services in the tree-view under the managed host.
The Adabas Administration Services administration area of the System Management Hub becomes available to you.
Expand Services in tree-view, by clicking on the plus sign (+) to the left of its label.
The list of installed services appears.
Expand the name of a service in the server list in tree-view, by clicking on the plus sign (+) to the left of its label.
The databases, clients, and client hosts that are supported by the service are listed in groups in tree-view, as well as access to the offline service parameters you can set. In addition, details about the selected service are displayed in detail-view.
In tree-view, right-click on the name of the service you want to shut down and select command from the resulting drop-down menu.
A request to confirm that you want to shut down the service appears in detail-view.
Click .
The service is shut down.
You can view the current Adabas Administration Services log file or start a new one. This section describes both processes.
![]() To view the log file for the Adabas Administration Services:
To view the log file for the Adabas Administration Services:
Make sure you have accessed the System Management Hub.
Select the name of the managed host on which Adabas Administration Services is installed.
Expand the tree-view frame for the managed host by clicking on the plus sign (+) to the left of its name.
Select in the tree-view under the managed host.
The Adabas Administration Services administration area of the System Management Hub becomes available to you.
Expand Services in tree-view, by clicking on the plus sign (+) to the left of its label.
The list of services appears.
In tree-view, right-click on the name of the service whose log file you want to view and select the command from the resulting drop-down menu.
The console log for the services appears in detail-view.
You can close the current log file for an Adabas Administration Services and start a new one at
any time. When you do this, the current log file
(aas-svc.log) is saved under a new name and is cleared of
all log entries. The name of the renamed log file is assigned in the format
aasnnnnn.log, where
nnnnn is an incremental number determined by the
number of the most recent log file that was renamed and saved. The log file
with the name that includes the highest number is the most recently saved log
file.
By default, Adabas Administration Services log files are stored in the logsvc directory in one of the following locations:
In Windows 7 environments: ProgramData\Software AG\Entire
Net-Work Server\logsvc75
In UNIX environments: $SAG\aas\.
If you would like to specify the location in which server log files should be stored, read Specifying the Adabas Administration Services Log File Location.
![]() To start a new log file for Adabas Administration Services:
To start a new log file for Adabas Administration Services:
Make sure you have accessed the System Management Hub.
Select the name of the managed host on which Adabas Administration Services is installed.
Expand the tree-view frame for the managed host by clicking on the plus sign (+) to the left of its name.
Select Adabas Administration Services in the tree-view under the managed host.
The Adabas Administration Services administration area of the System Management Hub becomes available to you.
Expand Services in tree-view, by clicking on the plus sign (+) to the left of its label.
The list of services appears.
In tree-view, right-click on the name of the service for which you want to start a new log file and select the command from the resulting drop-down menu.
The Start New Log File panel appears in detail-view.
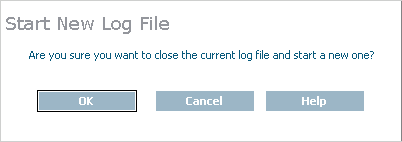
Click .
A new log file is started for Adabas Administration Services and the old one is closed.
You can specify the fully-qualified path of the directory in which log files should be stored. If you do not specify a log file location, the default location for Adabas Administration Services log files (the logsvc directory) will be used. This directory will be stored in one of the following locations:
In Windows 7 environments: ProgramData\Software AG\Entire
Net-Work Server\logsvc75
In UNIX environments: $SAG\wcp\.
![]() To specify the log file location:
To specify the log file location:
Make sure you have accessed the System Management Hub.
Select the name of the managed host on which Adabas Administration Services is installed.
Expand the tree-view frame for the managed host by clicking on the plus sign (+) to the left of its name.
Select Adabas Administration Services in the tree-view under the managed host.
The Adabas Administration Services administration area of the System Management Hub becomes available to you.
Expand Services in tree-view, by clicking on the plus sign (+) to the left of its label.
The list of installed services appears.
Expand the specific service name in tree-view, by clicking on the plus sign (+) to the left of its label and then select the node in tree-view.
The drop-down menu for setting service parameters offline appears in tree-view.
In tree-view, right-click on and select the command from the resulting drop-down menu.
The Service Basic Parameters panel appears in detail-view.
Specify the fully-qualified path of the directory in which you want log files stored in the LOGDIR parameter. When all parameters are set as you want, click .
The Adabas Administration Services parameters are updated.
There are three kinds of trace processing that can occur when using Adabas Administration Services:
Traces can be performed for individual service processing.
Traces can be performed for Software AG transport services processing (XTSTRACE).
Traces can be performed for Software AG communications processing (ADALNK).
Tracing should be used only for problem analysis. When you specify trace levels, large trace files will be stored on your disks and performance will be affected. Therefore, we recommend that you perform this function only under the advisement of your Software AG technical support representative.
This section covers the following topics:
Tracing should be used only for problem analysis. When you specify trace levels, large trace files will be stored on your disks and performance will be affected.
| Warning: While you can set the trace level for a service using SMH, we recommend that you perform this function only under the advisement of your Software AG technical support representative. |
You can set the trace level for a service dynamically (immediately and for only this execution of the service) or permanently (for future executions of the service). The dynamic trace level setting occurs immediately, but if the service is restarted, it is reset to the trace level specified in the service definition. The permanent trace level setting occurs in the service definition and takes effect only when the service is restarted.
This section covers the following topics:
![]() To set the trace level offline in SMH for the service:
To set the trace level offline in SMH for the service:
Make sure you have accessed the System Management Hub.
Select the name of the managed host on which Adabas Administration Services is installed.
Expand the tree-view frame for the managed host by clicking on the plus sign (+) to the left of its name.
Select Adabas Administration Services in the tree-view under the managed host.
The Adabas Administration Services administration area of the System Management Hub becomes available to you.
Expand Services in tree-view, by clicking on the plus sign (+) to the left of its label.
The list of installed services appears.
Expand the name of a service in the server list in tree-view, by clicking on the plus sign (+) to the left of its label.
The databases, clients, and client hosts that are supported by the service are listed in groups in tree-view, as well as access to the offline service parameters you can set. In addition, details about the selected service are displayed in detail-view.
Expand the specific service name in tree-view, by clicking on the plus sign (+) to the left of its label and then select the node in tree-view.
In tree-view, right-click on and select the command from the resulting drop-down menu.
The Set Service Trace Granularity panel appears in detail-view.
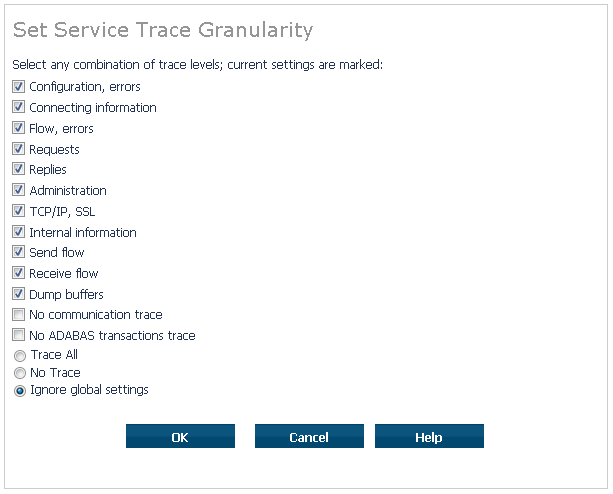
Select appropriate trace levels as requested by your Software AG support representative.
The Trace All, No Trace, and Ignore global settings radio buttons are mutually exclusive selections. The Trace All and No Trace radio buttons are provided as global trace settings.
If you select Trace All, data is collected for all of the trace levels listed on the panel, regardless of what you have selected (checked).
If you select the No Trace radio button, data is collected for none of the trace levels listed on the panel, regardless of what you have selected (checked).
The Ignore global settings radio button must be selected if you want to collect trace data for only some of the trace levels listed on the panel. This ensures that neither the Trace All and No Trace radio buttons are selected and indicates to Adabas Administration Services that specific trace level data collection is requested.
Click .
The trace level is set. You must restart the service in order for these trace level changes to take effect.
![]() To dynamically set the trace level for the service:
To dynamically set the trace level for the service:
Make sure you have accessed the System Management Hub.
Select the name of the managed host on which Adabas Administration Services is installed.
Expand the tree-view frame for the managed host by clicking on the plus sign (+) to the left of its name.
Select Adabas Administration Services in the tree-view under the managed host.
The Adabas Administration Services administration area of the System Management Hub becomes available to you.
Expand Services in tree-view, by clicking on the plus sign (+) to the left of its label.
The list of installed services appears.
Expand the name of a service in the server list in tree-view, by clicking on the plus sign (+) to the left of its label.
The databases, clients, and client hosts that are supported by the service are listed in groups in tree-view, as well as access to the offline service parameters you can set. In addition, details about the selected service are displayed in detail-view.
In tree-view, right-click on the name of the service for which you want to set the trace level and select command from the resulting drop-down menu.
The Set Trace Level Online panel appears in detail-view.

Select appropriate trace levels as requested by your Software AG support representative.
The Trace All, No Trace, and Ignore global settings radio buttons are mutually exclusive selections. The Trace All and No Trace radio buttons are provided as global trace settings.
If you select Trace All, data is collected for all of the trace levels listed on the panel, regardless of what you have selected (checked).
If you select the No Trace radio button, data is collected for none of the trace levels listed on the panel, regardless of what you have selected (checked).
The Ignore global settings radio button must be selected if you want to collect trace data for only some of the trace levels listed on the panel. This ensures that neither the Trace All and No Trace radio buttons are selected and indicates to Adabas Administration Services that specific trace level data collection is requested.
Click .
The trace level is set. You must stop and restart the service in order for these settings to take effect.
Tracing should be used only for problem analysis. When you specify trace levels, large trace files will be stored on your disks and performance will be affected.
| Warning: We recommend that you perform this function only under the advisement of your Software AG support representative. |
Once Software AG transport services tracing is activated, the trace messages are written to the Adabas Administration Services log file. For more information about the Adabas Administration Services log file, read Managing Adabas Administration Services Log Files.
![]() To set the Software AG transport services trace level and activate
transport services tracing:
To set the Software AG transport services trace level and activate
transport services tracing:
Make sure you have accessed the System Management Hub.
Select the name of the managed host on which Adabas Administration Services is installed.
Expand the tree-view frame for the managed host by clicking on the plus sign (+) to the left of its name.
Select Adabas Administration Services in the tree-view under the managed host.
The Adabas Administration Services administration area of the System Management Hub becomes available to you.
Expand Services in tree-view, by clicking on the plus sign (+) to the left of its label.
The list of installed services appears.
Expand the name of a service in the server list in tree-view, by clicking on the plus sign (+) to the left of its label.
The databases, clients, and client hosts that are supported by the service are listed in groups in tree-view, as well as access to the offline service parameters you can set. In addition, details about the selected service are displayed in detail-view.
Expand the specific service name in tree-view, by clicking on the plus sign (+) to the left of its label and then select the node in tree-view.
In tree-view, right-click on and select the command from the resulting drop-down menu.
The Service Basic Parameters panel appears in detail-view.
Modify the XTSTRACE parameter and Full XTS Trace checkbox on the Service Basic Parameters panel, as requested by your Software AG technical support representative. These parameters are described in the following table. When all parameters are set as you want, click to save them.
| Parameter | Description |
|---|---|
| XTSTRACE | Set the XTS trace level using this parameter. |
| Full XTS Trace | Click in this checkbox to set the XTSTRACE value to obtain full tracing of Software AG transport services processing. Do not check this checkbox unless specifically instructed to do so by a Software AG technical support representative. If you do, your installation could be overrun with trace messages that would be meaningless to you and would likely affect system performance. |
The transport services trace levels are set and activated.
Tracing should be used only for problem analysis. When you specify trace levels, large trace files will be stored on your disks and performance will be affected.
| Warning: We recommend that you perform this function only under the advisement of your Software AG support representative. |
Once Software AG communications tracing is activated, the trace messages are written to the Adabas Administration Services log file. For more information about the Adabas Administration Services log file, read Managing Adabas Administration Services Log Files.
![]() To set the Software AG communications trace level and activate
communications tracing:
To set the Software AG communications trace level and activate
communications tracing:
Make sure you have accessed the System Management Hub.
Select the name of the managed host on which Adabas Administration Services is installed.
Expand the tree-view frame for the managed host by clicking on the plus sign (+) to the left of its name.
Select Adabas Administration Services in the tree-view under the managed host.
The Adabas Administration Services administration area of the System Management Hub becomes available to you.
Expand Services in tree-view, by clicking on the plus sign (+) to the left of its label.
The list of installed services appears.
Expand the name of a service in the server list in tree-view, by clicking on the plus sign (+) to the left of its label.
The databases, clients, and client hosts that are supported by the service are listed in groups in tree-view, as well as access to the offline service parameters you can set. In addition, details about the selected service are displayed in detail-view.
Expand the specific service name in tree-view, by clicking on the plus sign (+) to the left of its label and then select the node in tree-view.
In tree-view, right-click on and select the command from the resulting drop-down menu.
The Service Basic Parameters panel appears in detail-view.
Modify the LNKTRACE parameter and Full LNK Trace checkbox on the Service Basic Parameters panel, as requested by your Software AG technical support representative. These parameters are described in the following table. When all parameters are set as you want, click to save them.
| Parameter | Description |
|---|---|
| LNKTRACE | Set the ADALNK trace level using this parameter. |
| Full LNK Trace | Click in this checkbox to set the LNKTRACE value to obtain full tracing of ADALNK processing. Do not check this checkbox unless specifically instructed to do so by a Software AG technical support representative. If you do, your installation could be overrun with trace messages that would be meaningless to you and would likely affect system performance. |
The communications trace levels are set and activated.