
This document covers the following topics:
You can deploy a Natural application from a version control system to a Natural server. The Natural sources and any other resources may reside in a versioning repository on one machine, and the ready-to-use application may be deployed to a different machine via a Natural server connection.
NaturalONE offers a deployment wizard which collects all required information (such as the access information for the versioning repository and the Natural server) and writes it to an Ant script which is used to start the deployment process. This Ant script makes the deployment task highly configurable and repeatable, and allows you to run the deployment process unattended.
The deployment process can either be started from within the NaturalONE Eclipse environment or via the Ant command line utility. It performs the following steps:
check out a Natural application from a version control system (either CVS, Subversion or GIT); this is done outside of Eclipse,
transfer the Natural objects to a Natural server,
catalog the Natural objects on the Natural server.
The deployment wizard creates a Natural deployment file in your project root. This is an Ant script. You can create one or more Natural deployment files for a project, and you can also load an existing Natural deployment file and modify the current settings.
The deployment file contains information on whether it has been created for a secured or unsecured environment, that is, whether the environment is protected by Natural Security or not. This setting cannot be changed after the deployment file has been created. Thus, if you change a project from secured to unsecured (or vice versa), you have to create a new deployment file.
![]() To use the deployment wizard
To use the deployment wizard
In the Navigator view or in the Natural Navigator view, select the Natural project for which you want to create the deployment file.
Or:
If you want to load the settings of an existing Natural
deployment file, select this file in the Navigator view or
in the Natural Navigator view.
From the menu or from the context menu, choose .
In the resulting New dialog box, expand the Natural node, select Deploy Natural Ant and then choose the button.
The first page of the wizard appears (see below).
Specify all required information as described in the topics below. Use the button repeatedly to proceed from the first page of the wizard to the last page.
When all required information has been provided, choose the button.
The different pages of the deployment wizard are described in the following topics:
On the first page of the wizard, you define general settings for the deployment.
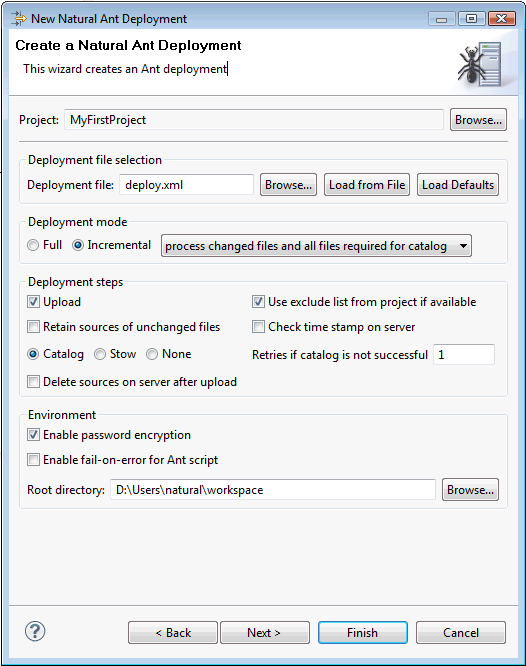
- Deployment file
The default name for the Natural deployment file is deploy.xml. This name is shown in this text box when an existing Natural deployment file was not selected while invoking the wizard. However, when an existing Natural deployment file was selected, the name of the selected file is shown and the settings from this file are automatically loaded.
You can enter any other name for your new deployment file. It is recommended that your new deployment file also has the extension ".xml".
Note:
If you keep the name deploy.xml, the settings from an existing Natural deployment file with the same name are loaded the next time you select the project and invoke the wizard.If you want to load an existing Natural deployment file, choose the button. A dialog appears, providing for selection all Natural deployment files in the current project. Next, you have to choose the button. Otherwise, the settings in this file are not shown in the wizard and may thus be overwritten unintentionally.
If you want to return to the default settings of the deployment wizard (this also includes the information that can be specified on the other pages of the wizard), choose the button.
- Deployment mode
Select one of the following option buttons:
Full
With a full deployment, the sources and resources in the project are processed completely each time the deployment process is started.Incremental
With an incremental deployment, only those sources and resources are processed which have been changed in the versioning repository since the last run of the deployment. You determine the files that are affected by a subsequent upload (catalog) by selecting one of the following options from the drop-down list box:
process only changed files
Only the files that have changed in the workspace are processed.process changed files and their dependents
All files that have changed in the workspace and all files which have dependencies to the changed files are processed.process changed files and all files required for catalog
All files that have changed in the workspace and all files which have dependencies to the changed files are processed (same behavior as with the previous option). All additional files that are required to catalog the sources are also processed.Example: When a program is changed that uses a global data area (GDA), both the program and the GDA are uploaded to the server. In addition, all other sources which use the same GDA are also uploaded. All uploaded sources are then cataloged on the server.
See also Controlling the Scope of Files to be Processed.
Note:
You can run more than one incremental deployment inside a single Natural project. Each of the incremental deployments maintains its own state of changed files. This is helpful, if you want to deploy your application into different environments, for example, into a testing environment and later into a production environment.- Upload
When enabled, the sources and resources are uploaded to the Natural server.
- Use exclude list from project if available
When enabled, an exclude list is used. The files specified in the exclude list will not be used for the deployment. See also Excluding Objects from Processing in the Natural Environment.
- Retain sources of unchanged files
When enabled, only the sources of changed files are updated on the Natural server. The sources of unchanged files are neither uploaded nor stowed on the server. In case Stow is also selected, the sources of unchanged files are cataloged instead. See also Controlling the Scope of Files to be Processed.
Note:
This option only has an effect when an incremental deployment mode is selected. In full deployment mode, all files in the project are assumed to be changed files.- Check time stamp on server
When enabled, the time stamps of the sources to be uploaded are checked against the time stamps of the sources on the Natural server. If the sources on the server have been changed since the last deployment run, a time stamp conflict is detected and the corresponding sources on the server are not overwritten. For further information, see Checking the Time Stamps in the Natural Environment.
- Catalog / Stow / None
When Catalog is selected, the uploaded sources are cataloged on the Natural server. When Stow is selected, the uploaded sources are saved and cataloged on the Natural server (the time stamps of the sources and cataloged objects are then identical). When None is selected, the uploaded sources are neither cataloged nor stowed on the Natural server.
- Retries if catalog is not successful
When Catalog or Stow is selected, you can specify the number of retries for cataloging. This is helpful since it will not always be possible to catalog all sources in the proper order in one pass. When you specify a number greater than 1, the erroneous sources are recataloged until either no more errors occur or the specified number of retries has been reached. Default: 1.
- Delete sources on server after upload
When enabled, the sources are deleted on the Natural server after they have been uploaded and (if Catalog or Stow is selected) cataloged.
- Enable password encryption
When enabled, all passwords that are used in the deployment file are stored in an encrypted format.
- Enable fail-on-error for Ant script
When enabled, the Ant script reports errors and terminates in the case of a build failure.
When disabled, the Ant script still reports errors but build failures are only triggered in severe situations (see also Status Code Handling).
- Root directory
This path should only be changed when you intend to start the deployment from the command line (that is, when the deployment is not to be started from Eclipse).
Specify the directory in which the selected project is to be checked out and where the processing takes place. When the deployment is supposed to run on a different machine, you can insert the desired root path via copy-and-paste.
On the second page of the wizard, you can specify the source types that are to be processed.
When the Process all source types check box is not selected, you can deselect any sources types which are not to be processed. For example, if you deselect the GDA check box, global data areas are not processed (that is, they are not uploaded and cataloged) during the deployment.
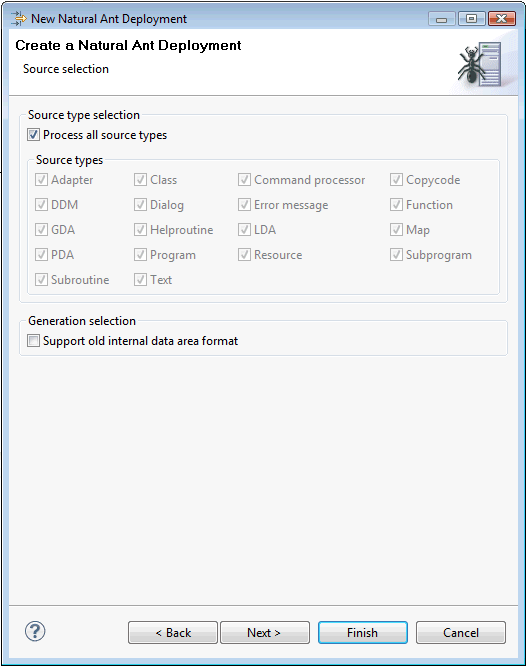
Select the Support old internal data area format check box only, if you require data areas in the old format that are to be used with Natural Version 5.1 or below. See also Natural in Changing the Project Properties.
On the third page of the wizard, you define all settings related to the versioning repository. This can be either Subversion (SVN), GIT or CVS.
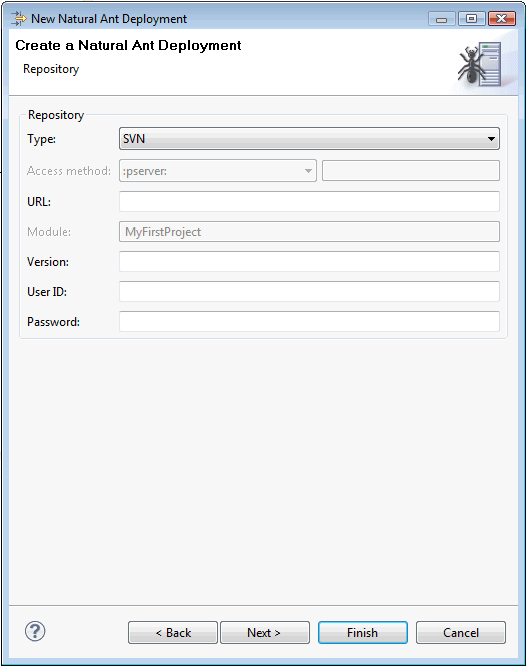
From the Type drop-down list box, select the type of versioning repository that you are using, and then specify all required information. The names of the text boxes and their availability changes according to the selected type.
The wizard usually collects a set of default information as given for the selected project. In most cases, only minor corrections have to be made to the defaults, for example, user ID and password may have to be provided.
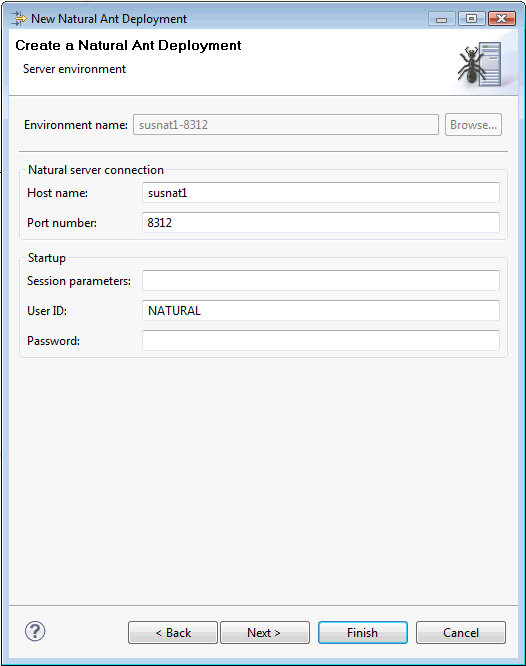
The fourth page of the wizard shows information which applies to the Natural server to which the selected project belongs (such as host name and port number). You can change the settings according to your requirements. For information on the options on this page, see Mapping a Natural Environment.
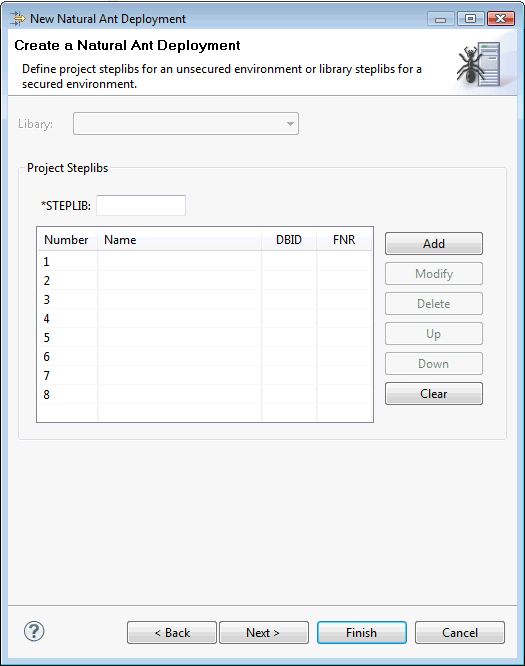
The fifth page of the wizard shows the steplib settings for the current project, depending on whether the current environment is protected by Natural Security or not.
The following page is shown for an unsecured environment. In this case, project steplibs can be defined.
The following page is shown for a secured environment. In this case, library steplibs can be defined.
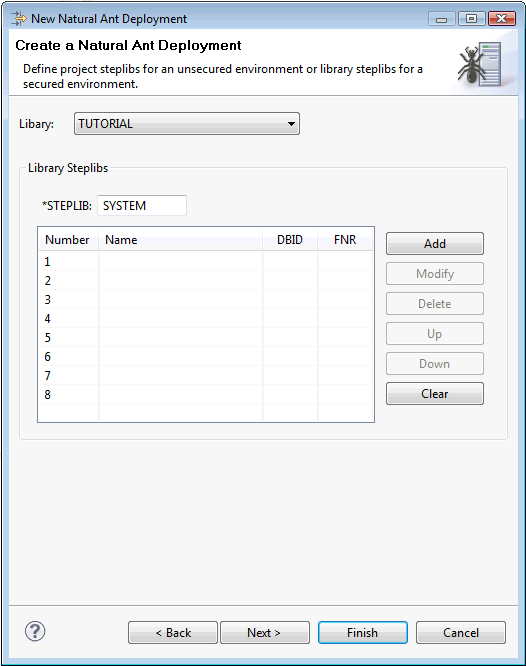
In many cases, the given settings are sufficient. For information on the steplib options on this page, see the description of the property page Steplibs in Changing the Project Properties.
On the sixth (and last) page of the wizard, you can enable the mapping of library names.
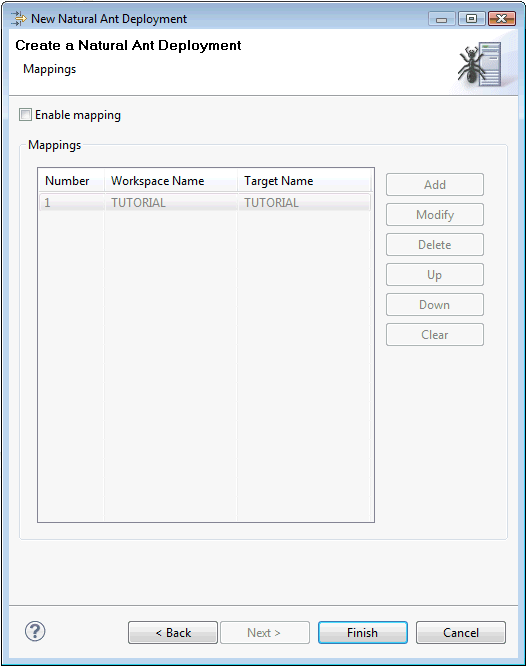
When the Enable mapping check box is selected, you can change the mapping information for all required libraries. The workspace name is the library name that is used in the versioning repository and in the current Eclipse workspace. The target name can be a different library name that is to be used on the Natural server.
To add a new mapping, choose the button and specify both the workspace name and the target name.
When you deploy a Natural application, you can control the scope of the files that are to be processed in the Ant workspace. This is done by choosing one of the following deployment modes on the first page of the deployment wizard for Natural applications:
Full Deployment Mode
When the full deployment mode is selected, all files in the
project are processed. The files are uploaded to the Natural server and are
then cataloged on the server. The full deployment mode treats each file in the
project as if it has been changed since the last run of the deployment
script.
Incremental Deployment Mode
When the incremental deployment mode is selected, the scope of
the files to be processed can be influenced using the options in a drop-down
list box. Based on a set of changed files in the Ant workspace (which is
provided, for example, by a versioning system), a superset of files is
calculated for further processing. Using the above-mentioned drop-down list
box, you can select to
process only the changed files,
process the changed files plus their dependencies, or
process the changed files, their dependencies, plus all files required for cataloging them.
See also General Settings for a description of each option.
Depending on your selection, the superset of files to be processed may be larger than the set of files that have actually been changed in the Ant workspace. If you want to process such a larger amount of files in the Ant workspace but do not want to upload and stow all the unchanged files on the server, you can select the Retain sources of unchanged files option on the first page of the deployment wizard. When this option is selected, the Ant deployment just uploads the changed files and assumes that all other necessary files are already present on the server. The already present files are only cataloged; their sources on the server remain unchanged during the deployment.
Important:
With both deployment modes, the files to be processed must
reside within a single Natural project. The Ant deployment script cannot
process files which reside in a different Natural project. In the latter case,
however, you can create a separate deployment script within the other project
which processes the files in that project accordingly.
When you start the deployment process from Eclipse, it is not
possible to execute the checkout and update targets
of the deployment file since these targets would access the versioning
repository, and this is not feasible from within an Eclipse environment. If you
want to check out a specific revision from the versioning repository or if you
want to update your project with sources from the versioning repository, you
have to start the deployment from the command line as described below.
For testing purposes, for example, it is helpful to start the
deployment process from Eclipse. Since the Natural deployment file is an Ant
script, the built-in Eclipse functionality of starting Ant scripts is used
here. The build target of the Ant script will then be
executed.
![]() To start the deployment from Eclipse
To start the deployment from Eclipse
In the Navigator view or in the Natural Navigator view, select your Natural deployment file, invoke the context menu and choose .
The deployment process is started, and the output of the deployment file is written to the Console view.
Note:
If you want to change the limit for the console output,
you can do this in the general Eclipse preferences under Run/Debug
> Console.
You can start the deployment process from a Windows command line such as the Command Prompt (cmd.exe) or from a shell command line on a Linux system. When you start the deployment from the command line, special requirements must be met.
The following topics are covered below:
The following must be installed and accessible:
Apache Ant 1.7.1
Java Development Kit (JDK) 1.7.0_11 or above.
Either the Subversion command line tool 1.5.2 or above, the CVS command line tool 1.11 or above, or the GIT command line tool 1.9.5 or above.
You have to copy the following JAR files, which contain the necessary processing code, from the NaturalONE Eclipse installation to the new directory (when using a master deployment file, it is not required to manually copy the files mentioned below):
com.softwareag.naturalone.natural.ant_<version>.jar
com.softwareag.naturalone.natural.auxiliary_<version>.jar
com.softwareag.naturalone.natural.ndvserveraccess_<version>.jar
com.ibm.icu.charset_<version>.jar
com.ibm.naturalone.icu_<version>.jar
You have to copy your deployment file, which has been created by the deployment wizard, into the directory which has been specified in the wizard as the root directory (this is the base directory for processing).
When all prerequisites are in place, the deployment can be started by issuing specific Ant calls. This section just provides some examples (where the default name deploy.xml is used).
Print the help screen of the Ant script:
ant -lib path-to-mylib -f deploy.xml help
Perform an initial checkout of the project sources from the versioning repository:
ant -lib path-to-mylib -f deploy.xml checkout
Perform an update of the project sources from the versioning repository:
ant -lib path-to-mylib -f deploy.xml update
Deploy the sources to the Natural server and perform the deployment actions as specified in the deployment wizard (such as upload, cataloging, mappings):
ant -lib path-to-mylib -f deploy.xml build
With a single call, perform an update of the project sources from the versioning repository first, and then deploy the sources:
ant -lib path-to-mylib -f deploy.xml update build
In the above examples, the logging information is written to standard output. If logging information is to be written to a file, use a call such as the following:
ant -lib path-to-mylib -f deploy.xml update build -logfile mylogfile.txt
The Ant deployment script can run in two status code modes. The
mode can be toggled by specifying the command line parameter
-Dnatural.ant.failonerror as described in the following
table.
| Command Line Option | Description |
|---|---|
-Dnatural.ant.failonerror=no |
Only severe errors such as missing project directories will lead to a build failure with a status code other than 0. Other errors such as catalog or stow errors will be reported but will not trigger a status code other than 0 and hence will not lead to a build failure. This is the default mode. |
-Dnatural.ant.failonerror=yes |
In addition to the severe errors described above, errors occurring during checkout, update, catalog, stow and delete will also lead to a status code other than 0 and hence will lead to a build failure. |
Note:
The default mode can also be changed on the
first page of the
deployment wizard.
When the additional status code handling has been enabled, the Ant tool as well as the internally used tools such as SVN, GIT or CVS clients may issue specific status codes. In case the status codes are unclear, refer to the documentation of these tools.
In addition, the following NaturalONE-specific status codes may be issued:
| Status Code | Description |
|---|---|
| 0 | No build errors occurred. |
| 11 | An error occurred while reading or writing the Natural Development Server configuration data. Check whether the Natural Development Server is accessible. |
| 12 | It is not possible to connect to the Natural Development Server. Check whether the Natural Development Server is running and accessible. |
| 13 | An error occurred while uploading Natural objects. Check whether the Natural Development Server allows uploading and saving of Natural objects in the affected libraries. |
| 14 | An error occurred while cataloging Natural objects. Check the affected objects and correct the errors. |
| 15 | An error occurred while deleting Natural objects. Check whether the affected objects are available on the server |
Note:
Under Windows, Ant currently maps all error codes other than 0
to 1. Thus, %ERRORLEVEL% is either 1 for errors or 0 for no
errors.
When deploying Natural applications in the usual way, the sources on the Natural server are exclusively updated by the Ant deployment scripts. In this case, the sources in the Ant workspace and the sources on the Natural server are always identical. If the sources in the Ant workspace are updated with newer revisions from a version control system, the Ant script can easily detect the new sources and directly transfer them to the Natural server without conflicts.
In special cases where the sources on the Natural server are not exclusively controlled by the Ant deployment scripts but, for example, are directly edited on the server, the deployment process would simply overwrite the modified sources when they have also been changed in the versioning repository.
To avoid overwriting of sources that have been modified directly on the server, it is possible to enable time stamp checking in the deployment wizard for Natural applications (see General Settings under Using the Deployment Wizard for Natural Applications).
The following topics are covered below:
Time stamp checking works as of the following versions:
Mainframe
Natural Development Server Version 2.2.7 cumulative fix 9 or
above.
UNIX or Windows
Natural Development Server Version 2.2.6 or above.
Natural Version 6.3.10 or above.
When time stamp checking has been enabled in the deployment wizard for Natural applications, the following happens during the deployment process:
For each source in the Ant workspace, the time stamp of the last successful upload to the Natural server is maintained. This time stamp is collected from the Natural server when the last upload has succeeded and has been stored in the Ant workspace.
When a source is to be uploaded to the Natural server, the collected time stamp of the last successful upload is compared with the current time stamp on the Natural server.
When the time stamps are identical, the source is uploaded. The new time stamp is collected and stored in the Ant workspace. The upload is successful.
When the time stamps differ, the content of the source in the Ant workspace is compared with the content of the source on the Natural server:
If the sources are identical, it may be possible that
the time stamp difference occurred, for example, due to a CATALL *
STOW system command on the server which changes the time stamp of the
source but not the content. In this case, the source from the Ant workspace is
uploaded. The new time stamp is collected and stored in the Ant workspace. The
upload is successful.
If the sources are not identical, a time stamp conflict has occurred and the source in the Ant workspace is not uploaded. A specific error message is shown. The time stamp is not collected and is not updated in the Ant workspace.
The time stamps in the Ant workspace are stored in the file timestamp_<project-name>.properties. When time stamp checking is enabled in the deployment wizard, this file is created during the deployment process. The time stamps in this file are updated each time an upload is successful.
If time stamp checking is disabled, an existing time stamp file in the Ant workspace will be deleted during the next deployment run. This is necessary because the time stamps in this file must be most accurate, and this is not the case when an in-between deployment is run without time stamp checking.
The checkts target of the Ant deployment script
simulates the next run of the script without making any changes. It just
reports the time stamp conflicts so that you are able to resolve these
conflicts before starting the usual deployment process.
The following is an example of starting the Ant script with the
checkts target:
ant -lib path-to-mylib -f deploy.xml checkts
Generally, resolving time stamp conflicts is a task left to the user of the deployment process because the reason for a time stamp conflict may be very specific and cannot be solved with a general rule or processing method.
When the time stamp conflicts have been resolved, you can
synchronize the time stamps of the sources that were in conflict. To do so, you
start the Ant script with the checkts target and the additional
option -Dnatural.ant.resolve.time.stamp.conflicts=yes. For
example:
ant -lib path-to-mylib -f deploy.xml checkts -Dnatural.ant.resolve.time.stamp.conflicts=yes
If the Ant script is started like this, it updates the time
stamps in the Ant workspace that were in conflict with the current time stamps
from the server. When the next usual deployment run is then started using the
build target, the sources that previously caused the time stamp
conflicts are also uploaded.
Keep in mind that the above Ant call only updates the time stamps in the Ant workspace for the sources that previously had time stamp conflicts. It does not perform the upload itself and it does not resolve the reason for the conflict, for example, by merging sources.
When using the Natural Deployment the log generated by the Ant
script might be to comprehensive, especially when the output is being analyzed
with tools like Jenkins. Therefore, the Ant script can be started with an
option -Dnatural.ant.short.log=yes which reduces the log output to
a minimum. For example:
ant -lib path-to-mylib -f deploy.xml -Dnatural.ant.short.log=yes